
The Zen of Fonts
How to stop struggling and live in peace and harmony with all your fonts


This article appears in Issue 14 of CreativePro Magazine.
Let’s start with a little mental exercise. When you’re ready, close your eyes, take a deep breath, and think about fonts. Picture yourself working with them as you normally do: browsing fonts, choosing and applying them, and so on. Go ahead, we’ll wait here till you’re done.
Finished? Okay, what was it like? Did you feel cool, calm, and clear… or foggy, frustrated, and frazzled? Many designers experience the latter because working with fonts is a hugely important topic, something a lot of us have to do all day, every day. And while it can bring you joy, there’s a lot to know—and a lot that can trip you up. And even if you’re very confident in your font knowledge and abilities, improving them just a smidge can pay big dividends in terms of time savings and satisfaction with your work.
So, in this article, we will be your guides to achieving a state of peaceful calm, or zen, when working with fonts. We’ll start with a look at the nature of fonts and then dive into using them in your Adobe apps. We’ll look at syncing fonts from Creative Cloud, wielding the controls your app font menus offer, and using some third-party tools for doing even more with your fonts. Along the way, we’ll highlight lots of resources that will help you always choose a great font, find any obscure character, and even make your own fonts using InDesign, Illustrator, or Photoshop.
By the end of our journey, you will have all the tools to become a zen master of fonts. Let us begin.
Font Fundamentals
Let’s start by answering the most fundamental question: What exactly is a font? In the simplest terms, a font is a tool for creating type. Historically, that meant a set of characters rendered in metal or wood for use in printing. Today, a font is a piece of software contained in a file on your computer. The term typeface usually refers to a group of related fonts, also called a family. So, Minion is a typeface. Minion Pro Bold Italic is a font.
Like any software, fonts come with licenses that grant users permission to use them in certain ways; they also restrict their use in other respects. For instance, you can generally embed most fonts in a PDF or an EPUB, but you may not share them with other users. Most font vendors let users share fonts with printers and print service providers to output files that are supplied to them but then require that the service provider delete those fonts when the job is complete.
As a font user, it’s your responsibility to read the fine print—even with free fonts, some of which are very explicitly licensed only for personal, noncommercial use.
Font Types
Just as image files can be saved in a variety of formats (JPG, TIF, PNG, etc.), fonts come in a several file types, the most common of which include:
PostScript Type 1: Introduced by Adobe in the 1980s, these fonts set the professional standard and have endured for many years, offering clear, vector-based data that could print your fonts on low-resolution laser printers or enlarge them to billboard size. Support for Type 1 fonts in Adobe apps is ending early in 2023 (see “The Long Goodbye” below).
A family of Type 1 fonts would come in the form of multiple files that worked together: printer fonts (one file per weight for the data used by your output device) and one screen font file (to render the fonts—roughly—on your computer screen).
TrueType: Created by Apple in the late 1980s as a competitor to Adobe’s (at the time, proprietary) Type 1 format, TrueType became a popular format on Macs. Apple’s strategy—licensing the technology free to Microsoft—worked: TrueType became the prevailing font format on Windows computers and a cross-platform standard.
Like Type 1 fonts, TrueType fonts were also capable of rendering fonts at high resolution for quality output. And unlike Type 1 fonts, TrueType uses one file for screen and printer data; no extra software was needed for fonts to look their best on screen. With some exceptions, TrueType fonts can also be used on macOS or Windows.
OpenType: The newest of the font formats, Microsoft’s OpenType has gained significant traction in recent years due to its support for Unicode, a technology standard for international publishing. An OpenType font expands the number of available glyphs to 65,000 glyphs, enabling it to contain extensive character sets with advanced typographic capabilities, including stylistic sets and ligatures. Unlike Type 1 fonts, which require a conversion process to use on another platform, a single OpenType font file works in macOS, Windows, and at least some versions of Linux.
OpenType variable fonts: A specific kind of OpenType font, variable fonts can allow precise customization of a font’s weight, width, slant, and/or other properties (officially OpenType Font Variations) when used in a variable font-aware application such as InDesign or Illustrator (Figure 1). See Issue #128 of InDesign Magazine for a full rundown on variable fonts.

Figure 1. Variable fonts allow you to adjust precise properties of a selected font.
OpenType-SVG color fonts: Another specific type of OpenType font, these fonts can contain glyphs that are defined as SVG with detailed color attributes and gradients defined within the font itself (Figure 2). The most famous might be Gilbert, which was created as a tribute to Gilbert Baker, the designer of the Rainbow Flag. Caution is advised if you’re planning to use SVG color fonts in print work. Some users have reported some alarming prepress glitches. Consult with your printer well in advance if you wish to use these fonts in a print project, a good habit when working with any emerging technology. Check out Adobe’s page on color fonts for more information.

Figure 2. A color font applied to text in Adobe InDesign
The Long Goodbye
In 2021, Adobe announced that Adobe Type 1 fonts will no longer function in any of the Adobe applications as of January 2023, drawing to a close an era of support for technology that will have lasted almost 40 years.
Going back as far as 1996, Adobe began to shift its concentration to OpenType, a format that was developed to be a far more robust and useful evolution of font standards.
Many designers saw the value of OpenType and shifted to using the font format almost exclusively. For those folks, this shift won’t mean much.
But to other designers who have been holding tight to a collection of fonts that go back decades, or who work on projects that use custom-built fonts that can’t be upgraded commercially, Adobe’s change will mean a major adjustment and possibly a major investment.
With the right software, you can convert Type 1 fonts to the OpenType format. See this article for one method, using TransType by FontLab.
Free Font Facts
For much more on the perks and perils of free fonts, check out Issue #2 of CreativePro Magazine, plus Issues #63 and #109 of InDesign Magazine.
Managing Fonts
For those of us who were designing in the earliest days of digital publishing, one of the joys of the new technology was access to fonts on a scale and scope that had previously been unimaginable.
And as we began to hoard these digital assets—one digital foundry in the era ran full-page ads in computer magazines with the headline “Whoever dies with the most fonts wins”—we overwhelmed our computers and operating systems of yore and created a huge market for font management software.
Decades later, computers have, of course, become far more capable of handling massive libraries of fonts open simultaneously. But irrespective of RAM and resources, you’ll be far more productive if you’re not scrolling through the visual clutter of hundreds of fonts in your menus. Let’s look at the options for managing your font collection with features built into your operating system as well as some capable third-party tools.
Operating system font folders
Whether you’re using macOS or Windows, your computer contains a system-level or user-level fonts folder. You can copy your font files into these folders to make them available to all your applications. Even better, both operating systems offer utilities that let you activate and deactivate fonts by scrolling through a list of all your fonts and turning them on or off, which is easier than dragging files. You can find all the details of using Font Book on macOS here, and the Fonts Control Panel on Windows here.
InDesign’s Fonts folder
InDesign has its own Fonts folder in its application folder. Fonts copied here will be made available to use in InDesign, but no other programs.
Tip: You can activate groups of fonts without moving the font files by creating an alias on macOS or a shortcut on Windows to a folder of fonts. Then, put that file in InDesign’s Fonts folder and all those fonts will be available to use immediately in InDesign. To deactivate a group of fonts, simply remove the alias or shortcut file from the Fonts folder.
Document Fonts folder
When you use the Package command (File > Package) to create an archive of your document, InDesign will create a folder called Document Fonts in the same folder as your document, and it will save your fonts in that folder (Figure 3). When you open that InDesign file, your fonts in that folder will be activated and available for use in that document. It’s a very fluid process because you don’t have to actively think about loading the fonts. InDesign just does it for you! Just remember to take fonts out of this folder when you no longer need them because accessing a large number of fonts from this folder can make InDesign run very slow, as was recently discussed in the InDesign Secrets Facebook group.

Figure 3. The Document Fonts folder lives in the same location as the InDesign file.
One caveat of this feature is that these fonts are available to InDesign only, so you’d need to activate those fonts using a traditional method to make them available to other applications.
When you’re working in an InDesign document you can easily tell which fonts were activated from the Document Fonts folder, since they’re isolated in their own submenu within the font menu (Figure 4).

Figure 4. The Document-Only category in the font menu of InDesign
Tip: You don’t have to use the Package command to take advantage of InDesign’s Document Fonts feature. Just create a folder named Document Fonts (or even DoCuMeNt FoNtS, the case doesn’t matter but be sure to spell the words right and have a space between them). Put the folder next to the document for which you want to activate the fonts. Then, open the document, and you’re good to go.
Warning: Loading fonts via a Document Fonts folder can cause serious problems in a Data Merge workflow. Read all about it in this article.
1,2,3, Pro!
OpenType Pro fonts contain so many advanced typographic features that it took a three-part series of articles to explore them all.
A Classy Collection
Want some deeper dives into the various font classifications? Check out these issues of InDesign Magazine for articles on script, dingbat, sans-serif, monospaced, and handwriting fonts.
Much More Mac Management
If you’re dealing with especially complex or obscure font problems on the Mac, check out jklstudios.com for the deepest of dives into font management in macOS.
Third-party font managers
If manual methods and built-in tools won’t cut it, you may want to invest in a third-party solution for managing your fonts. Here are a few noteworthy options:
Extensis Connect Fonts (Extensis, $9 per user per month, extensis.com): Connect Fonts, which in May replaced the company’s Suitcase Fusion, is the latest rebranding of software that traces its lineage back to Suitcase, first released for the Mac in 1988. Connect Fonts, now based in the cloud, is a companion to Connect Assets, which can similarly manage digital assets and documents.
Font Agent 10 (Insider Software, $99 for perpetual license or $59 per year for subscription, insidersoftware.com): Insider Software publishes a range of cross-platform Font Agent products, from its standalone font manager to cloud- or site-based servers and management software. The latest version of Font Agent can integrate with Adobe Fonts, letting you mix and match the cloud-based fonts in sets with local font files.
FontBase (Dominik Levitsky Studio, freemium, fontba.se): FontBase, for macOS, Windows, and Linux, in its free form offers all the basics of a good font manager, plus integration with the free Google Fonts library. For a fee ($3 per month, $29 per year, $180 perpetual license), FontBase Awesome (yes, that’s its name) adds more search, full access to glyphs, themes, tags, and the ability to sync your font collection via Dropbox or Google Drive.
Typeface 3 (By Default, free, typefaceapp.com): Typeface, for macOS, offers a “minimal interface and total focus on your fonts” with support for variable fonts and color fonts, as well as the ability to compare fonts with samples of both superimposed in overlapping colors. Upgrading to Typeface Pro ($35) unlocks more features, like dragging and dropping fonts from the program window into your document, if you’re using InDesign or any of 22 other supported programs.
Most font managers will auto-activate fonts in design-centric programs, create font samples and specimen books, and will let you store your fonts where you wish. They’ll also help you find and winnow your geriatric Type 1 fonts (Figure 5).
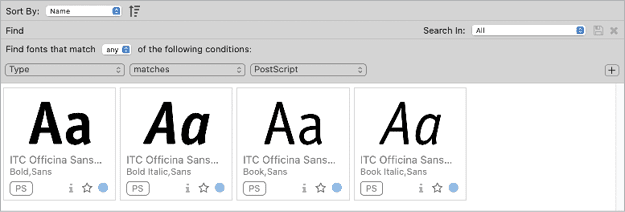
Figure 5. Most font managers can help you weed Type 1 fonts from your type collection with a simple search.
Using Adobe Fonts
When you mention “Adobe Fonts” to someone, it’s easy to cause confusion as Adobe has been creating fonts for more than 30 years and for many years distributed its own type library under that name. The Adobe Font Folio product, the last vestige of the company’s direct presence in the typographic sphere, was discontinued this year.
Confusing though it might be, Adobe Fonts now refers to a collection of more than 20,000 OpenType fonts for Creative Cloud subscribers to view and activate, either online or within individual apps in Creative Cloud. Whichever way you activate a font in Adobe Fonts, it is downloaded to a hidden folder on your computer and becomes available to all your applications.
You can activate Adobe Fonts from the website, or directly within the Adobe applications from commands in the font menus. Scroll through the list of available fonts and click the button on the right edge of the menu to activate (Figure 6).
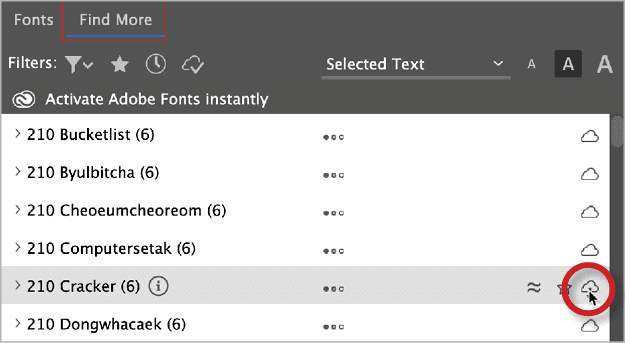
Figure 6. Activate Adobe Fonts directly from the font menu of your favorite Adobe application.
Limitations of Adobe Fonts
Adobe Fonts is a nice addition to your Creative Cloud subscription, but it doesn’t come without some drawbacks.
For starters, Adobe Fonts can’t be packaged. Normally, when you run the Package command in InDesign or Illustrator, it gathers copies of all the fonts you’ve used. Adobe assumes that any recipient who can open that file will have a Creative Cloud subscription and therefore will be able to activate those fonts.
But that won’t necessarily be the case, because of another limitation—font availability.
In addition to its own type products, Adobe licenses fonts for Adobe Fonts from other font foundries. If Adobe or another font foundry ends a business relationship and the font gets removed from Adobe Fonts, one day you could open up a project—even one that has been packaged—only to see fonts missing and no way to activate them without tracking down the source of the design and licensing it separately.
Managing fonts with the Creative Cloud desktop app
The Creative Cloud desktop app also offers some handy features for working with fonts. Click the Fonts button at the top of the window to access these features.
First, you can activate and deactivate fonts directly in the app. You can also select a font family and click the button to view it on the Adobe Fonts site. Even better: The app lists Previously Active fonts so you reactivate them quickly and easily (Figure 7). No more trying to remember the name of that cool script font you used six months ago!

Figure 7. Reactivating fonts is a cinch in the Creative Cloud desktop app.
The Creative Cloud desktop app also allows you to upload any fonts to your account and use those fonts on any computer where you’re signed in. Under Manage Fonts, click Add Fonts to Creative Cloud and follow the instructions (Figure 8). Just be sure the font license allows you to do so!

Figure 8. You can upload your own fonts to Creative Cloud to use them anywhere.
Fixing Missing Fonts
We’ve all opened up a file in an Adobe app and seen the dreaded warning that some fonts are not available. Text in missing fonts will be displayed in a default font instead and highlighted in pink (Figure 9).
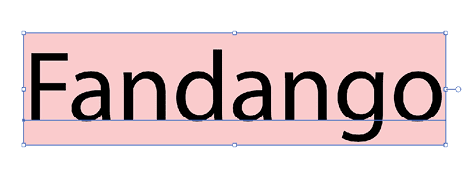
Figure 9. A missing font as seen in an Adobe Illustrator file
If the missing fonts are available in Adobe Fonts, all you have to do is open the Find/Replace Font dialog box and click the Activate checkbox. Or, you can have the app do the work for you. InDesign, Illustrator, and Photoshop all offer the ability to auto-activate Adobe Fonts when you open a file where they are missing. You can enable or disable this feature in File Handling preferences in InDesign and Illustrator. However, there’s no way to turn the feature off in Photoshop; it will always auto-activate missing Adobe Fonts.
If the missing fonts aren’t available in Adobe Fonts, you’ll need to replace them with others that you have access to. Both InDesign and Illustrator have a Find/Replace Font feature that lets you select the missing font and define a replacement font from a list and approve the changes one by one or all at once (Figure 10).
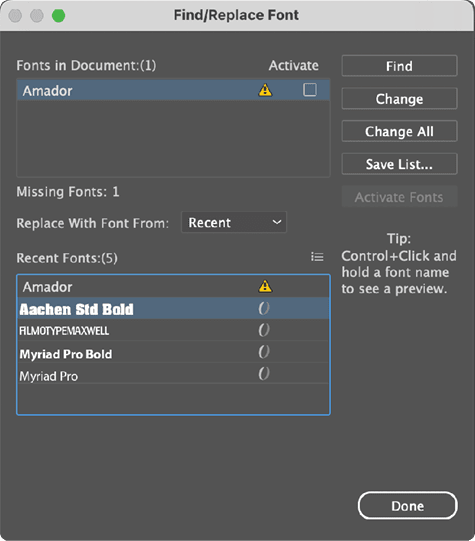
Figure 10. The Find/Replace Font dialog box in Illustrator
Finding Fonts with Specific Glyphs
Sometimes being able to insert a specific glyph is more important than what font it comes from. In cases like that, you need a way to identify which fonts in your collection contain that glyph. This isn’t something you can do in the Adobe apps (other than just browsing through your fonts in the Glyphs panel, which is not very efficient). But this article has you covered. It shows how to find fonts containing specific glyphs on both macOS and Windows.
Identifying Fonts
Need help identifying fonts you see in print or onscreen? Check out “What’s That Font?!” in Issue #111 of InDesign Magazine for a treasure trove of font-identification resources.
Missing Font Mysteries
While dealing with missing fonts isn’t a fun job, it’s usually straightforward. But occasionally you might encounter a real head scratcher. Check out these articles when:
- You can’t locate the text with missing fonts in your layout.
- You can’t fix a missing font because it doesn’t exist.
- Copying and pasting between documents introduces missing fonts.
Using Fonts in the Adobe Apps
Far from being the simple lists they once were, font menus in Adobe applications now sport many features to assist you in your font-finding process. You can find these menus in the Control panel in InDesign and Illustrator, the Options bar in Photoshop, and the Character panel in all three apps. They offer many more controls than you get when applying a font via the Type menu (Figure 11).

Figure 11. The Adobe font menu and its features
InDesign and Illustrator have very similar controls in their font menus. Photoshop offers a simpler set of controls. In InDesign and Illustrator, you’ll notice in the upper-right corner of the menu several icons—incrementally larger versions of the letter A—that allow you to increase or decrease the preview size of the fonts in the menu.
By default, the words Selected Text appear at the top of the font menu, which means that whatever text you have selected in your document will be used to preview fonts in the font menu. Click those words, and you’ll find a drop-down menu with other options: Typography (which just previews the word Typography), the alphabet, a string of numbers and punctuation, and a few common phrases, including The quick brown fox jumped over the lazy dog.
Above the list of available fonts are controls for filtering the list by numerous criteria.
Classification: The Filter Fonts By Classification button opens a window that allows you to filter fonts by classification (e.g., Sans Serif, Serif, Script, etc.) as well as properties such as weight, width, x-height, and contrast.
Favorite Fonts: The Show Favorite Fonts button reduces what is displayed in the font menu to only fonts that you have marked as favorites. To mark a font as a favorite, click the star to the right of the font name in Illustrator or InDesign, or the left of the name in Photoshop. Click it again to remove the font from your favorites. This can be a good way to tame a lengthy menu and stop wasting time scrolling long lists of fonts. For example, if you want to see the fonts you’re using for your current project only, you can make them all favorites (see “Font Menu Tips and Tricks” below).
Recently Added: The Show Recently Added button filters your list to the most recent fonts that you’ve added to your system.
Activated: The Show Activated Fonts button shows you all the Adobe Fonts that you’ve activated and hides all other fonts in InDesign and Illustrator. The icon is different in Photoshop, but it performs the same function.
Find More: Clicking Find More will change the menu to show other fonts you can activate from Adobe Fonts. To activate a font from this list, click the cloud icon to the right of the font name.
Show Similar: Click the Show Similar button to the right of the font name to narrow the list to just fonts with similar appearance.
Previewing fonts
Want to preview how some selected text will look in a specific font? Click in the family field in the font menu and start typing the name of the font you want (Figure 12). The menu will be filtered as you type. Use your keyboard arrow keys to move up and down the list, previewing different fonts with your text. Or, in Photoshop or Illustrator you can move your pointer over the name of a font to preview it. In InDesign you also need to press Command/Ctrl to preview the font. Press Return/Enter to apply the font to the selected text. Or, click elsewhere to keep the current font.
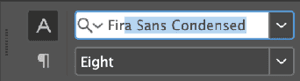
Figure 12. Type the name of the font you want to apply to text in the font field in the Control, Properties, or Character panels.
Tip: When you select text with the Type tool, it gets highlighted, and the colors are reversed. This can make it harder to decide if you like the look of a specific font. Alternatively, use the Selection tool to select the frame containing the text, then switch to the Type tool and click in the font menu as previously described. Now you can judge the look of your text without it being reversed.
Your Guide to Glyphs
InDesign, Illustrator, and Photoshop all offer Glyphs panels to assist you in finding and inserting special characters. Check out Issue #94 of InDesign Magazine for an in-depth look at the controls in this important panel.
Font Menu Tips and Tricks
Check out these articles for customizing your font menus in Adobe apps.
Scripts and Plug-ins for Working with Fonts
The Adobe applications—InDesign, especially—are highly scriptable. In addition to offering speed and efficiency, scripts and plug-ins can sometimes be used to leverage features and functionality that are unavailable through the user interface. Others give you entirely new capabilities. Below are some cool scripts and plug-ins you can leverage when working with fonts. Some are free; others cost money, but they are all worth checking out. If you need instructions for installing scripts in InDesign, check out this post.
IndyFont
It’s hard to overstate how amazing IndyFont is. This scripted plug-in gives you the ability to create your own custom OpenType fonts (or customize existing fonts), directly in InDesign. The Pro version of IndyFont costs €59. There’s also a free version that allows you to create a single-glyph font, which is handy for situations where you need to insert a custom bullet or icon in text. A free companion tool called FontMixer lets you combine glyphs from two fonts when one of them doesn’t have all the glyphs you need. See Issue #55 of InDesign Magazine for a full review of IndyFont.
Fontself Maker
Similar in concept to IndyFont, Fontself Maker allows you to create custom OpenType fonts in Illustrator or Photoshop. You can define alternate glyphs, ligatures, set precise kerning values, and even create SVG color fonts. The Illustrator plug-in costs $39; the bundle of plug-ins for both Illustrator and Photoshop costs $59. Fontself Maker also available as an iPad app where you can design fonts using vector brushes.
Make Font Catalog
This cool script for InDesign (Kasyan Servetsky, free, donations accepted) allows you to create a sample of any font on your computer (Figure 13). When you run the script, a dialog box allows you to choose which fonts you want for your sample, what text you want to use, and any fonts you want to exclude from having a sample created.
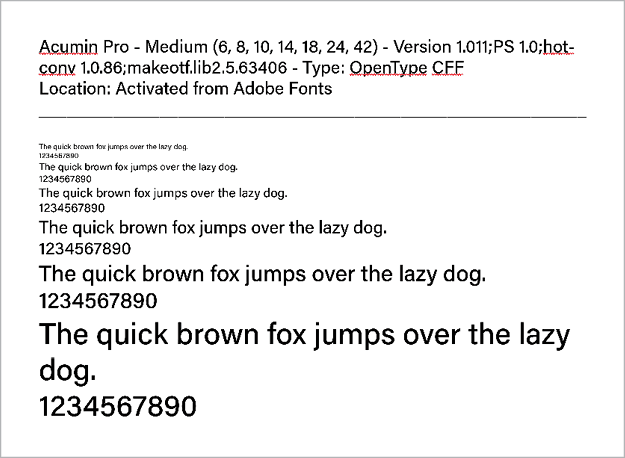
Figure 13. The sample created by the Make Font Catalog script
You can also point the script to a folder of fonts, or you can filter the samples to fonts whose names begin with certain text. This script is a tremendous timesaver if you are tasked with or just want to see a list of fonts displayed in those fonts.
Kasyan also has a number of equally great scripts for working with fonts in InDesign at his website, including ones that batch process font replacements, collect used fonts for any or all open documents, list installed fonts, and more.
Wakamai Fondue
If you want to know any pertinent information about one of the fonts that you’re using, the Wakamai Fondue Website web application is an amazing resource.
When you visit the website, follow the instructions to drop a font onto the window, and you’ll be presented with more information about that font than you might ever care to know! Information includes font format, how many glyphs it contains, who designed it, who owns the rights to it, its software version, and how many languages it supports, among other attributes.
Manage Missing Glyphs
The Manage Missing Glyphs script by Peter Kahrel will list all missing glyphs in a document and give you the opportunity to apply a different font to fix the problem. It also allows you to save the information about your missing glyphs in a text file.
Show Document Font Data
Also by Peter Kahrel, this script gives you much more information about the fonts in a document than InDesign shows in the Find/Replace Font dialog box.
A Happy Zending
We’ve reached the end of this journey, but your next one is about to begin, as you go forward with more confidence and ease when working with fonts. We hope what you learned in this article helps you achieve a state of true typographic tranquility.
Commenting is easier and faster when you're logged in!

Recommended for you

InDesign Magazine Issue 94: Special Characters
We’re happy to announce that InDesign Magazine Issue 94 (February, 2017) is now...

A Script for Accessing OpenType Features in InDesign
This free script makes it easier than ever to access OpenType features like disc...

How to Prevent Problems with PostScript Type 1 Fonts in EPS and PDF Files
Two techniques for heading off big problems when Adobe drops support for Type 1...