
Building Accessible EPUBs with InDesign
Start with a strong foundation to reach more ebook readers.


This article appears in Issue 14 of CreativePro Magazine.
Accessibility is on everyone’s mind these days and a part of everyone’s job. Owing to current and incoming legislation, and to the moral imperative to publish more inclusively, content publishers need to start thinking about accessibility concerns right from typesetting and layout.
If you use InDesign to make print layouts that will become ebooks, this article is for you. InDesign is not designed to be an ebook creation tool. You can make ebooks with it, but you have to really work the InDesign gears to get it to create clean HTML. Left to its defaults, InDesign will export generic markup that will get in the way of accessibility.
An accessible EPUB includes many features that allow people to read what
they want, when and where they want. This article lays a foundation for how to best set up InDesign for successful, accessible ebooks.
From Structure to Semantics
When thinking about accessibility, it helps to remember that we’re really talking about a machine displaying content. Look at a print book. You turn a page and you recognize design elements that mean you’re moving into a new chapter. But a reading device can’t recognize those elements in the same way.
An e-reader doesn’t glean information from your design or from the text itself. Instead, it has to be told, via special “tags” in the ebook, things like this is a first level head (h1), this is a sidebar (aside), this is an illustration (figure). Using these additional semantics makes your content meaningful to rendering engines and thus to readers with print disabilities.
Figure 1 shows an example of what accessible HTML5 semantic markup looks like, with tags inside angle brackets.

height=”242″> Figure 1. Structure applied to content with semantic markup
In this example, the <section> tag tells the machine we’re beginning a new chunk of text. Then, for clarity, the tag includes epub:type="bodymatter chapter" to say it’s the start of the main text of the book, and it’s a chapter. We read some text, and then a new, nested <section> begins. Inside that tag is an <aside>, which is like a sidebar.
If you’re using the accessibility features on an e-reader, you might want to hear all of the chapter titles read aloud, so you could jump to a specific chapter. That’s possible if the <h1> tag is applied only to chapter titles. You can choose to skip sidebars tagged <aside> when reading the main text, hear a picture description before reading its caption, and so on. (These features aren’t available in all e-readers today, but we have to aim for that possibility.)
How do we get that information into an ebook? Through structure and semantics.
Structure is the general outline of a book, as in <section> and <h1>. Semantics go further, assigning specific attributes to those generic elements: Frontmatter, Bodymatter, Backmatter, etc.
Semantics tells us whether a word is italicized because it’s emphasized (<em>) or because it’s a citation to a book title (<cite>), as well as whether a word is bolded for display purposes (<b>) or because it’s a WARNING (<strong>).
The machine reads what we tell it to by our markup. The human touch is evident in every choice we make in bookmaking, even if it’s only visible to a machine. And InDesign does a pretty decent job adding this information.
EPUB 2 or EPUB 3?
Simply put, there is no reason nowadays to create an EPUB 2 file. Exporting to EPUB 2 would be like making a black-and-white TV. Sure, there are black-and-white shows and movies, but most are in color. And color sets will show the black-and-white material without any problem. And, it’s important to note that EPUB 3 is more accessible by nature and by design. Every major reading system can display EPUB 3 files. EPUB 3 includes expanded navigation in the toc.xhtml, richer content tagging with epub:type, and stronger support for scripting, audio, and video. For older devices that can’t read EPUB 3 features—like the TOC—InDesign includes fallbacks, like the EPUB 2-specific toc.ncx.
Mapping Styles
How does InDesign lay the foundation for an accessible EPUB? The answer lies with style mapping.
Just as you do for Word styles when importing text into InDesign, you map InDesign’s paragraph, character, and object styles to HTML tags when you export to EPUB. For example, you can map the paragraph style Chapter_Title to <h1> and the basic Text paragraph style to <p>.
The quickest way to do this is to access the Edit All Export Tags command from any of the style menus. In this single dialog box, you can edit all the styles used in a file and enter corresponding HTML tags and CSS classes. (Figure 2).

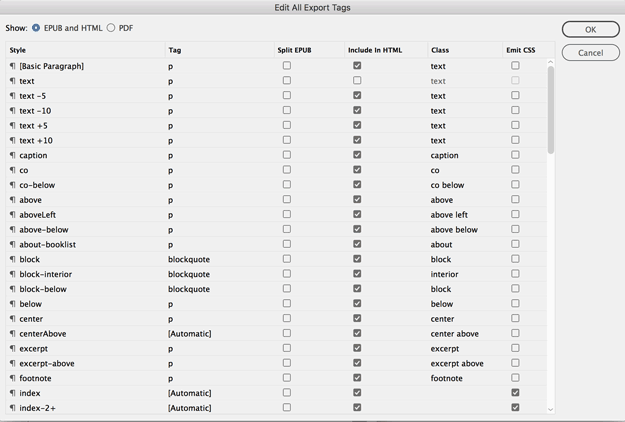
Figure 2. Access Edit All Export Tags from the panel menu in the top-right corner of any of the style panels (left). In the dialog box, you can enter CSS classes (right).
If you let InDesign create the CSS document, it will create classes with names based on the paragraph, character, or object style names. If you develop your own class names, you can plug them into the Class column, and InDesign will use them. Being consistent about style names will make editing easier.
Tip: You can also designate a tag and a class from within an individual style’s Style Options dialog box. If you do that, it’s a good idea to double check in the Edit All Export Tags dialog box. In older versions of InDesign, the tags sometimes disappear from the style definition after you’ve clicked OK.
Custom tags
Here’s where real InDesign magic can happen. You don’t have to stick with InDesign’s suggested tags that appear in the Tag field’s menu, like h1, h2, and so on. You can type in your own! For example, you can use object styles to create sections in your document. So, when you create an object style for an image, define its tag as <figure> (just enter the word figure in the field), which is the correct HTML5 tag for images. The same goes for a sidebar: Give it an object style called sidebar and define its export tag as <aside> (Figure 3).
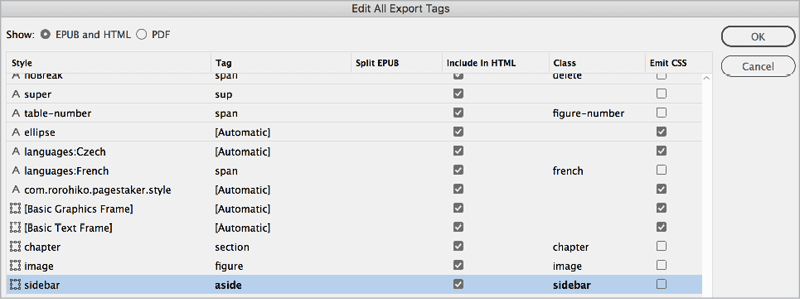
Figure 3. Note how object styles have tags assigned. The “image” style is a figure in tag-speak, sidebar is aside, and so on. Also, each has its own class, so they will be easy to manipulate in the EPUB.
Edit All Export Tags is the source of your EPUB super powers. Leverage these style mappings as much as possible. Once you’ve done that, you’re closer to a semantically correct EPUB file.
Keep Content and Design Separate
We’ve talked about structure and semantics. So where do design choices come in? The fact is that the aesthetics of a book—the typeface, text alignment, color—are meaningless for accessibility. But some design choices can make a book inaccessible. Suppose, for example, you color a table’s row blue to convey meaning—common enough in print, but problematic for an EPUB.
E-readers don’t derive any meaning from formatting like size and color. E-ink devices display only shades of gray. Text-to-speech software can’t interpret color, and users with color blindness won’t see the blue table row on a color tablet. So it’s important when adapting a print project for digital use to keep an eye out for design elements that may need rethinking.
Using Object Styles for Semantic Markup
InDesign is “div” happy. It puts <div> elements around most everything you export to EPUB. Figure 4 shows sample markup from an EPUB export. Unfortunately, the <div> tag has no semantic meaning. Because it doesn’t mean anything, text-to-speech software won’t know how it should render the content within the <div>. Instead, you should use <section>, the HTML5 tag. Earlier, we looked at how <section> and epub:type are used. You can assign both from within InDesign.
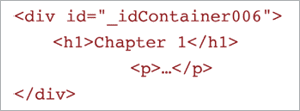
Figure 4. Typical code exported from InDesign, with a semantically meaningless <div> element
First, to assign the <section> tag, simply create an object style, and, in the Export Tagging area of the Style Options dialog box, enter section in the Tag field (Figure 5). Apply this object style to your text frame.
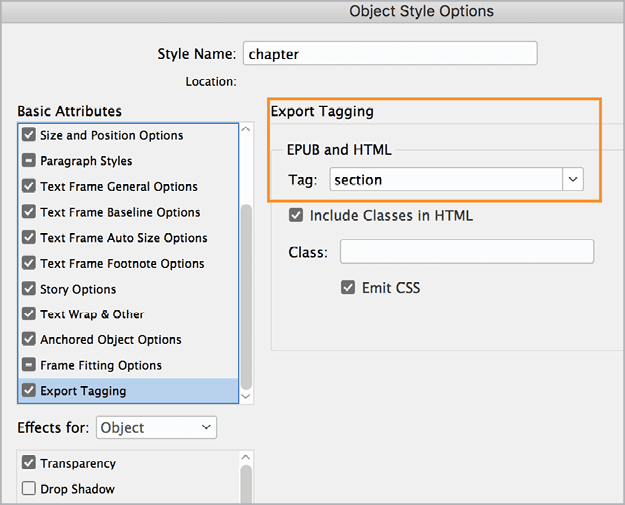
Figure 5. Create proper markup here in the Object Style Options dialog box.
Next, consider epub:type. These designations tell reading software what part of the book you’re looking at. Some example are:
- Cover
- Preface
- Chapter
- Glossary
- Index
See “Links and Resources” below for links to more information on epub:type definitions. You can assign these to a text frame in the Object Export Options dialog box, and InDesign will include that markup in the exported EPUB (Figure 6).
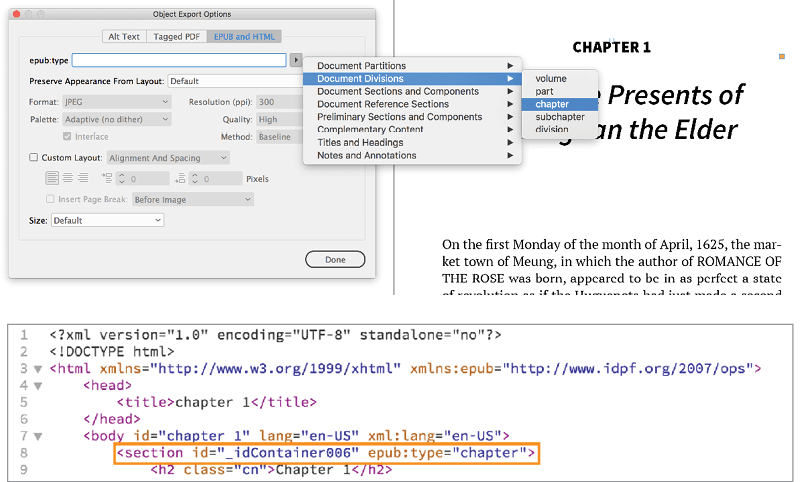
Figure 6. When you assign epub:type in the Object Export Options dialog box (top), InDesign will include that information in the code (bottom). Note section and epub:type:chapter. Note also id=”_idContainer006″. This is often a meaningless identification tag InDesign assigns. You can strip them out, but be careful: They are sometimes destinations for toc.xhtml listings.
Split the story to assign different object styles
There is one problem with applying tags via object styles: It only works on the first text frame of a story. If the dedication and preface are part of the same story, even if they’re on different pages in the print edition, you cannot assign epub:type to both text frames; you’ll need to break that thread.
InDesign has a couple of built-in scripts that can help. BreakFrame and SplitStory interrupt a thread and isolate text frames; unfortunately, they don’t leave the rest of the thread intact. But you can use another script, StorySplitter, which interrupts a long thread, leaving styles and positioning intact on both sides of the break. You can download this script and read about similar ones in this post.
With StorySplitter, you go through a book that’s threaded from front to back and you break it into chunks, such as by chapter. To each chunk, apply an object style that maps to <section> and the appropriate epub:type. (Note: When you activate the script, it sometimes jumps you to the last page of the thread; it’s not an error. Just choose Layout > Go Back to return to the page you started at and continue.)
ARIA
The epub:type property is specific to ebook accessibility and, unfortunately, is essentially meaningless. The parallel web-based specification is ARIA: Accessible Rich Internet Application. ARIA has its own set of roles that can be placed alongside epub:type designations to future-proof content as ebook standards evolve. For example:
<section role="doc-chapter" epub:type="chapter">
<h1>Chapter 1: Title</h1>
<p>…</p>
</section>
You need to put these into place once your EPUB is exported, because InDesign doesn’t include ARIA (yet) in its exported markup. Consider running global Find/Change routines after exporting the EPUB to add ARIA roles.
Find: <section epub:type="chapter">
Change to: <section role="doc-chapter" epub:type="chapter">
Navigation
Accessible EPUB3 includes rich navigation tools that give readers several ways into the text. They include the reading application’s table of contents (usually found in its menu); lists of illustrations, tables, and landmarks; and a page list. Figure 7 shows the navigation panel from Adobe Digital Editions with contents, landmarks, and page list.
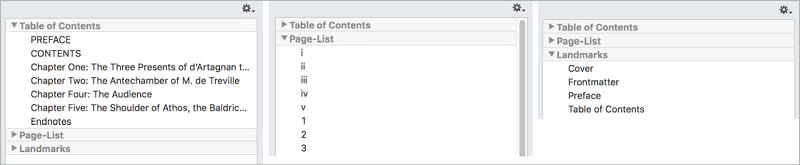
Figure 7. The navigation panel from Adobe Digital Editions, showing (from left) the TOC, Page-List, and Landmarks
The toc.xhtml is more straightforward than EPUB2’s toc.ncx. All listings are simple ordered lists; there are none of the annoying navpoint and playorder numbers to keep track of. (You should still include the toc.ncx in your EPUB for older devices; InDesign exports it for you.
Create the toc.xhtml using InDesign’s Table of Contents (TOC) feature (Layout > Table of Contents). You don’t need to insert the TOC in your book—just save your settings as a TOC style. Then, when you export to EPUB 3, choose Multi Level (TOC Style) and your style for the type of Navigation TOC, in the General section (Figure 8). This populates the e-reader’s Contents menu.
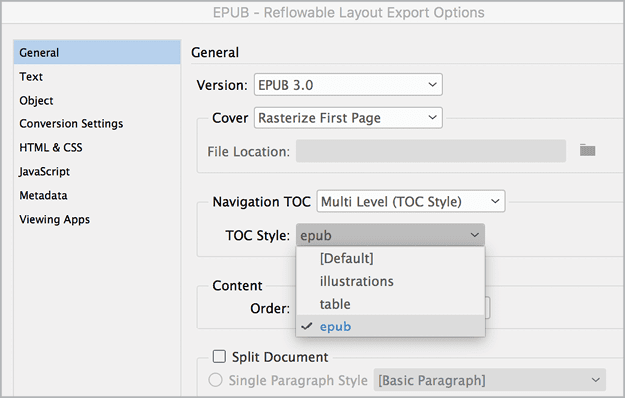
Figure 8. Choose the TOC style you want. InDesign creates the toc.xhtml from this.
If you’ve added epub:type tags to parts of your book, like Frontmatter and Preface, InDesign will add them to the Landmarks in the TOC.
Page-List and listings of illustrations and tables add to accessibility by providing information about the contents to readers in various situations. Landmarks can let a reader using a small screen quickly find the index instead of scrolling through many screens or slogging through a long table of contents.
Logical reading order
When reading a book that has tables, footnotes, images, or sidebars, you usually read the text first, and then go to the sidebar or table for additional information. The HTML5 <figure> (for images and tables) and <aside> (sidebars and footnotes) tags signify elements that are not part of the main text flow. Someone using assistive technology may be able to delay reading anything marked <aside> or <figure>, depending on the software they’re using.
Images
Inserting images involves applying structure and including alt text (alternative text). One is simple to address; the other may require a team effort.
Structure
Figure 9 shows the basic structure for an image with a caption in HTML5. If only InDesign would export like this! You’ll have to do a combination of style mapping and post-export Find/Change to accomplish it. Here are the steps:
Assign an object style to your image, and map it to generate the <figure> tag (Figure 9).
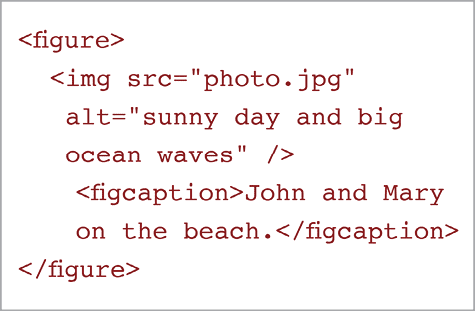
Figure 9. HTML5 <figure> element representing an image
Assign a paragraph style to your caption and map it to <figcaption> (Figure 10).

Figure 10. Map your caption paragraph style to <figcaption> (top) and your image object style to <figure> (bottom).
Anchor your image in position, either before or after the caption.
When you export, you’ll see something like the markup in Figure 11.
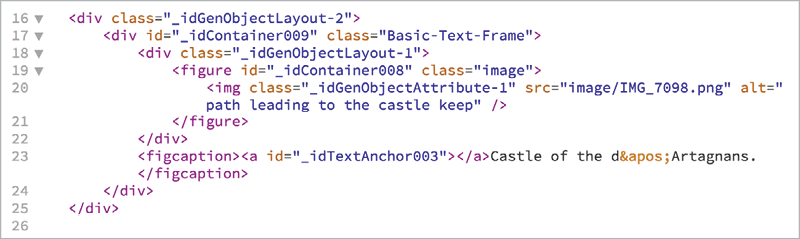
Figure 11. Notice all the <div> tags. As we’ve described, they don’t have any semantic meaning. You can leave them in place or remove them. You do have to move the </figure> from line 21 to after line 23, though, so it closes after the </figcaption> (line 24). Note that if InDesign creates the CSS, it may be using some of those classes inside the <div> tags to size or position the image. So be careful when deleting them; see if the class is in your exported CSS.
Alt text
Alternative text sits inside the <img> tag and is read aloud when text-to-speech reading is enabled. It should provide information not found in the caption or surrounding text.
For example, the caption for a photo of a couple at the seaside might mention John and Mary on the beach, while the alt text describes the weather and surf conditions.
If descriptions in the caption and elsewhere in the text are enough to convey the meaning of the image, you can leave the Alt tag empty: alt ="". Or, you can reference the text discussion: If the text mentions Figure 1, and the caption describes it in full, just put “Figure 1” in the alt text so text-to-speech listeners will know that they’re moving past the image.
How to add alt text
You can add alt text in a couple of places. In the Object Export Options dialog box, you can select Custom from the Alt Text Source menu and enter the text (Figure 12) or select From Structure, which pulls from the image’s metadata if it has any.
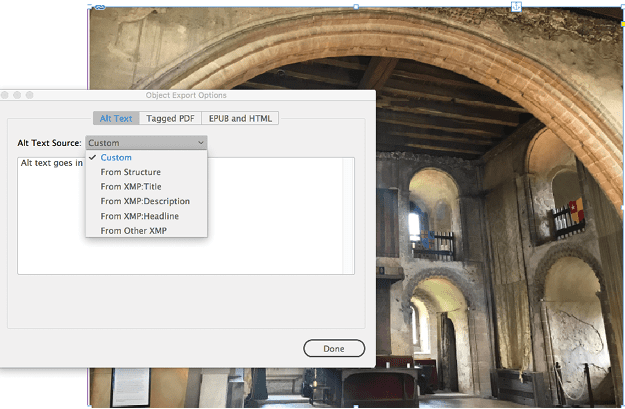
Figure 12. Enter your own custom alt text here, or select another choice if your workflow allows.
You can also add the Alt Text in the HTML after export; just type it between the quote marks: alt="sunny day and big ocean waves".
Tip: For more on writing effective alt text, see this post.
Tools for Editing EPUBs After Export
Use a tool like ePub Zip/Unzip or eCanCrusher to open an EPUB, which unzips the file and makes all parts available for editing in text editors like Dreamweaver, BB Edit, or Notepad++. Editors like Oxygen or Sigil allow editing from within the unzipped EPUB. It also validates your EPUB as you’re working.
Tables
Tables have always been problematic in ebooks. Multi-column, complicated material doesn’t fit on a small smartphone screen. Some reading systems have trouble parsing the code. This led developers to present complex tables as images. But that has problems, too.
Any text inserted as an image is not accessible. Text-to-speech readers can’t get inside an image. You can add alt text to describe the table, but that probably won’t work for complicated tables. So what’s to be done? There are some solutions.
Rewrite simple tables so they are flowing text. Turn column headers into subheads, for example.
For larger tables, use InDesign’s table tools. These will export to EPUB with the necessary HTML markup, especially if you map InDesign’s styles to HTML tags. You’ll need to go in and clean it up after export, but the exported markup is usable.
Be careful to designate header rows as header rows. The will create a <thead> line which will get read accurately with the columns items by TTS technology.
Figure 13 shows the basic accessible HTML5 markup for a table.
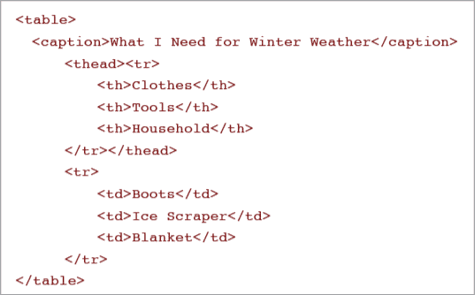
Figure 13. HTML5 table code
Sidebars, Footnotes, and Endnotes
Like images and tables, sidebars, footnotes, and endnotes often give extra information that can be read after the main text. That’s why they take the <aside> tag. Assigning this tag to footnotes and sidebars is simple in InDesign. Endnotes need a little extra work.
Footnotes
InDesign assigns <aside> to footnotes created with the Footnotes panel, but only if you choose Inside a Pop-up (EPUB 3) from the Footnotes Placement menu in the EPUB Reflowable Layout Export Options dialog box (Figure 14). Otherwise, you’ll have to add your own <aside> tags manually, by editing the ebook afterwards.
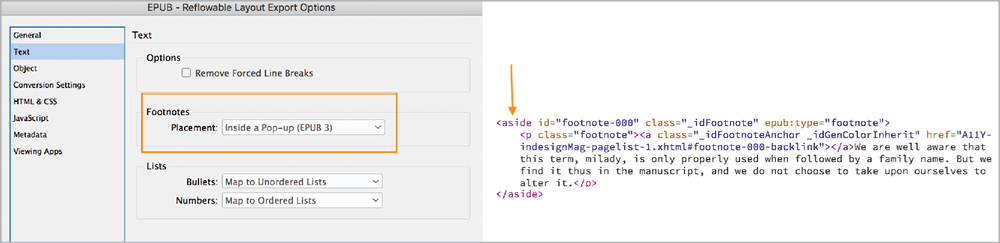
Figure 14. The EPUB Reflowable Layout Export Options dialog box showing Inside a Pop-up (left) and the exported HTML showing the <aside> tag, along with the epub:type markup (right)
Sidebars
So long as the sidebar is in a non-threaded text box, simply assign it an object style with the export style mapped to <aside>. That’s it (Figure 15).
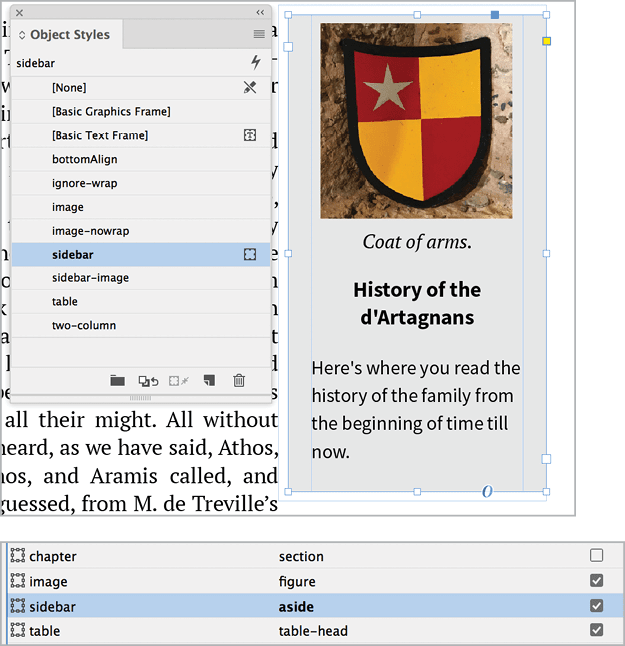
Figure 15. Assign an unthreaded text frame containing the sidebar an object style that will export as an <aside> (top) and map the sidebar object style to export as <aside> (bottom).
Endnotes
When exported, endnotes don’t take on any of the necessary semantics. As for footnotes, you’ll need to take endnotes as <aside> and ensure they carry an epub:type of rearnote. The text reference needs an epub:type="noteref". After exporting, you can use Find/Change to adjust the HTML as shown in Figure 16.
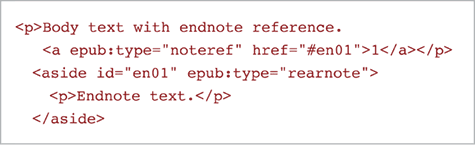
Figure 16. HTML5 code for an endnote
Lists
Numbered and bulleted lists have their own markup in HTML5. InDesign exports those for you if you’ve set them up as lists.
In the HTML, a numbered list becomes an ordered list (<ol>), and a bulleted list is an unordered list (<ul>). When you export, you choose how to map them (Figure 17).
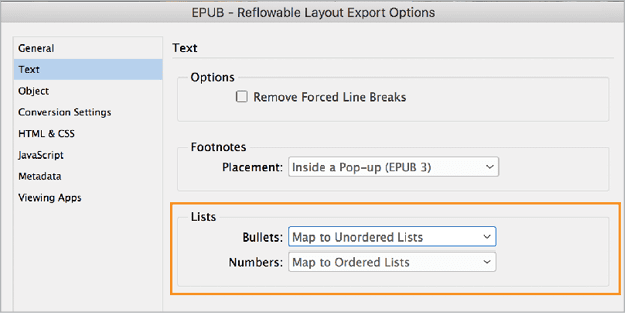
Figure 17. The default settings for converting lists as you export
It is important to maintain lists as lists in the HTML, because assistive technology alerts the reader that they have encountered a new list item. Converting those to paragraphs will get in the way of the text-to-speech reading experience.
Language Shifts
Marking a change from the dominant language in an ebook helps a reading system pronounce the word correctly. If your language is set to English: Canadian and your book includes some words in French, apply a character style to the French words.
First, create a new character style (call it french). The only attribute you need to apply is in Advanced Character Formats. Set the Language option to French (Figure 18).
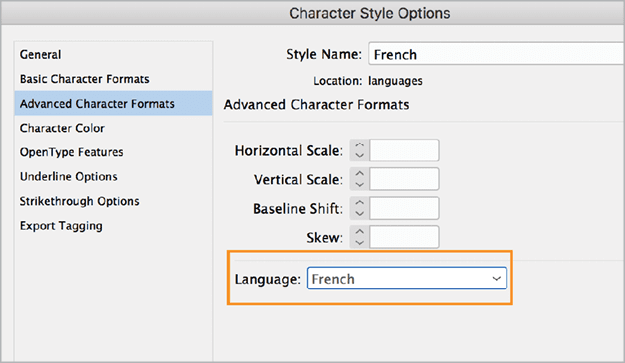
Figure 18. Define language shift in a character style. InDesign will wrap it in the correct markup.
On export, InDesign will wrap the French-styled words in a <span> that includes the language attribute (Figure 19).

Figure 19. The <span> includes the French language designation.
You might have to rely on your editor to provide a list of words or support them to do the tagging in the manuscript.
Color and Contrast
Some readers have difficulty distinguishing colors when there’s not enough contrast between foreground and background. Think about type treatments where thin pale blue text sits over a medium-blue band. Combinations that work well in print may be illegible in ebooks, particularly in e-ink (grayscale) e-readers.
This is an issue if you convert your type treatment to a JPEG or PNG, for a highly designed title page, say. If the text is a very thin sans-serif rendered in 40% black, for example, chances are it will be illegible on an e-ink screen.
Test your ebooks on e-ink devices, and create an alternative color scheme if needed. Take values directly from InDesign, and input to your CSS as needed. See the “Links and Resources” sidebar for links to online color checkers, where you can see how accessible your combinations will be.
Emphasis
All italics are not <em>, nor are all bolds <strong>. InDesign provides only those choices when you’re mapping styles to CSS. But remember: You can input anything you want in the mapping panel. Ask your editor or author to help assign the correct tag.
Italic
There are three types of italic in accessible markup.
- That bump is huge! (<em> for emphasis)
- Voila! That’s how they serve them on board the Titanic. (<i> for foreign words, proper names)
- I read all about ocean-going desserts in Cruise Food: A Guide to Onboard Cuisine. (<cite> for titles)
Bold
- Desserts on your cruise. Ice cream cones are favorite desserts. (Use <b>, because the bold adds no meaning.)
- WARNING! Eating ice cream too fast makes you want more! (Use <strong> when the bold needs to be emphasized.)
Accessibility Testing
Adding the features described here will help bring your EPUBs to a baseline of accessible content, but there’s lots more you can do. Since there are so many layers, it’s helpful to have an evaluation.
Ace by DAISY Accessibility Checker
Ace by DAISY has quickly become an indispensable tool for ebooks developers. It will analyze your ebook, pointing out places where you might have missed semantics or an image description, in addition to pointing you to resources to help explain what is missing.
Global Certified Accessible
Benetech—a pioneer in making ebooks accessible—recently launched Global Certified Accessible. This program provides publishers with detailed feedback on their EPUB 3 files, with suggestions for improvements.
Reference Tools
Check out the two sites below for more information, code samples, and explainers on the bits and pieces of accessible publishing.
The Daisy Knowledge Base
The Daisy Knowledge Base is a high-level knowledge repository for all things accessible EPUB. It is dynamic, nicely indexed, and very thorough. It has code samples that developers can borrow, and links out to more detailed information in the spec.
Accessible Publishing Learning Network
APLN.ca is a different kind of knowledge base. It aims to be a plain language repository on things related to accessible publishing in general: ebooks, of course, but also audiobooks, websites, digital marketing, image descriptions, and metadata.
Links and Resources
Here’s where you can find out more information about the tools and techniques mentioned in this article.
EPUB Secrets: Operated by the publishers of CreativePro Magazine and edited by Laura Brady, epubsecrets.com is an invaluable resource for all things EPUB, including accessibility.
For a list of things that should be cleaned up in an InDesign EPUB Export, see this Accessible Publishing Learning Network post.
Other Resources:
- ACE by DAISY Accessibility Checker
- Accessible EPUB 3, by Matt Garrish
- ARIA
- Benetech
- BISG Quick Start Guide to Accessible Publishing
- Colour Contrast Check
- Contrast Ratio
- IDPF EPUB accessibility standards
- ePub Zip/Unzip
- Epub:type guidelines
- FlightDeck
- Oxygen
- StorySplitter script
- PageStaker script (for creating a PageList)
Some of the scripts mentioned in this article are free, and some cost a little.
Please consider donating to the free scripters if you use their scripts.
A Rewarding Effort
Maybe someday InDesign will be smart enough that making accessible ebooks will be nearly automatic. But in the meantime, use InDesign thoughtfully and carefully will help you produce an ebook that everyone can enjoy. Taking the time to understand and implement accessibility best practices pays off richly in the end. By following the steps outlined in this article you can produce well-structured content that will be easier to publish in any electronic format or media that may come down the pike.
Commenting is easier and faster when you're logged in!

Recommended for you

Preflighting eBooks for Overrides
With the help of the Preflight panel, a plug-in, or a cool script, you can spot...

Window Seat: Fixed-Layout EPUB is Ready for Take-Off
Let’s take a little break from the usual fare of tips, tricks, scripts, an...
Structure Pane versus Page Order for EPUB Export from InDesign
There are two ways to control the order of text and graphics in your EPUB export...