Review: Adobe Illustrator CC
Your raster images must also be embedded, which can rapidly degrade Illustrator’s redraw performance. Illustrator limits the size to roughly a million pixels for pattern and art brushes (pixel width X pixel height), and where possible attempts to downsample for you or pops up the warning that you must resample. You’ll have the most control if you scale the image in Photoshop first, but you can scale it on the artboard, then choose Object > Rasterize, picking a lower ppi if necessary, if you don’t want to scale it before entering Illustrator. Once you’ve taken all this into account, you’ll enjoy this expansion to your arsenal of brushes, letting your creativity flow in new directions.
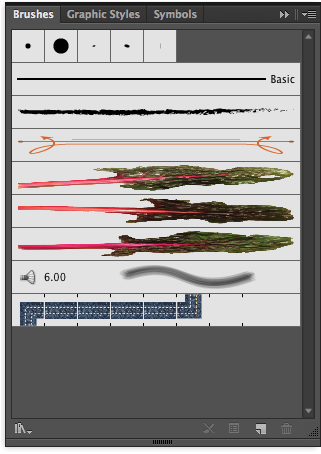
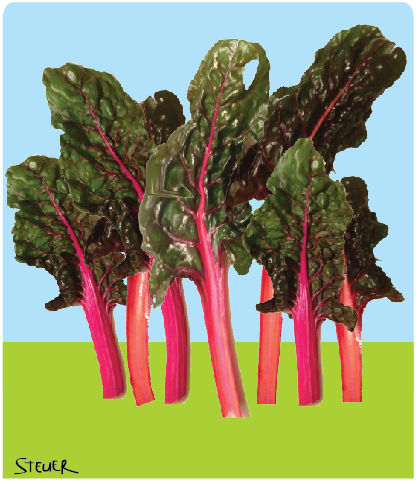
Sharon Steuer painted this image with brushes she created (top) after extracting them from her original photos inside Photoshop.
Transform Characters in Text (with Touch support)
Before Illustrator CC, when we wanted to scale, rotate, or reposition the individual characters within a text object, we were limited by numeric input in the Character panel, or first had to cut, then paste the letters as separate text objects to use the Transform tool, but no more. Now you can use the new Touch Type Tool to interactively manipulate the size and position of individual characters, while the text object stays editable. Click on any character and the selected character now sports a bounding box ready to use for your transformations. You can use a touchpad or other touch-enabled device, as well as your mouse or stylus. You’ll find the Touch Type Tool in both the Tools panel with the other Type tools, and in the Character panel (or press Shift-T if you don’t have any Type tool active).
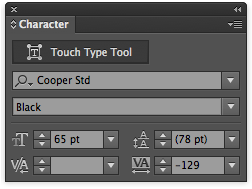
One way to access the Touch Type Tool is with this button in the Character panel.
You won’t be able to do things like flip a single letter within a word, or transform it with Shear with the Touch Type Tool, but with the transformations you can do, your text remains editable. If you highlight and delete a letter, then type a new one in its place, the transformation you made earlier is retained. This can be helpful if you’re not adding any following characters, but when your alteration to the text changes a transformed “e” to an “ea,” for example, the additional letter “a” also takes on the transformation. In such instances, style retention might hinder, rather than help. Hint: set transformations to “neutral” using the Character panel (Reset Panel in the popup menu) to quickly “untransform” a character. Transform, Control, and Appearance panels do not control transformations made with the Touch Type tool, and you can’t save manipulated type as a Graphic Style. Transformation commands that are menu items operate on the whole type obje
ct, not a single selected character.
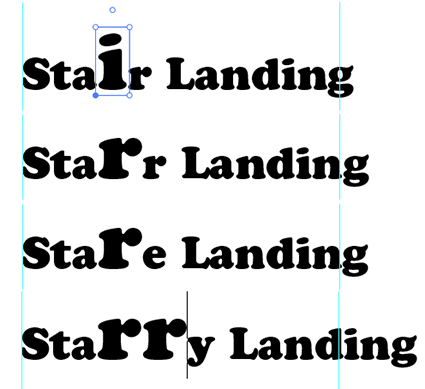
When editing text, each replacing character inherits the original character’s transformation, but if a new character follows a transformed character, it also inherits that transformation (bottom line).
There are other times when using the Touch Type Tool to transform characters might make your job more time consuming. In order to transform letters within a word without jumbling it all together, Illustrator may have to make room by moving all the following characters out of the way. Often one transformation thus leads to another. Normal kerning still works, and trailing characters always follow the leader when repositioning—move the leading letter and all the rest come along for the ride—which can make repositioning a lot easier, but still an extra step or two. It also transforms only a single selected character at a time, unlike transforming with the Character panel. So while this new tool most certainly encourages a creative approach to your type, it hasn’t quite replaced all occasions when the old methods make the better choice.

Some simple Touch Type Tool experiments.
Design Productivity
Free Transform Touch Tool (with Touch support)
Cousin to the Touch Type Tool, the new Free Transform Tool is friendly both to users of touch devices and those who use a mouse or stylus, but prefer a visual interface over keyboard shortcuts. Select Free Transform and you’ll get a floating panel of icons for basic functions, with onscreen cursors that show up when you hover over an anchor point. For instance, you can touch, or click on, both the Free Transform icon and the top Constrain icon to constrain rotation to 45 degree increments and scaling to maintain proportions. One touch on another icon and you can distort with perspective, or shear the object. Drag the reference point anywhere on the screen to alter the pivot point for rotating objects. For those who are comfortable with switching between transform functions using keyboard shortcuts, these are still available—you’re not forced to use the new floating panel—but if you use touch devices, such as the new touch Cintiq tablets, or don’t remember all the shortcuts, this feature is a big help.
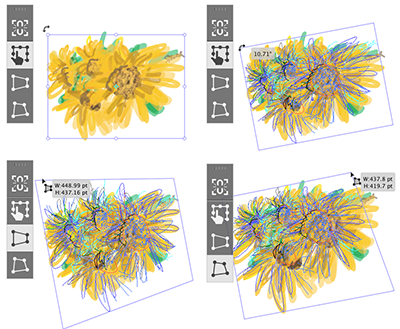
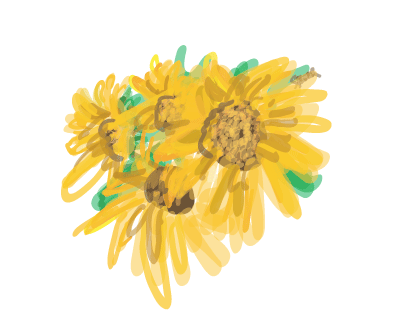
After painting her flower cluster, Sharon Steuer transformed them using the Free Transform Touch Tool until it matched her new vision of the cluster.
Improved Search for Fonts and Swatches
For quickly locating your fonts, Illustrator has added a new wrinkle to the Search field. Before Illustrator CC, you could type the first few letters of a font name into the Search field in either the Control or Character panels, and the font list would jump to the first name that matched those initial characters. Twirl open the list and all the fonts in the list from that point on were displayed.
You now have a choice in the Search dropdown list to “Search Entire Font Name,” or to “Search First Word Only. Searching on the entire name, type “hand” and your list might contain both “Handwriting-Dakota” and “Hannah’s Messy Handwriting,” and the list displayed will be confined to only those fonts that contain “hand.” Type “gar,” then a space, then type “ad” and your list might contain Adobe Garamond Pro and Adobe Devanagari. The order in which you type each string makes no difference. Each space you type between strings is interpreted as “and,” so adding “bold” to “gar” and “ad” will now display only the bold styles in those matching families. Work with this new Search field a few times and I can just about guarantee you’ll be hooked on it.
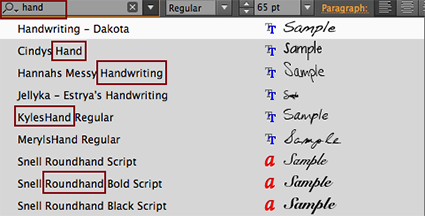
Font Search still matches a string to the first name of a font, but also can match that string anywhere in the rest of the font name.

Every string you add to the search field, with spaces between strings, limits the results to only those font names that contain each string somewhere in the name.
The Find field in the Swatches panel (as well as in Swatch Libraries) isn’t new, but it is more useful. (You still have to enable Show Find Field from the popup menu to see it.) In CS6, you could type “25,” and the field auto-completed to highlight the first swatch it encountered that contained a value of “25” anywhere within it. Illustrator didn’t allow you to specify more than that. In addition, the search results were affected by the order in which the swatches were listed, and would only highlight one swatch, still displaying all the swatches.
In Illustrator CC, you can type either a name (such as blue) or a value (24), including a value limited to a particular CMYK ink (C24), and the panel will hide swatches that don’t match. So if you type “24” you’ll only see swatches that have some ink value of 24, while “c=24” shows only those swatches that contain a Cyan value of 24. The Color Swatches section of the Color Picker now also has a Find field that works the same as the search in the Swatches panel. While you can’t search for all swatches containing C24 and K100, obviously the new search function is much more useful now, and adding this function to the Color Picker as well is a big improvement.
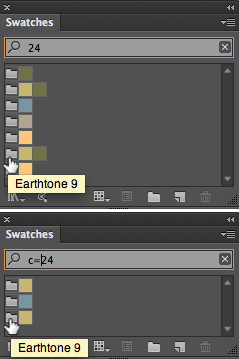

Hunting for swatches with a specific name or percentage of ink returns only the matching results in both the Swatches panel and the Color Picker Color Swatches section.
Convert Area Type to Point and Vice Versa
Designers frequently have to convert Area type to Point, or vice versa, and until now that’s meant starting over. Now if you select a type object with the Selection tool, you’ll see a handle with either a hollow or filled circle, depending upon whether the type is Area type or Point type. Simply double-click on that circle to convert the type to its opposite. You won’t see any difference in the type itself, but what was Point type is now Area type and can be modified as such, and vice versa. A simple feature, but a big difference in how quickly we can alter our document.
![]()

The quotation was originally set as one long string of Point type. When the design needs changed, the quotation was quickly reset as Area type using the new convert type annotator.
Easier Guides Placement
This small, but useful, improvement to placing guides lets you double-click on the ruler to place a guide at that spot, hold Shift and double-click to make sure the guide is placed on a ruler tick mark, or click in the upper left corner of the Rulers, then press Ctrl (Windows) or Cmd (Mac) to drag both a vertical and a horizontal guide into position in one move.
Input/Output Productivity
Place Multiple Files In One Step
Illustrator and InDesign have long had very close ties, and now Illustrator users are getting InDesign’s “place gun,” a cursor loaded with multiple selected files that displays a thumbnail preview of the file you’re about to place. Instead of making a separate trip through the File > Place command for each file, you can now select several files at once to load your cursor with all of them, then scroll through your selection with the arrow keys to select one for placing, or drop a selected file from the queue with the Esc key. I tried to crash Illustrator by loading almost eight gigabytes worth of layered PSD files, 18 in all, and despite not having a powerful computer, this feature in Illustrator performed smoothly.
Note to InDesign users: although dragging several files from Bridge into an InDesign document automatically loads the “place gun,” dragging multiple files from Bridge into Illustrator, at least as of this writing, will still place only a single file. You’ll need to use File > Place for multiple files.
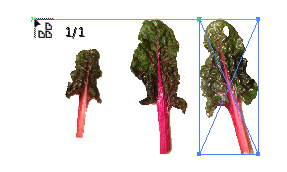
To create the Chard Pattern brush, Sharon Steuer used the multiple place feature in AI to bring in all three Photoshop files at the same time.
Managing Files During Input/Output
Getting your projects into and out of Illustrator is an area of productivity that can often go wrong. Either files aren’t interpreted on import the way you expect, have artwork in them that isn’t accessible to you for editing, or don’t get output to printer and press as expected. Illustrator CC has addressed several issues that arise with collaboration.
This article was last modified on January 18, 2023
This article was first published on June 24, 2013
Commenting is easier and faster when you're logged in!
Recommended for you
Make a Grungy Logo in Photoshop
If you’re a seasoned Photoshop user, this little tutorial might not be for...

Scanning Around With Gene: Oh Yeah? Then Show Me Your Badge.
Mix ‘n’ Match Design Process Most badges seem to have been designed...

How Photoshop Uses Bungee Cords to Define Color
The following excerpt is adapted from Speaking Photoshop CC by David Bate. Repri...


