
Illustrator for InDesigners
Step outside of InDesign and into Illustrator to discover a world of creative possibilities.

This article appears in Issue 9 of CreativePro Magazine.
As users of Adobe software, we have access to a virtual smorgasbord of apps and services in Creative Cloud. But in practice many of us spend the bulk of our time and effort in one program, dipping into the others only when necessary. If you use InDesign almost exclusively, you might feel uncomfortable when you’re asked to do something in Illustrator, where a simple double-click in the wrong spot can be disorienting. But I’m here to tell you that even if you’re a total Illustrator newbie, you can create artwork with the InDesign skills you already have. So, let’s step outside of InDesign into Illustrator to discover all it has to offer page layout professionals.
Familiar Tools and Panels
Illustrator, InDesign, and other applications in Adobe’s Creative Cloud suite have numerous common tools. As a first step, launch Illustrator and create a new document of any size.
Click on the three dots at the bottom of the Illustrator Toolbar, which by default is along the left side of the application window (just like in InDesign). Next, from the upper-right-corner flyout menu choose Advanced. You should now have a two-column Toolbar (Figure 1).

Figure 1. Illustrator’s Advanced Toolbar, shown here in Medium Dark and Light interface modes. You can choose a Brightness level in User Interface preferences.
Several of the tools should be familiar to you from InDesign:
- The Selection and Direct Selection arrows
- The Pen tool and its group are the same as in InDesign, including Add Point, Delete Point, and Convert Direction which is called the Anchor Point tool here
- The Type tool group
- The Line Segment tool, known as the Line tool in InDesign, grouped with tools for making grids, arcs, and spirals
- The Rectangle tool and its group of other Shape tools
- The Rotate, Scale and Free Transform tools are separate, unlike in InDesign where they are all grouped under Free Transform
- The Gradient Tool (somewhat different from InDesign’s Gradient Swatch tool)
- The Hand and Zoom tools
Other InDesign tool counterparts are here too, but are grouped with other tools, so click-and-hold to find them:
- The Pencil is under the Shaper Tool (the one right under the Rectangle Tool), as are the Smooth and Erase Path tools
- The Scissors is under the Eraser tool
- The Shear tool is under the Scale tool
Saving Illustrator files for Use in InDesign
Before you begin exploring the tools and creating artwork, here’s how to save an Illustrator file for placement in InDesign.
Once there is artwork on your artboard (anything at all—a filled shape or stroked line will do), choose File > Save. You may be prompted to save to Creative Cloud. For now, opt to save locally, and you’ll see a standard Save dialog box. The default Illustrator file format (AI) works in InDesign, provided you turn on the necessary option. After you click Save, you’re prompted to specify options for the file: Be sure to leave Create PDF Compatible file checked! Otherwise, you won’t see the artwork preview in your InDesign file.
Now let’s create some Illustrator artwork!
Illustrator Tools to Help You Create Things
Illustrator has many tools in common with InDesign. The Illustrator versions of the tools have added capabilities, and some function differently than they do in our favorite page layout application. In all cases, I encourage you to experiment; you will be pleasantly surprised by how much you can do with artwork using Illustrator’s tools.
Type tools
Illustrator has a several extra Type tools that are not available in InDesign (Figure 2). The default Type tool creates floating text, known as Point Type, anywhere you click with it on the artboard. Click and drag instead, and you get a frame filled with Lorem Ipsum text. Don’t you wish InDesign had that option?
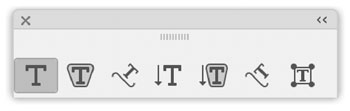
Figure 2. Illustrator’s set of type tools (from left to right): Type, Area Type, Type on a Path, Vertical Type, Vertical Area Type, Vertical Type on a Path, and Touch Type
The Type on a Path tool is like InDesign’s; Click on a path and start typing. Hold down Ctrl/Command and click the text: An extra control appears in the middle of it, the Center Control Bracket. You can drag this to reposition the text along the path, and to flip the text. Additional controls for text on a path are under Type > Type on a Path.
Next is the Area Type tool: It’s for adding text inside a shape, as shapes are not recognized automatically as frames the way they are in InDesign. Select the Rectangle tool and draw one, then click it with the Area Type tool. Now you can start typing within the rectangle.
Use the Vertical Type tools to stack the letters of your text on top of one another, as you might see on a sign. Click for floating text or click and drag to create a text frame. You can also click on any existing shape with the Area Vertical Type tool to start filling it with stacked text (Figure 3).
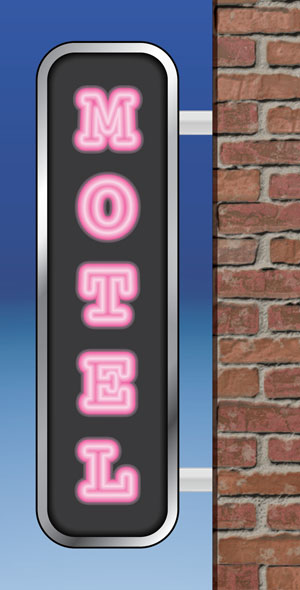
Figure 3. This vertical text is fully editable, and has a Neon Graphic style applied.
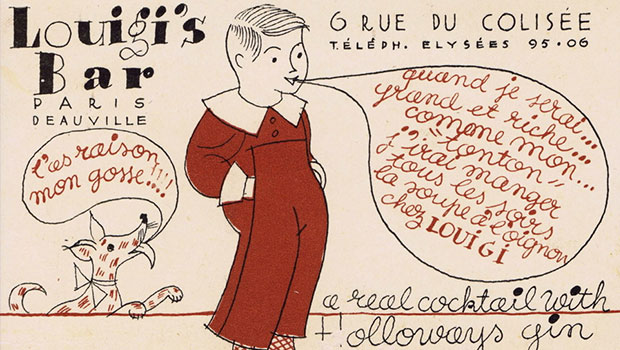
With the Touch Type tool you can select individual glyphs in any live text and move them around—nudge them up or down and rotate them—all while keeping the text editable. It’s a great way to add character to headlines and short runs of text (Figure 4). Check out this video to see the Touch Type tool in action, and this video to see some awesome shortcuts for switching between Illustrator’s many type tools.

Figure 4. Letters in this headline were repositioned with the Touch Type tool—all remain editable.
Line tools
Next, view the tools in the Line (Segment) tool group. In InDesign this is a solo tool, but here in Illustrator you have four more, and they are all easy to use (Figure 5). Try the Arc tool to create smooth curves. Hold down Shift while drawing with this tool to create perfect circle-quarters and drag in different directions to alter how the arcs are rendered. Tap the Up and Down Arrow keys while drawing arcs to flatten or round their curvature.

Figure 5. Illustrator’s line tools (from left to right): Line Segment, Arc, Spiral, Rectangular Grid, Polar Grid
The Grid and Polar Grid tools can save you a lot of time as compared to InDesign, where you’d have to build them piece-by-piece. Tap the Up, Down, Left or Right keys as you drag out a grid. The number of grid lines will change as the mouse button is held down while tapping these keys.
The Spiral tool is another fun one. You can quickly create multiple spirals with different stroke weights and colors to make a decoration. Tap the Up or Down Arrow keys to add or reduce spiral segments while drawing. Find Color and Stroke Weight controls in the Properties panel or choose Window > Stroke and Window > Color to bring up separate panels for these attributes.
To create some trippy art, start dragging out a spiral, hold down the Tilde (~) key, and keep dragging. Whoa!
All the Line group tools and most others in Illustrator have options: Double-click a tool in the Toolbar or press Enter/Return while a tool is active to bring up its Options dialog box. Notice how much control Illustrator gives you—unmatched in InDesign!
Shape tools
The Rectangle tool group includes Ellipse and Polygon tools, just like InDesign. The additional tools are Rounded Rectangle, Star, and Flare. Try them out to create a variety of shapes.
When creating rectangles and polygons, you will notice little circles appearing in the shape’s corners: These are Corner Widgets. Click one and drag to alter all the corners. Click twice to select a single corner for editing. Choose View > Hide Corner Widget if they’re distracting or you find yourself editing corners by accident (Figure 6).

Figure 6. Corner widgets are visible in this pattern-filled rectangle.
Just as with the Spiral tool, the arrow keys work with the Shape tools. In InDesign, the arrow keys let you create rows and columns of multiple shapes. In Illustrator, tapping arrows while drawing shapes will increase or decrease the number of sides on a polygon and the number of points on a star.
With the Star tool You can also hold down the Alt/Option and Ctrl/Command keys while dragging. Alt/Option constrains the angles, while Ctrl/Command enables you to lengthen or shorten the points, all while you’re still holding down the mouse button. And remember that you can double-click any of the shape tools or press Enter/Return while they’re active for options.
That Tilde (~) key trick with the Spiral tool works with Illustrator’s other shape tools, too! Have fun creating instant, elaborate shape compositions.
The Flare tool is really not that useful, so you can safely ignore it. But if you’re curious, feel free to experiment with it, and for best results create your flares over a filled shape.
Gradients
The Gradient tool is reminiscent of its counterpart in InDesign. However, there are more gradient options in Illustrator that are controlled mainly by the Gradient panel.
Start with a shape, and keep it selected. Bring up the Gradient panel by choosing Window > Gradient. Click the Gradient swatch in the panel to activate it and apply it to your shape with Fill targeted. Just like in InDesign, the default is a linear gradient. The Gradient panel works while any tool is selected. Click the Gradient tool in the Toolbar (or press G) to reveal the helpful Gradient Annotator. You drag across a shape to re-orient linear and radial gradients, and the Annotator lets you directly edit color stops.
At the top of the Gradient panel, you’ll see the Linear and Radial gradient Types, and a third that’s only available in Illustrator: Freeform. Click a Type icon to change the gradient, then you can add or remove gradient stops and apply colors to them.
Try a freeform gradient to make an interesting fill that’s not possible with InDesign’s gradient tool. With the Gradient tool active you can edit freeform gradient stops directly in the filled shape; Expand or shrink the stops to control color spread. Reposition stops by dragging them. Click to add new ones or press Delete on your keyboard to delete an active stop. Back in the Gradients panel switch the Freeform Gradient Draw mode from Points to Lines and the stops will adhere to a path. This can be helpful for more easily following the contours of a shape (Figure 7). For a deep dive into designing with gradients, check out Issue #145 of InDesign Magazine.

Figure 7. Illustrator’s freeform gradients blend colors beautifully.
Illustrator Panels with Artwork You Can Use
We’ve discussed the creative possibilities of the tools that Illustrator has in common with InDesign. Illustrator also has features that can create and modify artwork for you, with the ease of clicking in a panel—no drawing skills necessary. The following four panels all have a Library button in the lower-left corner (Figure 8).

Figure 8. The Library button, shown here at the bottom of the Brushes panel
Use this button to access collections of pre-made artwork. Alternatively, you can Choose Window > Brush Libraries/Graphic Style Libraries/Swatch Libraries/Symbol Libraries to access these collections. Let’s look at each panel and what it offers.
Patterns in the Swatches panel
Open the Swatches panel by choosing Window > Swatches. In addition to colors and gradients, Illustrator has a swatch type not found in InDesign: Patterns.
Patterns are perfect for filling shapes and decorating areas of your InDesign pages with pleasing repeating motifs. I recently wrote an entire article about patterns for beginners, and Carlos Garro has an article on more advanced pattern techniques later in this issue.
Creating a repeating pattern is as easy as dragging shapes from the artboard into the Swatches panel. However, there’s a collection of pre-made patterns included with the application.
Click the Library button in the lower-left corner of the panel and choose Patterns to explore the three categories of libraries included with Illustrator. Opening a pattern library displays it in its own panel. Select one or more swatches and choose Add to Swatches from the library’s panel menu to place them into your active document. Pattern swatches are added to your document from any library as you apply them to artwork, even if you later change your mind and use a different pattern.
Brushes
Brushes let you apply a pen-stroke, painted look, or a pattern to an Illustrator path. Brushstrokes work on lines or shapes, whether open or closed. You can also draw free-form paths with the Brush tool. Creating your own brushes can be a lot of work. To learn how, see this article on CreativePro.
An easy way to use brushes is by simply applying them to existing artwork. Open the Brushes panel by choosing Window > Brushes, then open a Brushes Library from the Library button. There are many brush types to choose from! Among these is a Borders collection with many pattern brushes you can use to create decorative frames for InDesign projects (Figure 9).

Figure 9. Illustrator comes with dozens of border styles that you can apply to artwork with just a click.
With selected artwork on your artboard, just click a brush in the panel and watch how the path transforms. Like pattern swatches, brush types that are applied to your artwork will get added to the document’s Brushes panel.
Experiment further with stroke and fill attributes of your brushed objects. Some brushes let you change the path color, others are unaffected. You can edit stroke weight to make the brush effect larger or smaller along the path.
Symbols
Symbols are pre-made graphics you can place individually, or in multiples to create artwork such as foliage and raindrops. As with brushes and patterns, there are multiple symbol libraries included with Illustrator. Arrows, map symbols, and chart shapes are just three of the over two dozen symbol libraries that ship with Illustrator.
Open the Symbols panel by choosing Window > Symbols. Click the Library button in the lower-left corner to find the many available symbol collections. Open one or several.
Drag a symbol from the panel onto your artboard for instant artwork. To apply multiple symbols you can use the Symbol Sprayer tool (not mentioned above): It’s the one under the Eyedropper (Figure 10).

Figure 10. The Symbol Sprayer tool
Try out the Symbol Sprayer and the other Symbol tools in its group. Multiple symbols placed with the Sprayer remain in a special symbol group; You can move them together with either the Selection or Direct Selection tool.
Whether you dragged a symbol directly onto the artboard or applied many with the Symbol Sprayer, you will see exactly what you rendered when placing the Illustrator file in InDesign.
Learn how to create and use symbols in my October 2021 tutorial on CreativePro.
Graphic styles
Illustrator’s graphic styles are not unlike object styles in InDesign: They let you apply multiple transformations, fills, and strokes with a single click to objects or to live text.
Type some text on your Illustrator artboard. Open the Graphic Style panel by choosing Window > Graphic Styles. Now click a graphic style thumbnail in the panel, and voila! More instant artwork. And here’s a tip: Alt/Option-click a thumbnail to add to the style without replacing what’s already applied. You can create elaborate looking artwork by applying multiple graphic styles this way.
Once again—as with brushes, symbols, and patterns—there’s a trove of graphic styles available in Illustrator’s included libraries. Use the Library button in the panel or choose Window > Graphic Style Libraries to open new panels with a variety of ready-to-use graphic styles.
Learn even more about creating and using graphic styles on CreativePro.
Back to InDesign
I hope you enjoyed discovering all the artwork Illustrator includes, and the additional capabilities it offers via otherwise familiar tools. As you can see, it’s not necessary to know how to draw or illustrate to use these features. Now you can jump into Illustrator, create artwork quickly, save it, and place it back in your InDesign file. Your documents will look better than ever!
For a whole lot more on Illustrator from the perspective of an InDesign user, check out Issues #110 and #147 of InDesign Magazine!

Commenting is easier and faster when you're logged in!

Recommended for you
Scanning Around With Gene: When Business Cards Were Big
Occasionally, a garage sale find, thrift-shop discovery, or gifts from friends a...

Using the Shift+Arrow Keys to Extend a Text Selection in Both Directions
Selecting text in InDesign is easy... except when it's baffling! Here's a quick...

InDesign How-to Video: Find File Size and Location
Anne-Marie Concepción shows how to quickly determine the exact size of an InDesi...