
Understanding InDesign’s Text Frame Options
From columns and spacing to baselines and grids, learn how to take full control over your text frames.

This article appears in Issue 142 of InDesign Magazine.
InDesign has dozens of “default settings”—options that you can change that control how the app sets type, displays images, and so on. If I could change any of InDesign’s default settings, it would be one that few InDesign users even know about, much less have ever used: something called First Baseline Offset. This obscure feature, which turns out to be really important, is hiding deep inside one of the most important dialog boxes in InDesign: Text Frame Options.
In this article I will take you on a guided journey through the Text Frame Options dialog box. Along the way, I’ll also explain what’s so important about First Baseline Offset, how it affects your text in a text frame, and why changing the default setting will make your job easier.
How Do I Open Thee,
Let Me Count the Ways…
Text Frame Options is the most easily accessed dialog box in all of InDesign, with no less than six ways to quickly open it.
- Choose Object > Text Frame Options.
- Press Command/Ctrl+B.
- With either selection tool, hold Option/Alt and double-click a text frame.
- Hold Option/Alt and single-click either the Number of Columns or Gutter icons in the Control panel or Properties panel.
- Click the Text Frame Options button in the Properties panel.
- Right-click a text frame and choose Text Frame Options from the context menu.
Note that if you open Text Frame Options without first selecting a frame, any changes you make to the settings will apply to all future text frames you create in the current document. Changes you make with no documents open will apply to all new documents.
Shortcuts to Settings
class=”p2″>The settings in the Text Frame Options dialog box are divided into five groups: General, Column Rules, Baseline Options, Auto-Size, and Footnotes. With the dialog box open, you can use the following keyboard shortcuts to quickly jump directly to each one:
- Command/Ctrl+1: General
- Command/Ctrl+2: Column Rules
- Command/Ctrl+3: Baseline Options
- Command/Ctrl+4: Auto-Size
- Command/Ctrl+5: Footnotes
General
The first group of settings is called General (Figure 1). Here you can set the number of columns (from 1 to 40) and the amount of gutter space between them.

Figure 1. InDesign’s Text Frame Options dialog box
When you set Columns to Fixed Number and enter a value for Number, InDesign divides the width of the frame into that number of columns. If you choose Fixed Width and then resize your text frame, InDesign snaps to the nearest possible overall width, while keeping each column at exactly the column width you specified in the Width setting. The third option for Columns, Flexible Width Columns, allows columns to grow in width up to a Maximum value you specify. Finally, the Balance Columns setting tells InDesign to keep about the same amount of text in all the columns of the frame when there isn’t enough text to fill them all.
Use the Inset Spacing options to move text in from the edges of the frame (what the web coders like to call “padding”). You can set this space individually for each edge or set it for one and click the chain icon to link the values. Note that Inset Spacing works in combination with paragraph indents. So, if both your left inset space and your left paragraph indent are set to half an inch, for example, the left edge of your text will start one inch inside the left edge of the text frame.
Vertical Justification controls the vertical alignment of text in the frame: Top aligns text to the top of the text frame, while Center aligns text between the bottom of the text frame and the top of the first line of text. Note that these first two options depend on your First Baseline Offset setting in the Baseline Options section of Text Frame Options. Depending on that setting, text may not appear to be centered even though mathematically it is. Unequal Inset Spacing applied to the top and bottom of a frame can also lead to centered text looking uncentered. Bottom aligns the last line of text in a frame to the bottom of the frame, while Justify increases paragraph spacing and/or leading to fill the frame with text from top to bottom. Choosing Justify also activates the Paragraph Spacing Limit, which sets the maximum allowable space between paragraphs in a text frame. If the space between paragraphs reaches the maximum value, InDesign then adjusts the leading of lines of text in the frame. To stop InDesign from changing the leading, enter a large Paragraph Spacing Limit (Figure 2).

Figure 2. The Vertical Justification settings control the vertical alignment of text in the frame. Note the difference between Justify with and without a Paragraph Spacing Limit.
Finally for this first panel of the dialog box, the Ignore Text Wrap checkbox stops a text frame from being affected by a text wrap.
Column Rules
The Column Rules section of Text Frames Options allows you to add vertical lines between your columns of text. You can set the starting and ending points of the rule in the Rule Length section, keeping in mind that negative values let you extend the rule even beyond the edge of the frame (Figure 3). When you set both the Start and End values to zero, the rule(s) will begin at the Ascent of the first line of text and end at the Descent of the last line.

Figure 3. Use the Column Rules settings to apply rules between columns in a text frame.
By default, InDesign centers column rules horizontally between columns, but you can push them left or right using the Horizontal Position Offset. Positive values move the rule to the right, while negative values move the rule to left. Using the Stroke settings, you can adjust the properties of the rule (Weight, Color, Tint, Type, and whether it should overprint).
Baseline Options
At last we come to the aforementioned First Baseline Offset feature, so obscure and yet so important! The Baseline Options section of Text Frame Options lets you control two things. First, you can set where the first baseline of a text frame will sit inside the frame. Second, you can set a custom baseline grid for the frame. Let me explain.
You can choose among five settings for the First Baseline Offset: Ascent, Cap Height, Leading, x Height, and Fixed (Figure 4). Here’s how each of those options position the first baseline. Note that the exact results you’ll see will depend on the fonts you use.
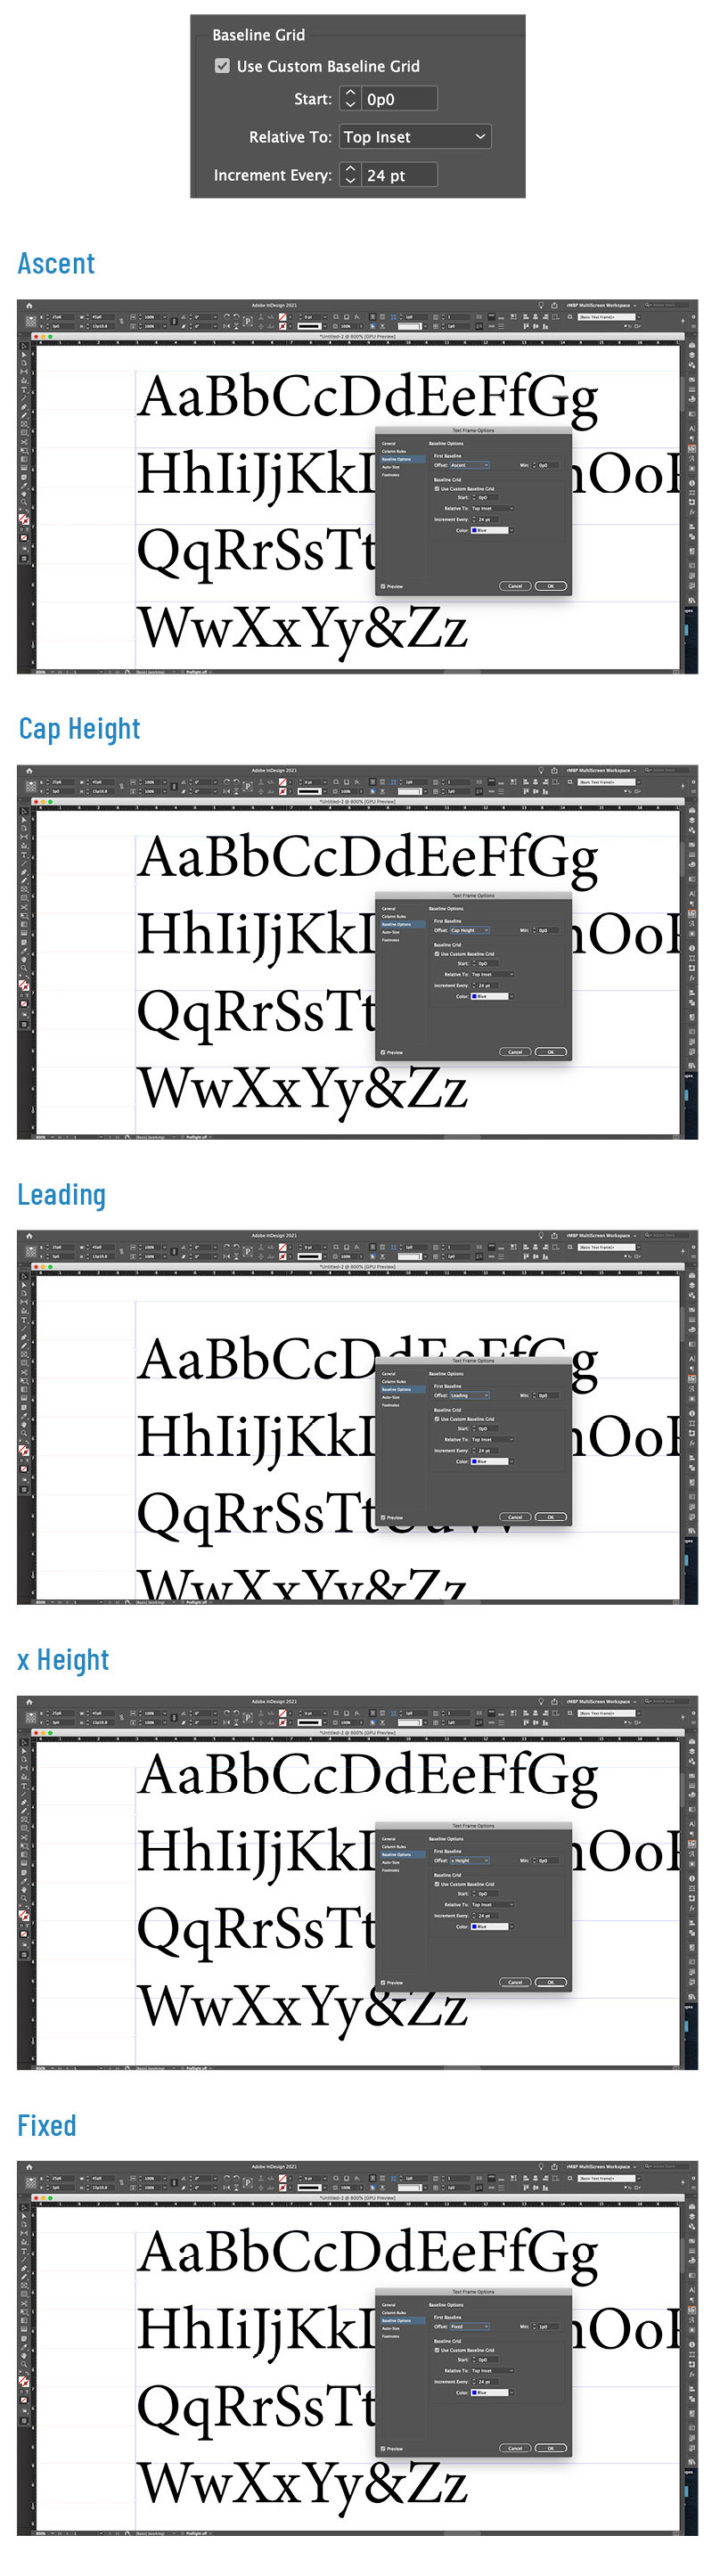
Figure 4. The result of each First Baseline Offset setting on text in a frame set in 19 point Minion Pro with 24 points of leading. Also shown is a frame-based baseline grid relative to the document baseline grid.
- Ascent: The height of the d character falls below the top inset of the text frame. This is the default setting that makes me grind my teeth.
- Cap Height: The top of uppercase letters touch the top inset of the text frame.
- Leading: The text’s leading value determines the distance between the baseline of the first line of text and the top inset of the frame.
- x Height: The height of the x character in the font falls at the top inset of the frame.
- Fixed: Allows you to specify the distance between the baseline of the first line of text and the top inset of the frame.
Three of these five options are (in my humble opinion) ridiculous and should never be used: Ascent, Cap Height, and x Height. The problem with these three offset methods is that it’s nearly impossible to figure out exactly where the first baseline will sit on your page! After all, the location will change dramatically depending on the fonts you’re using. You could perhaps resort to scripting to calculate the distance from the top of the frame to the baseline of the first line of text, but why bother? Additionally these three offsets result in varying amounts of leading of the first line of text when you use characters from different fonts or of different sizes, or if you use an inline graphic.
Fortunately, the other two settings are much more helpful, if you are serious about typographic precision. The Fixed option lets you to specify exactly how far from the top of the frame the first baseline should be. The value you enter in the Min field determines this distance. Although such control sounds great, I rarely use Fixed because it’s too strict. Instead, let me introduce you to the best of the bunch: Leading.
I like the Leading setting for First Baseline Offset because it sets the first baseline precisely, allowing you to know exactly where the first baseline of text will fall relative to the top of the frame. Meanwhile, it’s also flexible, because it updates when you change the text’s leading value. If you know the location of the first baseline of text in a text frame, you can snap the top of the frame to a ruler guide and/or grid location and be confident that the baseline will fall exactly where you expect it to! When you use Leading, the first baseline is one leading increment from the top of the text frame, regardless of the size of the characters, the font used, or the size of any inline graphics.
When you set Leading for First Baseline Offset and also ensure every character in the paragraph uses the same leading (by choosing Apply Leading to Entire Paragraphs in Type preferences), you can relax knowing that every line in your paragraph will mathematically align on your page—even if you don’t use the Align to Baseline Grid feature.
That said, if you do like using a baseline grid, you can use the Baseline Grid controls inside the Text Frame Options dialog box to set a baseline grid for each individual frame, independent of the document-wide Baseline Grid setting in the Preferences dialog box. Unlike that setting, the Text Frame Options grid controls do not include a View Threshold setting; the frame-based baseline grid will be visible when Show Baseline Grid is turned on in the View > Grids & Guides submenu, regardless of your magnification. Additionally, the Align to Baseline Grid option found in the Paragraph panel will align to the frame’s baseline grid rather than the document baseline grid.
One Offset to Rule Them All
Choosing either Ascent, Cap Height, or x Height as a First Baseline Offset method results in varying distances from the top of the text frame to the first baseline of text, especially if the line contains multiple fonts, multiple font sizes, or inline graphics. In the following examples, text is set using 10 point Minion Pro with 18 point leading. In the left-hand frames, the names are set in 10 point Zapfino and the tree is set as an inline graphic. Using the Ascent, Cap Height, and x Height offsets, there’s no consistency between where the baselines of the first line of text of each frame fall as text settings change. Only the Leading and Fixed offsets yield a consistent first baseline position, regardless of font, font size, or use of inline graphics.

Ascent

Cap Height

Leading

X Height

Fixed
Accessing the Secret Sixth Offset Option
As we’ve discussed, the Text Frame Options dialog box offers five choices for your first baseline offset. But, InDesign also supports a hidden, sixth choice: Em Box. This positions the first baseline at the bottom of the em box of the font used. Why the folks at Adobe built this but then chose to leave it out of the user interface is a mystery. You can, however, access it by a script. You can find the code for a simple script to set the first baseline to the em box in this post at Indiscripts.com.
Auto-Size and Footnotes
The Text Frame Options dialog box contains two more sections we should cover: Auto-Size and Footnotes.
The Auto-Size section of Text Frame Options allows frames to grow or shrink as you add or remove text in them. From the Auto-Sizing menu, you can choose whether a frame grows in height only, width only, both height and width, or both height and width proportionally. From the anchor proxy, you can choose which reference location InDesign should use to resize the text frame. You can also include some constraints, such as a minimum frame height and/or width, and whether line breaks are automatically added to the text.
Finally, the Footnotes section of Text Frame Options gives you the ability to override the Span Footnotes Across Columns setting of Document Footnote Options. Before Adobe added this feature to InDesign 2020, you could specify the ability to span footnotes across columns as a document-wide setting only. Now, you can specify the setting and the spacing options that relate to it on a frame-by-frame basis (Figure 5).

Figure 5. Footnotes shown with the Span Footnotes Across Columns setting off document wide (top) but enabled as an override for the bottom frame
Good Typography Isn’t Optional
If you care about good typography and layout (and as you’re a reader of InDesign Magazine, I know you do), one of the first default settings you should change is the First Baseline Offset. Just make sure you do it with no documents open. Setting the First Baseline Offset to Leading this way ensures all new documents you create use that setting rather than the unfortunate default setting of Ascent. This, in turn, means you can always snap the top of your text frames to your leading grid and know exactly where the first baseline of text will fall (Figure 6). And that is one of the first steps in achieving good typography!

Figure 6. Using the Leading First Baseline Offset is the first step in ensuring good typography throughout your projects!
Frame Facts
Want to dig even deeper into the behavior of text frames? Check out these posts at CreativePro.
The Curious Case of Occasional Overset
InDesignSecrets How-to Video: Auto-Size Text Frame Height
Starting Chapter Text at a Fixed Position on the Page
Understanding the First Baseline Position of Text
How to Center Capitalized Text Vertically in a Frame
Commenting is easier and faster when you're logged in!

Recommended for you

InDesign Magazine Issue 81: Publish Online
We’re happy to announce that InDesign Magazine Issue 81 (January, 2016) is now a...

Unflubbify Your Writing Book Excerpt
Use these quick tips to improve your spelling, punctuation, and grammar.

Taming Wild Assets with Adobe Bridge
Not a Bridge user? Alan Gilbertson shows you what you’ve been missing.