
Excerpted from InDesign Magazine, November/December 2010 (issue 38).
In addition to the HTML version of the excerpt below, you can also download the excerpt as a PDF that retains the full interactivity and design of the magazine. This PDF is best viewed in Adobe Acrobat or the free Adobe Reader.
Creating tables in InDesign can be useful, and is often necessary, but rarely is it thought of as very exciting. Here’s a little spice, though, that can perk things up, and that even the most seasoned table user rarely thinks of: adding anchored objects to table cells.
Anchored objects can include images, dingbats, or even shapes that appear to extend or reshape a table cell. For example, you can use triangles or arrows to establish a sense of movement within your tables, or you can change the shape of cells by adding a circle at the intersection of strokes throughout a table. Using anchored objects within a table also makes it easy to incorporate graphic images, such as icons, in table header rows that will appear on each page or frame, along with the text (Figure 1). Throw in a little imagination and creativity, and all kinds of fun things start to happen!
Figure 1. Characters or images of any shape can be anchored to become part of a table, including in header rows (green table). Dingbats are used in the black table below, and simple triangles in the third, multicolored table below.


I’ve touched on this idea before, but I want to go a little more in depth and share some recipes for using anchored objects to make table cells look like they are not just rectangles. There are just a few things you need to know before trying out this technique in your own kitchen.
The key is having the right settings in the Anchored Objects dialog box (Object > Anchored Object > Options). Be sure to set the X Relative To: position to either the Anchor Marker or the Column Edge. (If you use the Text Frame option, InDesign will anchor the object relative to the text frame containing the table, not to individual columns or cells.) For the Y Relative To: position, use one of the Line options. This means you’ll be using the position of the text within each cell as one of your anchor reference points.
Because of this, it’s a good idea to use fixed row heights and have consistent cell text insets at the top. I usually anchor the object at the beginning of text in the next cell to the right, then position the anchored object so it butts back against the target cell and appears to be part of it. This puts the anchored object close to its anchor marker and makes it easy to keep track of.
Once you’ve established the correct position of the first anchored object, you can select the anchored object, copy it to the Clipboard and Paste it throughout your table, or, as I’ll show in one of my recipes, automate the process using a GREP Find/Change query.
In this article, I’ve given you just a little sampler to get started. Try your own variations on the recipes shown here—there are many—and you’ll be amazed at the results.
Flèches de la Table
Ingredients
1 InDesign table
1 or 2 arrows, Illustrator file OK
The Object > Anchored Object command
1 Object Style (optional)
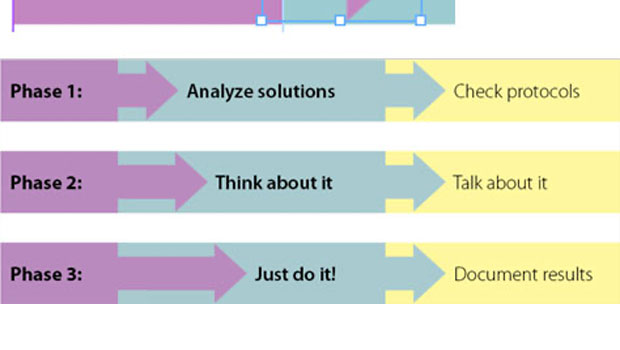
Adding arrows to tables can make them more compelling than plain old rows and columns. Arrows help move the eye across the information and make the presentation more dynamic. Arrows come in many sizes and shapes, and here are just a couple of examples that will hopefully serve as inspiration for you to try others on your own.
Figure 2. Arrows are anchored at the beginning of the text to the right of each arrow. In this example, the arrows extend above and below the row in which they sit, by anchoring an arrow that is wider than the row is tall, and using very wide white row strokes in between.
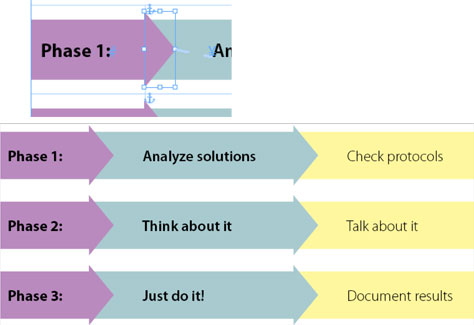
In the Figure 2 example, I used large arrows, and they extend beyond the top and bottom of the row in which they are anchored. Each arrow is set to anchor relative to the Anchor Marker. Remember, the text insets must be the same for the top of and left of each cell, so that the distance from the Anchor Marker to the anchored arrow is consistent.
The color of each arrow must match the cell it appears to join. Use a selective copy and paste to insert the anchored object: Once you position the first arrow correctly, simply select the anchored triangle, copy it, then paste to the next location. The anchor marker comes along for the ride. Or you can create an object style from the first occurrence of the triangle of each color, then copy and paste into the appropriate locations.
To prevent cell overset when pasting images that are taller than a row of fixed height, set the cell’s First Baseline to Fixed and adjust the Vertical Alignment (Table > Cell Options > Text). Do this before setting the correct anchor distance for each object. To create the white space shown between rows, use wide row strokes assigned with the color Paper.
An alternative approach is shown in Figure 3, where the arrows are different lengths. This is done by increasing the left text inset in the cell with the anchor marker, and then selecting the back of each arrow with the Direct Selection tool and dragging to extend its length. Try different shapes and amaze your friends, who won’t believe it’s done in InDesign!
Figure 3. These arrows are anchored at the beginning of the text to the right. The left text inset in cells in the second and third row is increased, along with the length of the arrow to create this staggered effect.


Little Circles
Ingredients
1 InDesign table
1 little circle
The Object > Anchored Object command
The Find/Change command
For certain tables, the process of inserting small anchored objects to enhance the look of the table can be greatly automated. If the same object needs to be anchored within a large group of cells or the entire table, you can set up a simple GREP Find/Change that will take care of things for you.
In this example, we need to add small circles to the intersection of all the row and column strokes, except those in the first column (Figure 4). The same rules apply as in the example on the previous page: the cell text insets should be the same at the top and left, and the circle is anchored relative to the Anchor Marker.
Figure 4. The circles are anchored to the text in the cell to the right of the anchor position. The reference point is set X Relative to the Anchor Marker. An object style can be created to re-apply the position settings if necessary.


After the first circle is anchored correctly, it can optionally be made into an object style by clicking on the anchored circle, then clicking the Create new style icon on the bottom of the Object Styles panel. The positioning is picked up in the style.
Once the first circle is anchored correctly and copied into the Clipboard, you can set up a GREP Find/Change to position the remaining circles in the rest of the table.
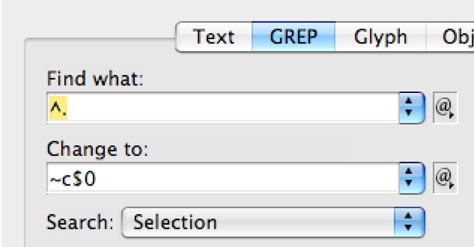
First, select the range of cells that need to contain the anchored circle. In the Find/Change dialog, use the menus to set up the query needed. Set the Find what: field to Location > Beginning of Paragraph, followed by the Wild Card Character > Any character. In the Change to: field, set Other > Contents of Clipboard formatted, followed by Found > First Text. Finally, be sure to set the Search range to Selection (Figure 5).
Figure 5. You can use a GREP Find/Change to quickly anchor a shape to all the cells, or range of cells, in a table at once. After copying the first anchored circle in the table above to the Clipboard, the GREP query below positions all circles throughout the table.
Voilà! Your table now has beautiful corners that no one will ever suspect were cooked up in InDesign!
This article was last modified on August 2, 2021
This article was first published on June 8, 2011
Commenting is easier and faster when you're logged in!

Recommended for you

Five Paper Tips from Xerox: Use Less, Use Wisely
Memos, reports, invoices, forms, presentations and instructions are the trademar...

Applying Flexible Paragraph Spacing in InDesign
When it comes to creating space between paragraphs in InDesign we generally use...