
Keynote: The Pro Design Powerhouse
Unlock type styles, photo adjustments, animation, and video capabilities that go far beyond basic slides.

This article appears in Issue 57 of CreativePro Magazine.
Most designers I know open Keynote a few times a year, put together a pitch deck, export a PDF, and move on. And that makes sense. It’s presentation software, and the real creative work happens in the tools we identify with.
If you spend some time poking around Keynote’s controls, however, a very different picture starts to emerge. Underneath that blank slide you’ll find a surprisingly deep feature set that borrows more from apps like InDesign and After Effects than it does from PowerPoint: reusable paragraph and character styles, object animations with layered property controls, built-in background removal, and live camera compositing, to name a few. And these aren’t just gimmicks; they’re polished, production-ready features baked into an app you already have on your Mac. And the best part? You probably already know how most of them work.
So, without further ado, let’s look at some of my favorite pro-level design features in Keynote.
Kinetic Typography with Magic Move
If you’ve ever animated text in more traditional animation apps, then you know the drill: setting keyframes for position, scale, opacity, and rotation across dozens of layers, or characters, just to get a few words moving on screen.
Keynote’s Magic Move transition lets you achieve similar results with a fraction of the effort.
- Set up your text on one slide.
- Duplicate the slide, and adjust the text properties on the second slide. These adjustments can be for character spacing (letterspacing, or tracking for InDesign users), spacing (line spacing, or leading), text color, and more.
- Apply the Magic Move transition. Select the Animate tab, then click the Add An Effect button. Select Magic Move.
Then watch how Keynote automatically animates between the two states, interpolating the differences in these typographic attributes for you.
And this isn’t limited to just position and scale. You can change your text’s font weight from regular to bold, adjust its position, tweak its rotation. Magic Move will smoothly animate the changes.
On top of that, Keynote’s build animations—which create or delete your object or text step by step—include presets that can animate your text on a word-by-word or character-by-character basis, giving you even more control over how your typography enters and exits the current slide.
When you start combining Magic Move transitions with build animations, you can create surprisingly sophisticated kinetic typography sequences right inside Keynote, without ever opening a dedicated motion graphics application.
In Figure 1, for example, the first slide starts with a centered title in a gray, regular-weight font, the eyebrow title set with character spacing of 250%, and opacity set to 0%. On the second slide, the title is set to a heavier weight, with 0% character spacing and 100% opacity for the eyebrow.
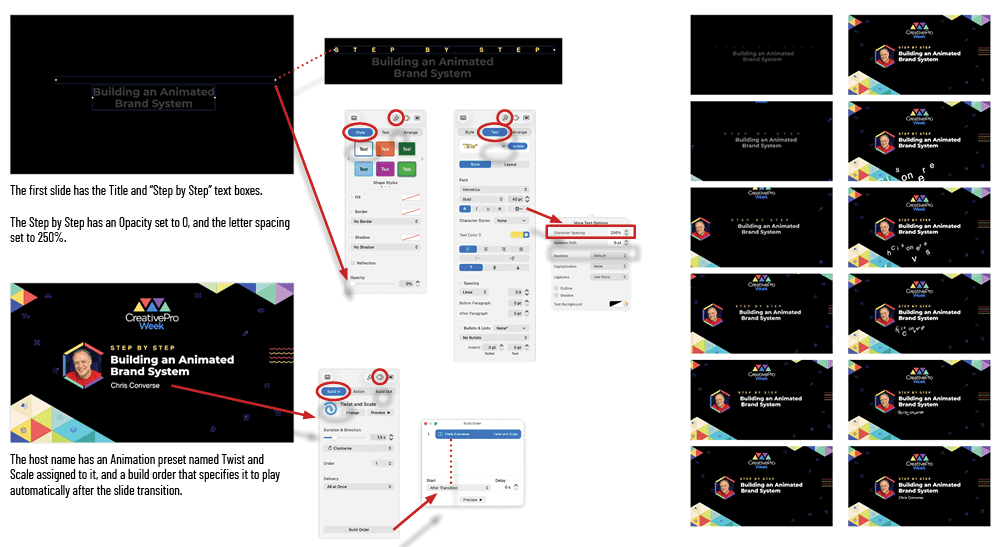
What’s more, the build animation menus (Build In/Build Out) include several text animation presets. On the second slide, the host’s name is assigned the Twist And Scale preset. This animation is set, in the Build Order panel, to play after the slide transition. With one click, you can animate several properties, including position, scale, and rotation on a letter-by-letter basis.
Play Video Across Slides
One of the most impressive things Keynote can do is play video continuously across slide transitions. Not only does this feature allow for looping videos and animations to more seamlessly move into your slides, but it also enables multiple videos to play in sync. This came in handy for my presentation showcasing a series of motion graphic templates developed for BBC Studios and used here with permission.
Take a look at Figure 2: I have five videos loaded on a slide, but only one is visible while the other four are positioned just outside the canvas. When I advance to the next slide—which contains the five videos transition on the canvas—all of them come into view at once, and because Keynote keeps them playing across the transition, they’re all perfectly synchronized.
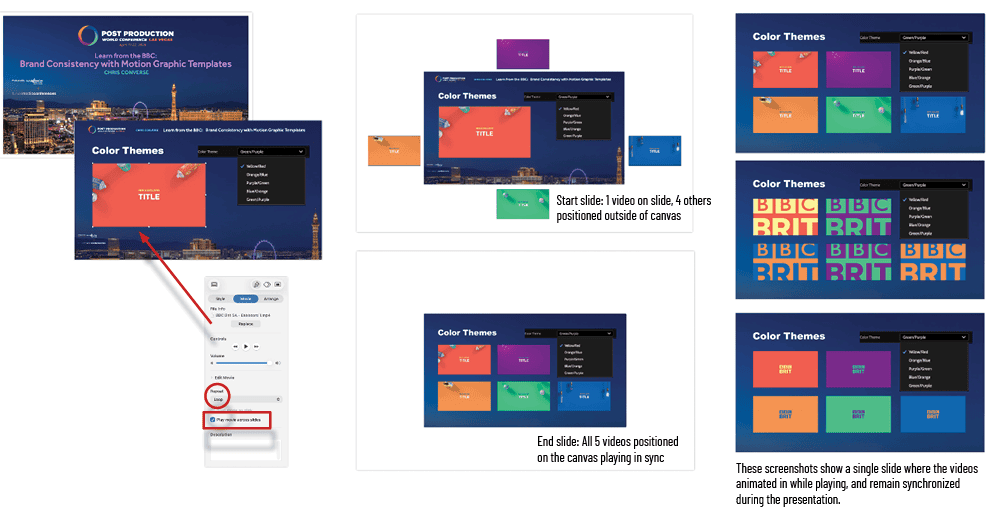
The synchronization helps emphasize the narrative of the template-based workflow by showing similar videos that differ in color and style only. This would be nearly impossible to pull off without the Play Movie Across Slides feature and would likely result in videos restarting on the next slide. This feature allows for seamless movement across slides and helps communicate the complexity of this design project.
Setting this effect up is a breeze in Keynote.
- Use the same video on two slides.
- Open the Format panel and switch to the Movie tab. With your video selected on the slide, turn on the Play Movies Across Slides option.
- If your video or Animated GIF loops, select Loop from the Repeat menu. Make sure you apply these same settings to the video for every slide it appears on.
If you copy and paste the video with these settings in place, Keynote will automatically set them each time you paste the video on a new slide.
Paragraph and Character Styles
If you’ve ever used paragraph and character styles in InDesign or Word, you’ll feel right at home with styles in Keynote. You can define a set of text attributes (say, font, size, color, and spacing), save them as a named style, and apply them to any text in your presentation with a single click. Redefine the style, and every instance across your entire deck updates automatically.
These styles work independently from the text placeholders defined on your master slides. So, while your master slides give you a consistent starting layout, paragraph and character styles let you maintain consistent typography anywhere on any slide, even when you break away from the master layout entirely.
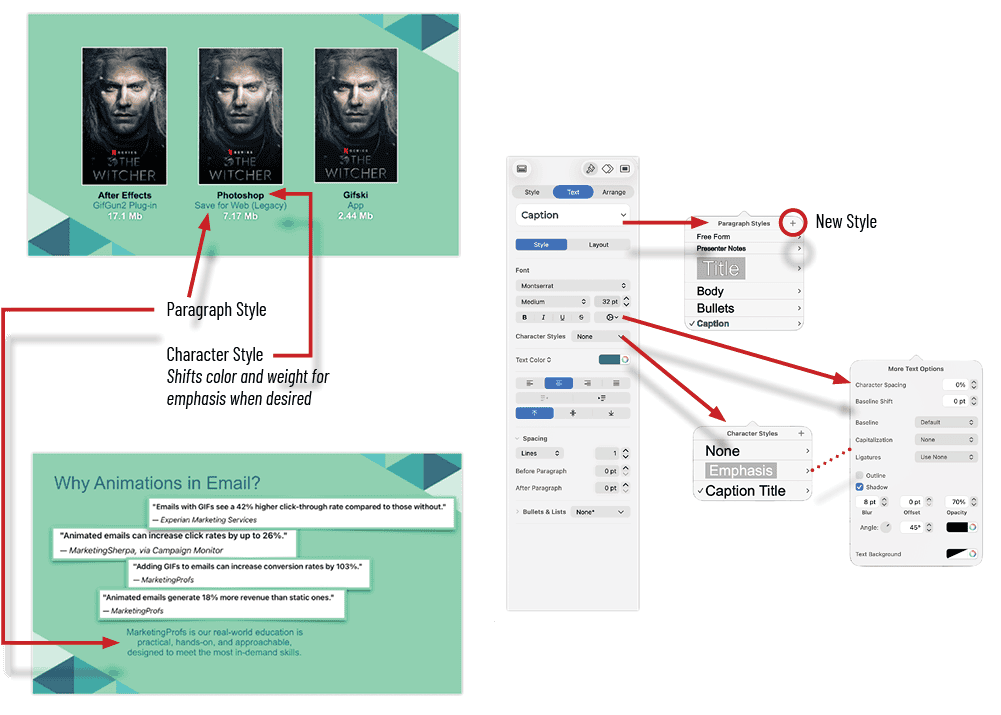
This means you get the best of both worlds: the structure of master slides when you want it and the freedom to place styled text wherever your design calls for it. For anyone coming from a design background, this is the kind of typographic control you expect from a page layout application, not presentation software (Figure 3).
To create a paragraph style:
- Style some text.
- In the Text tab of the Format sidebar, click the disclosure triangle in the styles menu to reveal the full Paragraph Styles menu.
- By default, text you type into Keynote is styled as Body. If you want to redefine Body, click the blue Update button.
- To create a new style and preserve the original Body type specs, click the + icon at the top right of the menu.
To create a character style:
- Choose some of the text and make some style changes, like color, italics, or weight.
- In the Text tab of the Format sidebar, click the disclosure triangle in the Character Styles menu to reveal its full content. Click the + sign at the top. The character style will inherit the original attributes of the paragraph style as you modified it in step 1.
Create Interactive Charts
Keynote lets you create interactive charts that you, or your audience, can click through during a presentation. Instead of cramming four years of data into a single, cluttered chart, Keynote gives you options for a slider or buttons, which allows for stepping through the data one year at a time.
This is especially useful when you’re working with larger datasets where trends can get lost in a sea of bars and labels. By segmenting the data into individual views, each year gets its own moment to tell its story, making it much easier for your audience to absorb what’s happening.
In Figure 4, you can clearly see the myTrailhike app’s growth pattern from 2022 to 2025, which can be delivered at a pace that keeps the audience focused on the specific data you’re discussing instead of “reading ahead” while you’re still talking about last year’s numbers.
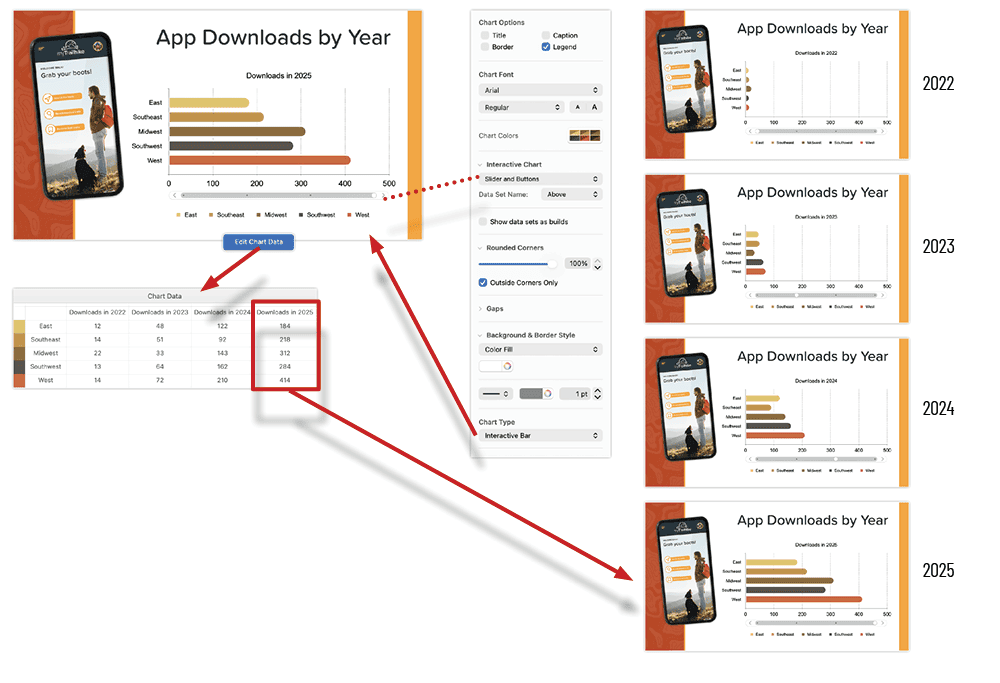
The best part? The slider and transitions are built right into the chart object itself, so there’s no need to create separate slides or build animations manually to get this effect.
All you need to do is add your data to multiple rows and columns in the mini-spreadsheet in the Chart Data dialog box. With that, Keynote takes care of the rest. Simply choose the type of interactive chart you’d like from the Chart Type menu (Interactive Bar, Interactive Column, Interactive Scatter, or Interactive Bubble), then interact with it immediately on the slide canvas.
Image Adjustments
In addition to cropping and masking, Keynote gives you access to professional-level controls for exposure, contrast, saturation, highlights, shadows, sharpness, de-noise, temperature, and tint. These are the same kinds of adjustments you’d find in a dedicated photo-editing application, and they’re all nondestructive, so you can tweak or reset them at any time. You’ll even find a histogram at the top of the Adjust Image panel (View > Show Adjust Image).
In Figure 5, I increased the exposure and bumped the saturation up to bring out the vibrant colors in the hand-painted chocolates. I also increased both the sharpness and the highlights to give the photo more clarity and depth.
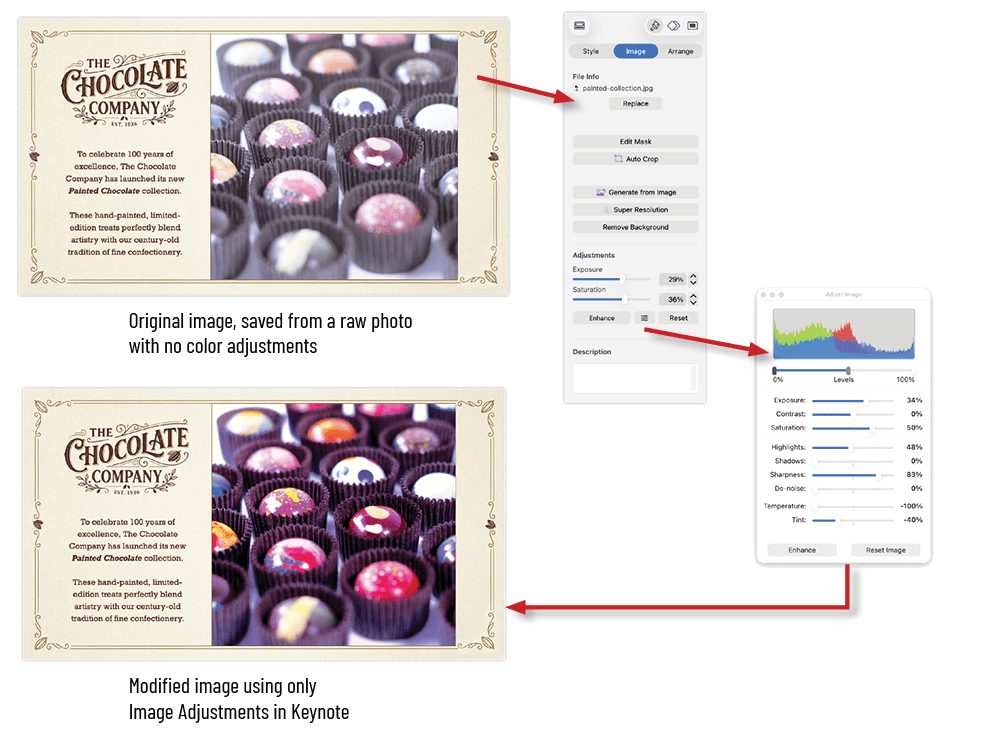
To push the mood a bit further, I shifted the temperature and adjusted the tint to give the image a warmer tone to make the chocolates really pop against the background. The result is a noticeably richer, more polished photo that was edited entirely within Keynote.
If you’ve ever found yourself jumping between apps just to make a quick color correction before dropping an image into a slide, this panel alone might save you more time than you’d expect.
Broadcast Quality Video Export (with Transparency!)
One of Keynote’s most underrated features is the ability to export your slides and animations as high-quality video files. You’re not limited to a compressed, presentation-only format, either: Keynote can render video at resolutions and quality levels that hold up just fine in a professional production pipeline.
What takes this feature from useful to genuinely impressive is the option to export video with an alpha channel, meaning your video can include full transparency information to separate animated elements from the background.
With that option, you can have a whole new workflow, one where Keynote becomes a quick and capable motion graphics tool, and the exported video can be dropped directly into a compositing or editing timeline in just about any video editing software.
Animations in your lower thirds, titles, text, and logos can all be built and rendered in Keynote, then layered on top of footage with the transparency fully intact. This is especially handy when you want to take advantage of Keynote’s animation tools for a project that ultimately lives outside of a presentation.
One place where this really shines is with data-driven animation. Keynote has a robust set of 2D and 3D animated chart options that can build bars, columns, pie slices, and line graphs on screen with smooth, professional-looking motion.
Creating animated charts like these is typically a weak spot for many motion graphics and video editing tools, where building a data-driven animation often means manually keyframing every element by hand. With Keynote, you can drop in your data, pick a chart style, apply a build animation, and export the whole thing as a transparent video ready to composite into your next project.
Figure 6, uses a 3D Rotate And Grow build animation preset, which will grow the pie wedges in 3D space with cinematic camera movements. Duration is set to 4 seconds, and Starting Rotation is set to 60°.
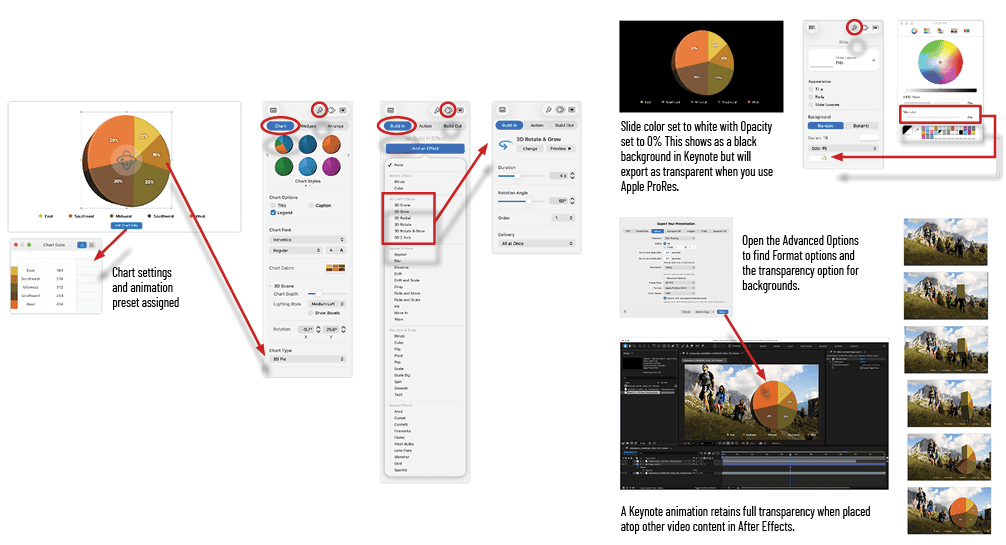
The final trick before export is to set the slide color to transparent. This will display as black in Keynote; however, the final export will be accurate.
Choose File > Export To > Movie, open the Advanced Options in the Export dialog box, and be sure to click the disclosure triangle to show the Advanced Options in the menu. Select Apple ProRes 4444 in the Format menu, then enable Export With Transparent Backgrounds, and click Save. Import your new video into a professional video application to start compositing with your new data-driven animation.
Keys to the Kingdom
I hope that this article has revealed an exciting fact: that the keys to an overlooked design powerhouse have been sitting right in your Mac’s Applications folder this whole time. Underneath Keynote’s simple surface lies a treasure trove of serious, pro-level design features, including sophisticated text styling, layered animations, and instant background removal. So dive in and start ruling your next creative project!
Commenting is easier and faster when you're logged in!

Recommended for you

Using Animated GIFs in InDesign
You can place animated GIFs in your InDesign document. How you get them to work...
Compositing Video in Photoshop
Tips for using masks, blend modes, filters, and more with video in Photoshop.
Replacing the Standard Poster for Video and Sound Files
If you create interactive PDFs from InDesign, you probably know that y...