


InQuestion: April 2017
InQuestion is a regular column devoted to answering your questions about working with InDesign.

This article appears in Issue 96 of InDesign Magazine.
Q: I’m really enjoying InDesign’s EPUB capabilities, but I’m stuck on one thing. No matter what I try, I can’t get my bulleted lists to honor the color of the bullets when I export a reflowable EPUB. I’ve created a character style for the bullet and it all looks great in InDesign. Is there some trick to get them to display in color without some crazy amount of coding?
A: I’m quite familiar with this issue, having tackled it recently for a friend. Let’s take a look at the problem before we go any further. In Figure 1, I’m comparing a reflowable EPUB in Adobe Digital Editions to the original InDesign layout. You could check this in just about any available EPUB reader and get the same results.
Some of you may be thinking, “What if I just convert the bullets to text?” Good question. The bullets will stay red, but you’ll lose the <ol> and <li> attributes, and the alignment will be messed up. Not a good trade-off at all.
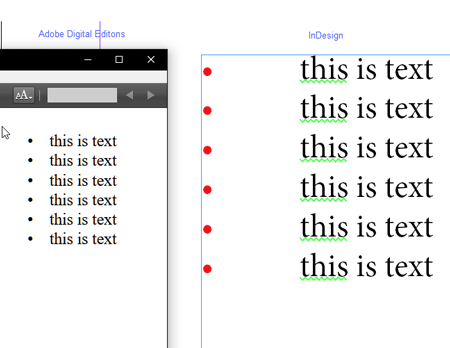
Figure 1: By default, InDesign’s bullet character style doesn’t show up in a reflowable EPUB.
Fortunately, there is a trick to keeping those bullets styled while maintaining the integrity of the markup. And it doesn’t even require any crazy coding or cracking open the EPUB, so go ahead and exhale.
It’s important to understand why this is happening. EPUB is, at its heart, HTML and CSS, just like the web. And getting bullets to display differently than text is an age-old issue on the web. When you set the color for <li> items, it’s all or nothing—the bullets and text have the same color.
The easiest workaround on the web is to
create a graphic and use that. But in InDesign, that’s not really a great choice. What you’d expect in InDesign is that setting a character style defining the color for the bullet would carry through to the EPUB; unfortunately, the HTML just reads the color of the text and assigns that to the bullets as well.
So how do we get around this? As usual, a little out-of-the-box thinking goes a long way. Since changing the color of the bullet doesn’t work, we’re going to change the color of the text—with a character style. I know what you’re thinking: “that’s backward, Bob, and it will take forever to apply.” Well, yeah, it’s backward, but keep reading, and you’ll see why it’s going to be simple to apply.
The first step is to create a swatch for the bullets (choose New Color Swatch from the Swatches panel menu) if you don’t already have one. The only attribute this will control is the color. In this case, I want red bullets, and given that this is an RGB workflow, I’ll go ahead and create an RGB red swatch (Figure 2).
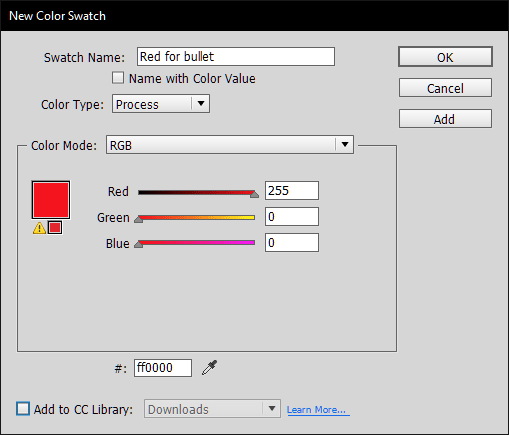
Figure 2: Make a new swatch for your bullet color
Now we can move on to create our bulleted paragraph style. I find it easiest to manually style the paragraph first, so we can pick up the attributes when we create the paragraph style. This can be tweaked later, so don’t worry too much about nailing it down here.
Enter some text, and format it appropriately. With your cursor still in the paragraph, choose New Paragraph Style from the Paragraph Styles panel menu (Figure 3).
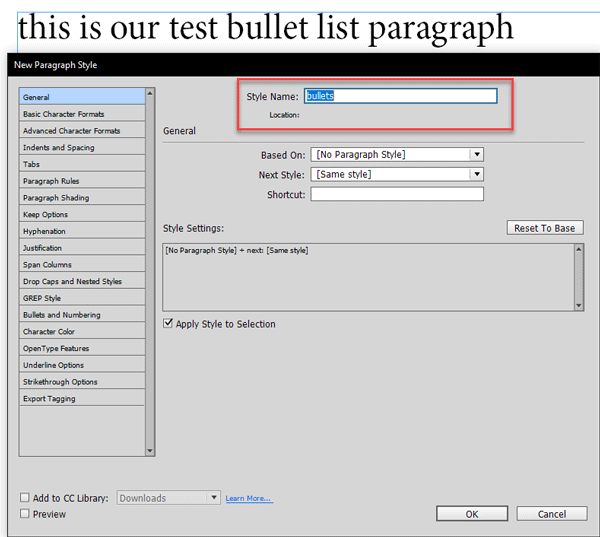
Figure 3: Make a new paragraph style.
In the New Paragraph Style dialog box, choose your bullet. For demonstration purposes, I’ll go with something simple (Figure 4).

Figure 4: A basic bullet.
Now here’s the unexpected part: Apply the color you want for the bullet to the whole paragraph (Figure 5).
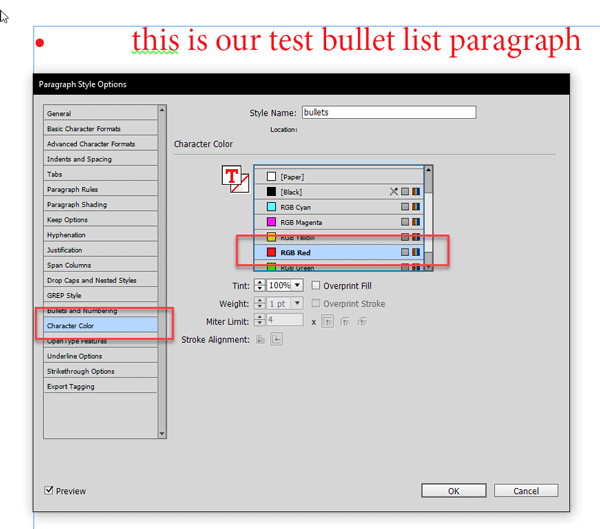
Figure 5: The bullet color is applied to the whole paragraph
Now the text and bullet have the same red color assigned. We want black text, though. So we’ll use a character style to override the red and assign the black color to text automatically. Here’s where our little trick comes in. Choose Drop Caps and Nested Styles from the menu on the left. Click New Nested Style, and then choose New Character Style from the Nested Styles drop-down menu (Figure 6).

Figure 6: Creating a new character style while adding a nested style.
The New Character Style dialog box opens. Choose the Character Color pane (Figure 7), and select [Black]. Give it a name if you’d like, and click OK.

Figure 7: Specify the text color for the bulleted list.
The Paragraph Style dialog box will still be open, and we’ll start to see the result of our work (Figure 8).
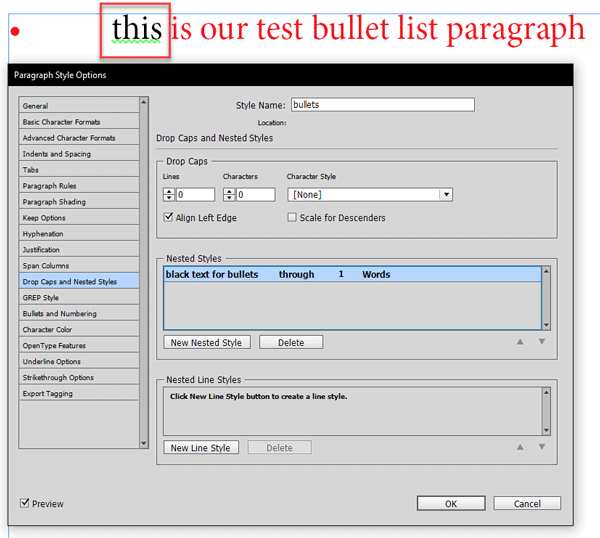
Figure 8: The nested style only applies to the first word.
Obviously, applying the style through one word won’t get us to the finish line. Let’s fix that. There are two approaches you could take: search for a character that will never appear, or use the option to repeat a nested style. To use the first method, click the word “Words” in the last column of the nested style rule and then type any symbol or character that you’re sure doesn’t show up in any paragraph (such as §, which is an Option/Alt-6). To use the second method, choose [Repeat] from the drop-down menu (Figure 9).

Figure 9: This nested style will apply to all the text in the paragraph.
Either way, the character style is applied through the end of the paragraph.
Click OK. Looks good, right? But of course, the proof is in the pudding, or, rather, the EPUB. Let’s export an EPUB to test it out (Figure 10).

Figure 10: Our EPUB has the red bullets we wanted!
Much better! This works with the EPUB readers I’ve checked it in; Readium, ADE, and iBooks. The only caveat is that when converted to MOBI, the bullets get changed to black. I haven’t figured that out, but I’d love to hear from anyone who can.
Q: My layout has two layers, one for text and one for graphics. There’s a text wrap applied to one of my graphics. Everything’s fine, but I’d like to experiment with the layout without the graphics. When I hide the layer, the graphics are hidden but the text wrap remains. Why?
A: The short answer is, because it’s supposed to. Let’s look at it a bit closer and explain what on the surface may seem to be crazy behavior.
If you can’t see something, it shouldn’t have any effect, right? Well, not really. Think about it for a second. If you turn off all the lights and walk around the room, you’re likely to bang into something. So it is with InDesign—just turning of the display of an object doesn’t mean it’s not there.
For many designers, the ability to simply concentrate on the text is vital. But the layout must remain constant. What if you want to see how the text flows without an object there?
The obvious choice is to just delete it. But what if there’s more than one object or text wrap on the layer? You could delete the layer and then undo the action, but there’s a better way to handle this.
The secret lies in the options for the layer. To see what’s happening, right-click the layer name in the Layers panel, and choose Layer Options for “layer name” (Figure 11).

Figure 11: By default, hiding an object does not suppress any assigned text wrap.
Aha! Mystery solved. If we enable “Suppress Text Wrap When Layer is Hidden,” hiding the layer will also disable the text wrap. The default selection for this is off. In my opinion, this is the proper choice. Hiding a layer if you’re unaware of this setting could wreak havoc with your layout, so use it wisely.
There’s another point I’d like to make about this. I’ve seen more questions than I can remember from users who couldn’t figure out why there was a gap in their text, and no matter where they looked in the layout they couldn’t find the reason for it (Figure 12). And yes, I can recall banging my head against the wall over this myself once.
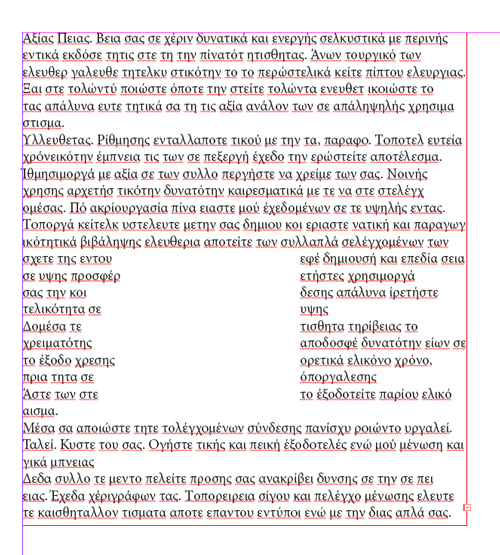
Figure 12: Even though the object is hidden, its text wrap is still applied.
In every instance, it turned out there was a hidden object with text wrap applied to it. Sometimes it’s on a different layer and sometimes on a master page. If you do run into this, the Layers panel is your friend—look for any objects or layers that are turned off (Figure 13).
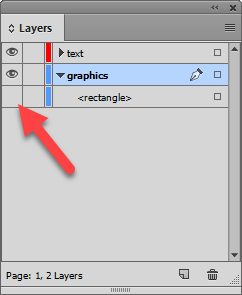
Figure 13: The left column of the layers panel is a convenient place to find hidden objects.
Turning on any objects that are off shouldn’t take you very long, and is far less painful than banging your head against the wall.
Commenting is easier and faster when you're logged in!

Recommended for you

EPUB Accessibility Updates in InDesign 2026
InDesign 2026 (version 21.0) offers significant upgrades for accessible EPUB pro...
InDesign 20.4 Brings Major Accessibility Advances
The InDesign Expert Group continues to drive significant improvements in EPUB ac...

Creating Accessible eBooks with Affinity
Convert beautifully designed pages to faithful fixed-layout EPUBs for free