


Over the next few months, this column will dive into Photoshop automation. The last couple of versions of Photoshop have introduced a deep level of scriptable control that lets you drive Photoshop from external scripts. Not only can you automate your workflow within Photoshop, you can also easily automate interaction between Photoshop and other Adobe Creative Suite applications. For digital photographers, this scriptability means you can automate any part of your photo-management workflow, from importing and organizing images, to applying corrections and adjustments, to integrating your images into a more complex print or Web publishing workflow.
On Windows, scripting is performed using JavaScript, the same language you might use for Web publishing tasks. Mac scripting uses AppleScript and JavaScript. I’ll cover all these options in future columns. (Mac users can get a head start by checking out this article, which details the scripting of some OS-level graphics routines.)
To get started, though, I’ll begin with Photoshop’s built-in automation tool, the Actions palette. If you’re already comfortable with Actions, this may just be a review, but many experienced Photoshop users could get more out of the Actions palette if they fully grasped its capabilities.
Taking Action
Accessible from the Windows menu, the Actions palette acts like a simple recorder that stores any sequence of operations you perform between hitting the Record and Stop buttons. Later, you can play back those operations on another image.
The recording process may be simple, but the results are not. You can script almost anything Photoshop can do, but there are exceptions. You can’t record tool options changes; view and window commands; or painting and toning tools (basically, anything that works like a brush).
Let’s begin by creating a simple Action that simulates a “bleach bypass” effect. In wet darkroom photography, bleach bypassing is a processing technique that skips the bleaching stage of development, resulting in a negative with extra silver. The resulting image looks something like a black and white image sandwiched with a color copy. The effect is pretty easy to achieve with simple Photoshop layering.
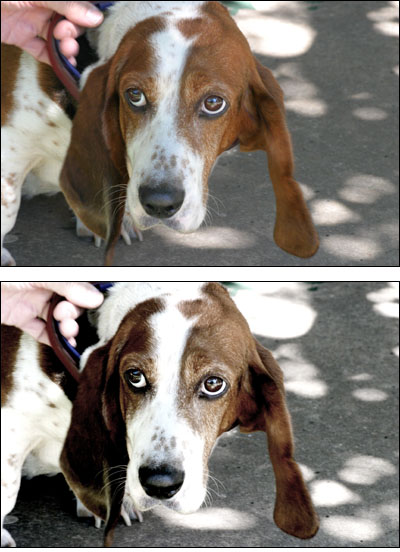 A simple Photoshop Action that mimics a bleach bypass technique yields this before (top) and after (bottom).
Open an image to work with. For the sake of safety, save a copy of the image if it’s something you don’t want to accidentally mess up.
Because you want to turn this into an Action, you first need to create a new Action and start it recording. Click the “Create New Action” button at the bottom of the Actions palette. (If you’re not sure which button is the Create New Action button, hover your mouse over the buttons to read their Tool Tips.) Photoshop will ask you to name the action and allow you to choose a particular set in which to store the action. (Sets are groupings of Actions.) Enter Bleach Bypass for a name, select the Default set, and hit Okay.
Photoshop should have automatically activated Record mode, as indicated by the highlighted record button at the bottom of the palette. Now, every recordable action you make will automatically be stored in your new Action.
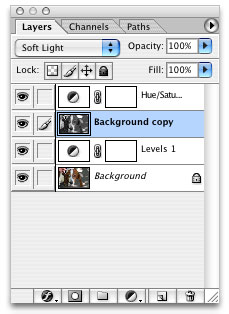
If it’s not already visible, open the Layers palette. Select the Background layer in the Layers palette by clicking on it.
Duplicate the Background layer in the Layers palette by dragging it onto the “Create a New Layer” button at the bottom of the palette. (You can also choose Layer>Duplicate Layer.)
The duplicate copy should be selected. Choose Image>Adjustments>Hue Saturation. Drag the Saturation slider all the way to the left to drain all the color out of the layer.
In the Layers palette, change the Blending Mode from Normal to Soft Light using the Blending Mode pop-up menu near the top of the palette.
 At this point, your Layers palette should look something like this.
Select the original background layer (not the copy) and create a new Levels Adjustment Layer by clicking on the “Create new fill or adjustment layer” button at the bottom of the Layers palette, and then choosing Levels from the resulting menu. Set the Input Levels in the resulting dialog to 31, 1.31, and 198. Hit OK.
Now select the topmost layer and create a Hue/Saturation Adjustment layer. Set the Saturation slider to around -40. Hit OK.
 The Final layers palette. You can see in the Blending Mode popup that the upper image layer is set to Soft Light.
Press the Stop Recording button at the bottom of the Actions palette. You’re finished!
Different images respond differently to this effect, so you may need to adjust it depending on your original. Fortunately, because of the way the effect is constructed, it’s fairly easy to change all of its parameters.
First, you can tweak the final Saturation adjustment by double-clicking on the Saturation adjustment layer and making changes to the Saturation parameters.
The blended copies of the background layer serve to simulate the contrast gain that bleach bypassing produces, while also providing an initial desaturation. If this isn’t quite enough contrast gain, use the Levels Adjustment Layer to add a little more contrast to our base layer. Because this Levels adjustment is performing the bulk of the contrast boost, changing its parameters has a profound impact on the strength of the overall effect.
Adding User Control
When you record an operation that includes parameters of some kind, like the Levels Adjustment Layer I mentioned in the previous paragraph, the Actions palette records the exact parameters that you enter at the time you make the recording. If you’d rather enter parameters for a given step on-the-fly, while the Action executes, check the Toggle Dialog On/Off switch next to the appropriate step in the Actions palette. This will cause the action to pause and display its dialog rather than automatically entering the values you used when the Action was created.
 The Toggle Dialog On/Off switch gives you control of dialog parameters when the Action is running.
You can tweak your action by using the fly-out menu in the upper-right corner of the Actions palette. With it, you can delete steps, insert new steps, duplicate existing ones, and load or save Actions to external files. You can also switch the Actions palette into button mode to view your actions as a series of buttons that can be executed as a single click.
You can further customize an Action by inserting a break for edits the palette can’t record. The Stop command lets you insert a break in your script to allow for these manual operations. You can then include a dialog that prompts users to perform a specific action. When they’re finished, they can dismiss the dialog box, causing the action to continue executing.
Life’s a Batch
Actions are great for executing a complex series of edits with a single click, and you can save even more time and effort by applying an Action to a bunch of files. Obviously, you can open each file by hand, apply the action, and then save the results, but after going to the trouble of creating an automatic image processor, you shouldn’t have to hassle with manually opening and closing files.
The Batch dialog (File>Automate>Batch) lets you apply an Action to a folder full of images, the current File Browser selection, the currently open file, or an image grabbed from any device that currently has a legitimate Acquire plug-in.
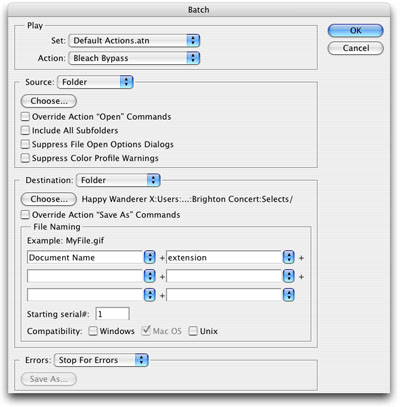 Photoshop’s Batch dialog applies an action to a folder or to a selection of images for automated batch processing.
You can select the relevant import source in the Source section of the dialog. Checkboxes let you automatically suppress all of the dialogs (such as color space warnings) that might pop up during an open command, ensuring that the batch process won’t get hung up waiting for you to approve some part of the opening process. If your action included an Open command of its own (because you started recording before you opened a file), then you can tell the Batch processor to ignore these open commands and work solely on the images you’ve chosen.
The Destination section of the dialog lets you specify how the results of your Action should be saved. Selecting None from the Destination pop-up leaves your resulting image open, while the other options let you choose to save the document back to its original location and then close, or save to a new location.
Using the File Naming options, you can create sequentially numbered files with a number of name and extension options. These options are particularly useful for processing sequences of images for video or animation.
If you want an easier interface to Photoshop’s batch-processing capabilities, consider creating a droplet, which batch processes any images or folders dropped onto it. Droplets are cross-platform-compatible and save you the hassle of repeated returns to Photoshop’s Batch dialog.
There is one bug in Photoshop’s Batch dialog. If you work with images in different color spaces, batch operations can get interrupted by Photoshop’s standard “Embedded Profile Mismatch” dialog, which appears when you open a document that has a different color space than what you’ve defined as your default space.
Though the “Suppress Color Profile Warnings” option should prevent such interruptions, it doesn’t. The easiest workaround for this problem is to choose Disable Profile Mismatch Warnings in the Color Settings dialog. This will take care of the problem right away, but remember to turn it back on after your batch process is complete. (And no, there’s no way to automate this preference change using an Action.)
Finally, note that Photoshop CS’s File Browser includes an Automate menu of its own, which allows you to execute batch operations directly from the browser. This feature is particularly useful for photographers who shoot in Camera Raw mode, as it allows you to easily create a more-streamlined raw image workflow. I’ll delve more into this topic in a future column.
Why Actions
As a scripting tool, Actions have a lot of limitations. They offer none of the repeat structures or logical controls that you’ll find in even the simplest scripting language. (Note that the Actions feature in ImageReady does offer a simple conditional operation that allows you to create simple branches based upon image characteristics.) Without these features, it’s impossible to solve complex workflow problems.
Nevertheless, Actions are an extremely simple way of creating automated Photoshop procedures. And Actions can be triggered by external scripts written in JavaScript or AppleScript. You may begin your automated workflow by developing Actions for your Photoshop operations, then launching and combining them using an external script of some kind.
Triggering an Action with a JavaScript (on both the Mac and Windows) will be the subject of the next installment of this column.
This article was last modified on December 14, 2022
This article was first published on March 8, 2005
Commenting is easier and faster when you're logged in!

Recommended for you

Alien Skin Software Brings the Look of Film to iPhone with Alt Photo
Press Release Raleigh, North Carolina –Alien Skin Software has announced the imm...

Know Your Photoshop File Sizes
How can one Photoshop image grow and shrink dramatically during production, even...

Out of Gamut: Soft Proofing in Photoshop 6.0
By now, it’s pretty clear that Adobe Photoshop 6.0 is an impressive upgrad...