Turning Grayscale to Color in Photoshop

When it comes to creating multitone images, it’s common to think of using the Duotone mode. But just because you want a multitone doesn’t mean that you need to use the Duotone mode to get it. In fact, you can often get just as good results by manipulating a grayscale image in either the Multichannel mode or the CMYK mode. There are, however, pros and cons to each technique.
File size. An image in Duotone mode, whatever the number of inks, is saved as an 8-bit grayscale image along with curves. CMYK images, then, are four times the size, because each pixel is described with 32 bits of information, even if you’re using only two channels. Similarly, a two-channel multichannel file is twice as large as a duotone.
Single-color areas. In Duotone mode, there’s almost no way to create a single area in which only one color is present. For example, it’s a pain to make a 20 percent blue square in the middle of an image, without black also printing in it. However, this is easy to do in any other mode.
Blends. There’s also no way to create a gradient blend between two spot colors while in Duotone mode. In CMYK mode, it’s easy.
Outputting images. When you output a multitone image, the mode it’s in may have an impact on your output process. For instance, you cannot import a multichannel PSD file into InDesign — it just doesn’t know what to do with it. You can save a duotone image in PSD, PDF, or EPS format. (We recommend PSD or PDF.)
Adjusting tone. In Duotone mode, you can always change the duotone curves without affecting the underlying grayscale image data. That means you can quickly repurpose the image to a number of different output devices. Or, if your art director decides to print with green instead of yellow ink, you can quickly change the tonal curve to adjust for the difference in ink density.
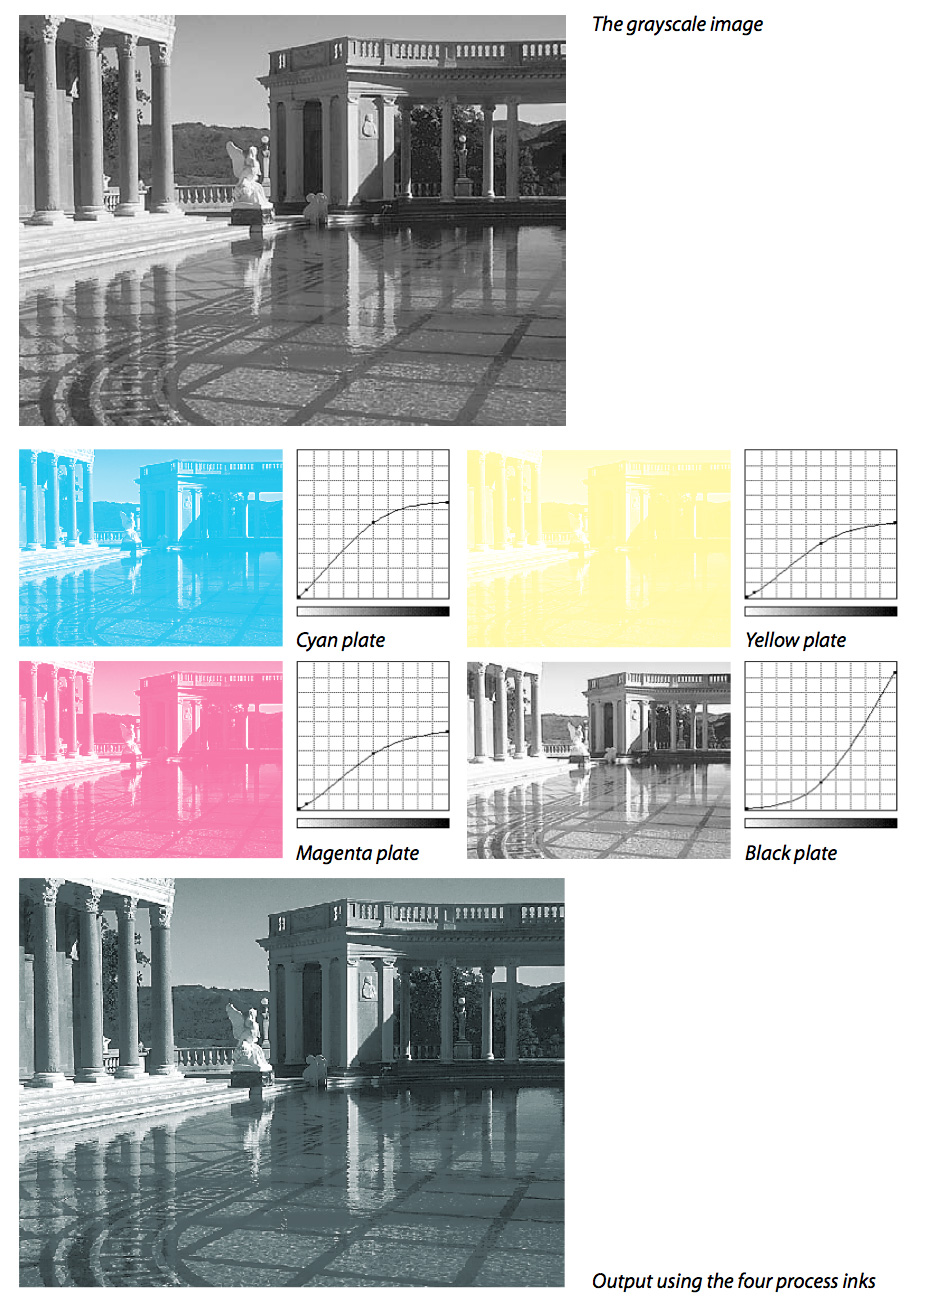
On the other hand, if you’re creating multitones in CMYK mode, you may be changing the image data in each channel, so you want to minimize the number of adjustments you make to avoid image degradation (or use adjustment layers). Working in CMYK mode, however, gives you the chance to actually see (interactively) how your curves are affecting the image data. And you can use features like the white-and-black-point clipping display in Levels to make decisions about your curves. This can be very helpful, especially when making small tweaks to the curves (see Figure 1).

Figure 1: Grayscale reproduction with the four process inks
Screen representation. Photoshop knows how to represent most spot colors reasonably well on screen when you’re in Duotone mode. However, if you’re creating spot-color multitones rather than process-color multitones in CMYK mode, you may have to ignore the colors you see on the screen (which are RGB representations of CMYK colors).
Converting Grayscale Images to Color
Because a multitone image typically represents a grayscale image using color, you generally begin with a grayscale image. In this article we’re discussing using CMYK to create duotones, so you’ll want to switch your image from Grayscale mode to CMYK mode. You can use two methods— simple conversion or copying into a new file.
Simple conversion. You can simply switch your image from grayscale to CMYK using the Mode menu. However, many people seem to think that this simply adds three new channels (cyan, magenta, and yellow), and leaves all the grayscale information in the black channel. Not so.
Photoshop uses the color settings preferences to convert neutral grays into colors. The amount of black generation (based on the profile or Custom CMYK setting you’ve selected in Color Settings for CMYK) determines what appears in the Black channel.
You can use Custom CMYK as an equivalent to creating a quadtone using the Duotone dialog. We rarely use this method; it’s clunky and just about impossible to make adjustments to each plate after the conversion. Plus, Photoshop separation curves are not designed to expand the tonal range of a grayscale image, so you’re losing the opportunity to enhance your image.
Nonetheless, if you do use this method, we strongly suggest you set Black Generation to Heavy in the Custom CMYK dialog first (see Figure 2). That way, the black channel contains more information, and small anomalies on press won’t result in large color shifts.

Figure 2: Heavy Black Generation in the Custom CMYK dialog box
The multichannel step. A second, more reasonable, way to convert your grayscale image into CMYK form is to convert the file to a Multichannel document first.
1. Duplicate your image (select Image > Duplicate).
2. Select Image > Mode > Multichannel. Notice that the Grayscale channel in the Channels palette has changed to “Black.”
3. Duplicate the Black channel three times by dragging it on top of the New Channel button in the Channels palette. You should end up with four identical channels.
4. Finally, select Image > Mode > CMYK. Photoshop assigns each channel to one of the colors (the first channel becomes cyan, the second channel is magenta, and so on).
Now it’s time to start adjusting curves for each of the channels. This is a tricky proposition because, you typically don’t want to make tonal adjustments to a channel more than once or twice. You can work around this by using a Curves adjustment layer to tune the curves, and then flattening the image when the curves are the way you want them (see Figure 3).

Figure 3: Creating a tritone with an adjustment layer
This article was last modified on July 12, 2013
This article was first published on July 12, 2013
Commenting is easier and faster when you're logged in!
Recommended for you

Photoshop How-To: Adding Bleeds and Crop Marks
One question that I receive on a fairly regular basis, is how to add bleed to an...

The Creative Commons and the Power of Open
If you’ve ever read Wikipedia or watched a TEDtalk video, you’ve benefited...

Using the Select Subject Feature in Photoshop
Any experienced Photoshop artist knows that most of the grunt work involved in c...


