

A few years ago I was asked by a British newspaper if I could take a dozen celebrities and cut their hair off, to show what they looked like bald. It was a rush job – could I do it in an hour? I explained patiently that when you erase someone’s hair in Photoshop they aren’t bald underneath, a fact that seemed to have escaped the paper’s editor.
So here’s how it’s done.
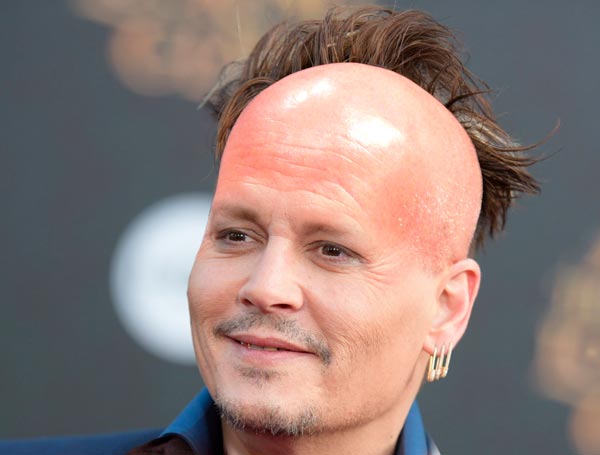
Step 1: Choose your victim
This is a technique that works with anyone with visible ears. If they have really long hair, you’re going to have to find some ears as well. We’ll use this photograph of Johnny Depp, an actor known for his glorious locks. The image is by Jonas 528 on Wikimedia Commons, and you can download it here.

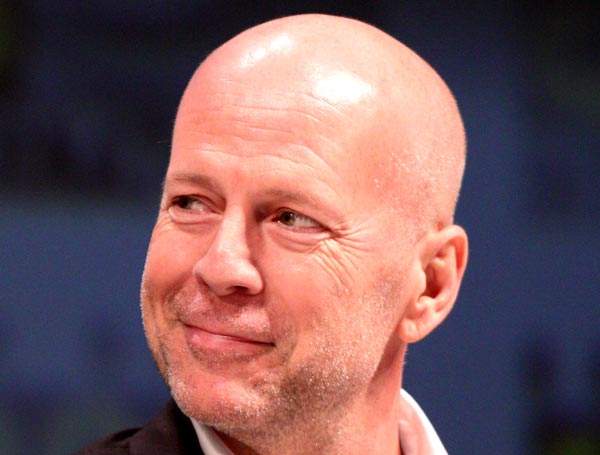
Step 2: Find a bald head
It’s important to choose a head that’s been photographed from, as close as possible, the same angle. I chose the head of noted shaven-headed actor Bruce Willis, by Gage Skidmore on Wikimedia Commons (which you can download here).
.jpg)
Step 3: Align the head
Start by using Select > Subject to separate Willis’s head from his background, and copy the selection to a new layer. To make the head fit, reduce the opacity of the new layer to around 50%, then use Free Transform to rotate and scale it to the correct alignment.

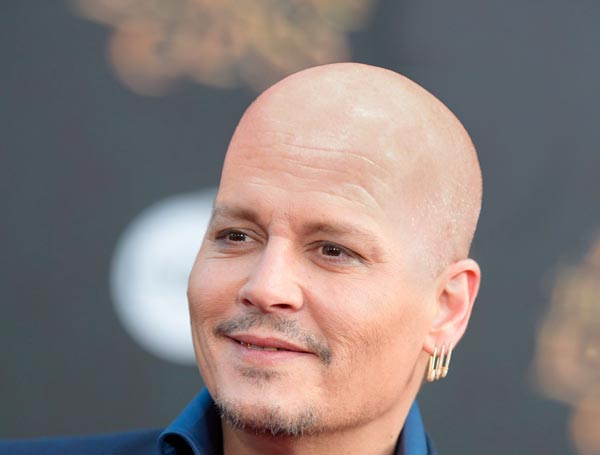
Step 4: Mask the face
Once you’ve got the head in the right position, apply the transformation and bring the layer back to full opacity. Make a new, empty Layer Mask for the layer, and use a large soft-edged brush to paint out Willis’s face so that only the bald head remains visible.
Step 5: Adjust the color
It’s unlikely that the new head will match the original skin tone, and you can use a variety of techniques to adapt it. It’s easiest to start with the Hue/Saturation dialog: here, I’ve reduced the Saturation significantly, and increased the Hue amount a little to make it match Depp’s face.

Step 6: After adjusting the color
Here’s how the composite looks after fixing then color. It’s not quite there yet, but it is very close.

Step 7: A little distortion
The new head is a close fit for the head beneath, but it’s not perfect – it’s looking slightly to the left. To fix this, use Free Transform and go into Image Warp mode by clicking the button on the Options Bar. If you’re using Photoshop CC, you can hold Option or Alt and to add a new vertical anchor, and then drag this to the right for a better fit.

Step 8: Patch the background
You could replace the background entirely, but it’s often more convincing to patch it with texture sampled from around the image. Make a new layer above the original image, and use the Clone tool set to Current & Below to clone background areas over the original hair.

Step 9: Tidy up
A little more work is needed to make the effect realistic. I’ve used the Spot Healing Brush Tool to cover up those bright highlights, which were a little too strong; and I used the Dodge tool to brighten the dark areas where the new hair didn’t blend well enough in with the original head.
This article was last modified on June 12, 2020
This article was first published on May 4, 2020
Commenting is easier and faster when you're logged in!

Recommended for you

FourMatch, the lie detector for photos
Back in June, I wrote a story on a new company that was developing software for...

Free Photoshop and Lightroom Webinar
As part of their ongoing Create Now: Ask A Pro webinar series, Adobe is offering...

Scanning Around with Gene: Getting That New Bike Down the Chimney
Vintage images and memories from when a shiny new bike was the ultimate Christma...