

InDesign’s Gradient feature has bothered me for over a long time and I finally figured out part of the problem!
I don’t make a lot of radial gradients (or blends or vignettes or whatever you want to call them)—you know, oval or circular blends. But when I do, I’m often stymied by getting them right.
I actually wrote about making and adjusting radial gradients here. But something never seemed right about making radial gradients. I thought maybe it was me, that I was just not making them right. But today I realized that it’s not me. It’s InDesign. The way InDesign makes radial gradients is fundamentally broken, and has been for over a decade… maybe since InDesign 1.0.
The problem comes down to the shape of your object when you first apply the radial gradient:
- If the object is square or wider than it is tall, then the radial gradient is circular. That is good.
- If the object is a little bit taller than it is wide, then the radial gradient is oblong. That is weird.
- Also, if you apply the radial gradient when it is wider than it is tall, and then resize the frame to be taller than it is wide the circular gradient becomes oval. That is also weird.
- If the object is a lot taller than it is wide, then the radial gradient is washed out, looks like crud, and makes you want to bang your head on the desk. That is really bad.
If this is not a bug, then it was designed by sadists.
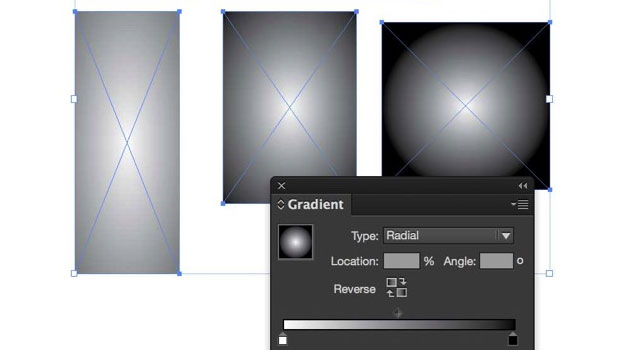
Here are some examples to illustrate the problem:

I selected all four of frames above and applied the same radial gradient in the Gradient panel at the same time. In my humble opinion, all four gradients should look exactly the same, but they obviously don’t. Not even close.
[Okay, here’s my crackpot theory: The “squishity” of the oval (that’s the technical term, I think… some people call it eccentricity) is linked to the slope of the hypotenuse of the frame… so a slope over 1 equals a higher squishity value.]
Meanwhile, you can try to use the Gradient Swatch tool to adjust the gradient in the frame, but if the radial is already squished then it’s too late. You can’t even create a square or wide frame, apply the gradient, and then resize it. The only solutions (if you want a circular blend in a tall frame) appear to be the following:
- Make a wide frame, apply the gradient, and then rotate it!

- Make both a wide frame and a tall frame, apply the gradient to the wide frame, cut and paste the wide frame into the tall frame, then fill the tall frame with the color used in the outside of the radial gradient. Adjust the inner frame to reposition or resize the gradient.

- Make the tall frame part of a compound path that is at least as wide than it is tall, and hide the other part of the compound path with other elements in your layout or put it out on the pasteboard. Sure, it’s crazy, but so are InDesign’s radial gradients.

This article was last modified on March 12, 2021
This article was first published on May 11, 2015
Commenting is easier and faster when you're logged in!

Recommended for you


How to Share Illustrator Swatch Groups
Learn how to use Illustrator’s brand-new Swatch Info feature and how to add swat...

Tip of the Week: Quick New Color Swatches
This tip was sent to Tip of the Week email subscribers on August 14, 2014. Sign...