
Using Find/Change Case in InDesign
Learn how to use Find/Change to modify the case of text in InDesign


This article appears in Issue 36 of CreativePro Magazine.
InDesign 19.5, released in July 2024, introduced an interesting feature in the Find/Change dialog box that allows you to actually change the case of your found text.
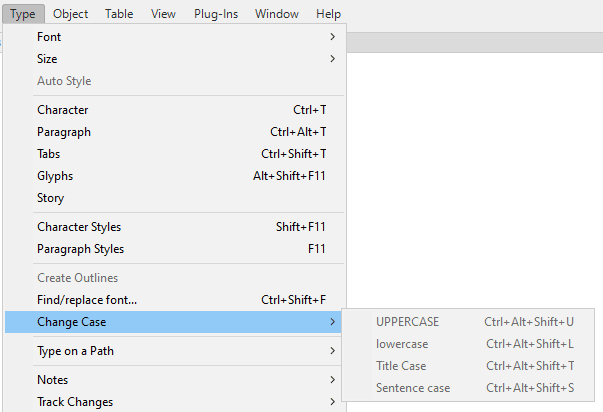
InDesign’s Change Case feature is nothing new—the command has always been in the Type menu (Figure 1), and you can use Find/Change to apply it to results from the Basic Character Formats offerings.
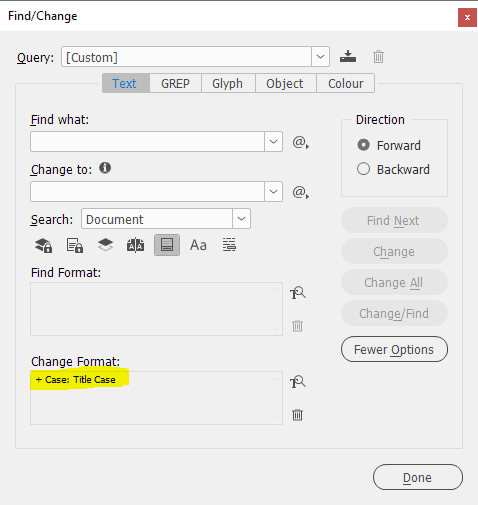
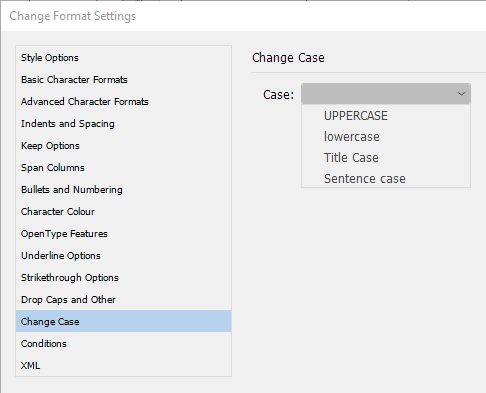
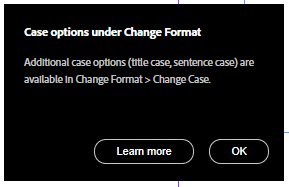
But a new version of the feature—known as case folding—is now available in the Find/Change dialog box, in a new Change Format section of the Change Format Settings dialog box in both the Text and the GREP tabs (Figures 2 and 3). When you first fire up the updated InDesign and open the Find/Change window (which defaults to the Text tab), you’ll be notified of the addition (Figure 4).
In the Basic Character Formats, when you apply small caps to some text, for example, the appearance of the text changes but the underlying text does not change. The same goes for all caps, italics, etc. You can see all that in the story editor.
By contrast, with the new Change Case offerings, the characters are replaced—from upper to lower case or the other way round. Upper case is truly upper case.
Adding the Change Case feature to the Change Format offerings is misleading, of course, because no format is applied—the underlying glyphs are changed. But we can understand why the Adobe engineers added it to the Change Case panel because—well, where else would they put it?
The Text Tab
In the Text tab you can use Change Case to apply, for example, upper case to acronyms or initialisms that appear in lowercase with an initial cap. So to change all occurrences of Nato to NATO, enter Nato in the Find What field, apply UPPERCASE in the Case field in the Change Case section of Change Format Settings, and click Change All.
Another usage would be to apply title case or sentence case to chapter and section titles. Leave the Find what and Change to fields empty, apply a paragraph style in the Find format panel, and set Title Case in the Change Case section of Change Format Settings.
However, in the Text tab it’s not possible to exclude certain words (a, an, the, etc.). This is a common problem that comes up in various user forums from time to time. To exclude these parts of speech that are customarily omitted from title case, people often suggest complicated GREP expressions or scripts (which aren’t entirely straightforward, either) as fixes.
In the GREP tab, on the other hand, title-casing titles is pretty straightforward.
Unsurprisingly, Change Case in the GREP tab is much more powerful. Change Case is available as an option in the Change Format area, and it works as it does in the Text tab.
But Change Format is much more useful in the GREP tab because you can target specific patterns of text. For example, a GREP query that will win many hearts is to apply intelligent title casing.
The problem with applying title case to content is that it’s an all-or-nothing feature: You can’t exclude certain words. Several scripts exist to deal with that. They all rely on a file that lists words to be excluded, or those words are hard-coded in the script.
But you can formulate a GREP expression that excludes words. The simplest form is the following, a simplified version of the expression posted by Jean-Claude Tremblay in Adobe’s InDesign forum:
(?!(the|and|a|an|but|by|for|in|or|nor|for|with))\w+This expression says “match all words that are not the, and, etc.”
Note: Jean-Claude’s version made use of more GREP features in order to make the expression more compact:
(?!(at?|and?|but|by|for|in|nor|o[fnr]|the|to|up|with))\w+where at? stands for ‘a’ or ‘at’, and o[fnr] for ‘o’ followed by ‘f’, ‘n’, or ‘r’, capturing of, on, and or. For clarity I use the simplified form here.
So to change case in all instances of the Heading 1 paragraph style, use the query as shown in Figure 5.

Depending on the case of the original titles, you may still need another query to capitalize the first word of a subtitle, which typically follows a colon and the first word after an opening quote. The first word after a colon can be capitalized across the board, words following an opening quote are better restricted to the same words used for the exclusion.
Find what: (:|[~[~{])\K(the|and|a|an|but|by|for|in|or|nor|for|with)
Change format: <Title Case>
On top of that, you will need a separate query for each part/chapter/section-heading style. That could run into half a dozen queries or so, but you can run those queries in one go using a query running script.
Fine-Grained Case Change
The Change Case format targets all the text matched by the GREP expression in the Find what field. However, as with any kind of formatting you can use lookbehind and/or lookahead to single out some part of whatever the GREP expression matches. This makes Change Case very flexible.
Further Refinements
Another new feature in the GREP tab is Case Modifiers, a new menu of four wildcards that can be used in the Change To field.
The wildcards are accessed and entered in the familiar way: Click the @ menu at the right of the Change to field and select Case Modifiers.
You’ll see the four modifiers:
First letter to lower case ()
All letters to lower case (\L)
First letter to upper case (\u)
All letters to upper case (\U)
What is not immediately clear, however, is that these wildcards must be used together with a captured group. To illustrate this we’ll do a query to apply title case to some words (replicating Title Case in the Change format panel).
Find what: (\w)(\w+)
Change to: \u$1\L$2
Which reads: “Apply upper case to the first character (\u) of the first referent ($1), and lower case to all characters (\L) of the second referent ($2).” (In fact, because the first referent is always a single character you could use \U instead of \u.)
You might think, Why bother with those wildcards if the “Change Case” format does such a good job? Well, that’s a good question, one with which my colleagues and eminent GREP experts Jean-Claude Tremblay and Laurent Tournier struggle as much as I do.
Some things are possible with the case modifiers which cannot be done with the Change Case format. They might not be particularly useful, but they do give us an idea of how to use the feature.
Example: Here’s how you can insert a lowercase letter after each uppercase one, e.g., ABCDE to AaBbCcDdEe:
Find what: (.)
Change to: $1\L$1 ( can be used instead of \L)
Example: Here’s how you can apply a different type of alternating case, e.g.: tHe WiND In ThE WiLlOwS:
Find what: (.)(.)
Change to: $1$2
Takeaways
The addition of the Change Case item to the Change Format Settings in Find/Change to apply to any text is very useful, especially in the GREP tab. But the new category Case Modifiers is still looking for real usage cases.
Commenting is easier and faster when you're logged in!

Recommended for you

InDesign How-to Video: Use the Find/Change Search Icons
In this week’s InDesignSecrets video, Erica Gamet explains what the icons in the...
Formatting in a Flash
How do you take 50 unstyled, manually formatted Word files and turn them into a...

Indexing Case Sensitive Words
Indexing is a painful word, close to root canal in my opinion. I have been lucky...