
Early in my career, I developed strong opinions about keeping 1-up business cards with live text separate from the imposed business cards. I prefer to have one file containing the live 1-up layout, and a second file containing the imposed PDFs of the business card (usually either 8-up or 10-up). The reason for this is because if I need to change something on the card (for example, a phone number or email address) I just want to do it once. Not 10 times.
But perhaps you’re thinking, “You can use Find/Change and still just change the phone number once and all 10 cards will be updated.” True. But what if the client wants an image or text frame scooted just a little bit? Or perhaps they want to change the font and I have to resize the text frame to accommodate it? For these changes, the Find/Change dialog box does me no good. I don’t want to have to reimpose my business cards every time the client decides to move something.
But I have finally found a solution whereby I can keep my 1-up and my 10-up cards in the same document and still retain the ability to make edits once and have them update in the 10-up imposition. This technique only works in CS6.
Years ago when I worked at a small print shop, we would manually impose business cards 10-up onto a letter sized page, for easy printing using standard sized paper. For that reason, this example uses an standard sheet size of 8.5″ x 11″.
There are four main tasks in this project:
- Setting up the pages in the document
- Creating the 10-up layout with crop marks
- Preparing the 1-up design for Placing and Linking
- Placing and Linking your 1-up design into the imposition template
Setting up the pages in the document
1. The first step in the process is to create a document with two pages
- one page 3.5″ x 2″ for the 1-up business card layout
- a second page 8.5″ x 11″ which will contain the imposed files.

I won’t go into detail about how to make a document with two different sized pages, because there is already an excellent article here.
Creating the 10-up layout with crop marks
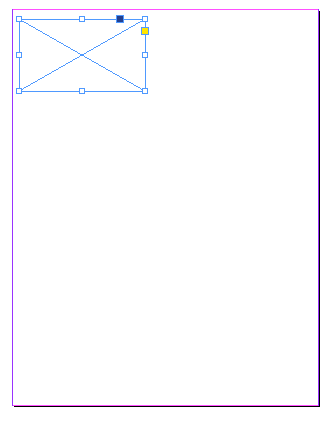
2. Once your document is set up with two different sized pages (page 1 will be your 1-up design, and page 2 will become the imposition template), go to page 2 of your document (which is where the imposition will be) and create an empty graphic frame 3.5 x 2″, with no fill and no stroke. Position it near the top left of your page.
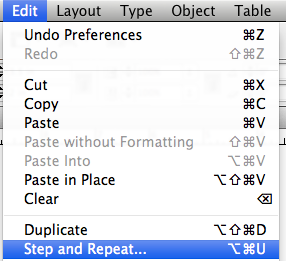
3. Now go to Edit > Step and Repeat.
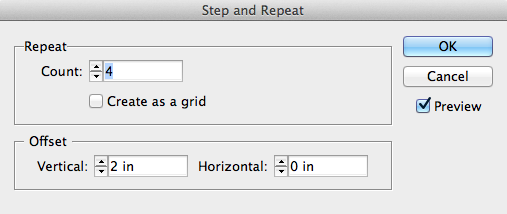
4. Next, create a grid 5 rows by 2 columns, with a vertical offset of 2 inches and a horizontal offset of 5 inches.

5. Now, group all the frames and align them to the center of the page.

6. Next, add crop marks. Open the scripts panel (Window > Utilities > Scripts). If you’ve never used scripts before, I encourage you to spend some time perusing this panel. InDesign comes with all sorts of nifty scripts. Most of them are pretty useful, and all of them can be used as starting points for writing your own scripts. We’ll be using the Crop Marks script.

With the entire group of frames still selected, double click the crop marks script. Below are the settings I use. You can change these up to your liking. But these are how I like my crop marks set up. By offsetting the crop marks, this ensures that they will be outside of the image area.
Side Note: (If you are using this script on multiple objects all abutting each other, be sure to select the “Entire Selection” option so the crop marks don’t cover up your artwork. In this case, all our frames are grouped, so they act as one object.)

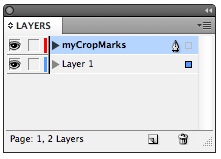
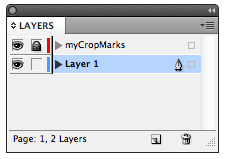
This script will automatically put the crop marks on their own layer. So if you don’t like they way they turned out, just drag the myCropMarks layer to the trash and try again.
7. Next, we’ll manually add the crop marks that will divide the rows of cards. Select the top left and top right horizontal crop marks. Go again to Edit > Step and Repeat and use these settings. This will add crop marks along the side of the business card.

8. Now, select the top left and bottom left vertical crop marks. Go again to Edit > Step and Repeat and use these settings. This will add the crop marks that divide the two columns of cards.


9. Now, lock the mycropMarks layer so you don’t accidentally move the crop marks. Alternatively, you could cut all these crop marks and paste them in place on a master page for extra security. That way, they’ll be easy to reuse if you have more than one page of business cards to impose.
At this point, the imposition is prepared and ready for some business card artwork. Since the frames we made were just placeholder frames to help us get the crop marks in the correct spot, we’ll now delete them.
Preparing the 1-up Design for Placing and Linking
This next step assumes that have already designed your 1-up business card.
10. Go back to your 1-up design on page 1. Select all the items and group them.

11. Now, make a no fill, no stroke frame 3.5″ x 2″ and position it in the top left of the page. Since the page is also 3.5 x 2″, it frame should be perfectly centered within the page.
12. Now cut the grouped 1-up design and paste it into the empty frame you just made.
Placing and Linking your 1-up design into the imposition template you made
13. Next click on the large frame and go to Edit > Place and Link. This command sort of serves as a combination of the Content Collector Tool and Content Placer Tool. If you’d like a little more info on these tools, check out this article and this video.
To be truthful, I initially hated the Content Collector Tool. I found that after I upgraded to CS6, every time I accidentally pressed the letter B (which apparently I do with great regularity), this giant, annoying gray box would take up a lion’s share of my screen space. But since I now found a use for the Content Placer in a print workflow, it doesn’t bother me so much.
14. Now that you have your 1-up business card loaded on your cursor, go to page 2 and click in the top left, lining up the card with the crop marks you made earlier.
15. Step and Repeat us the 1-up business card, using these settings:

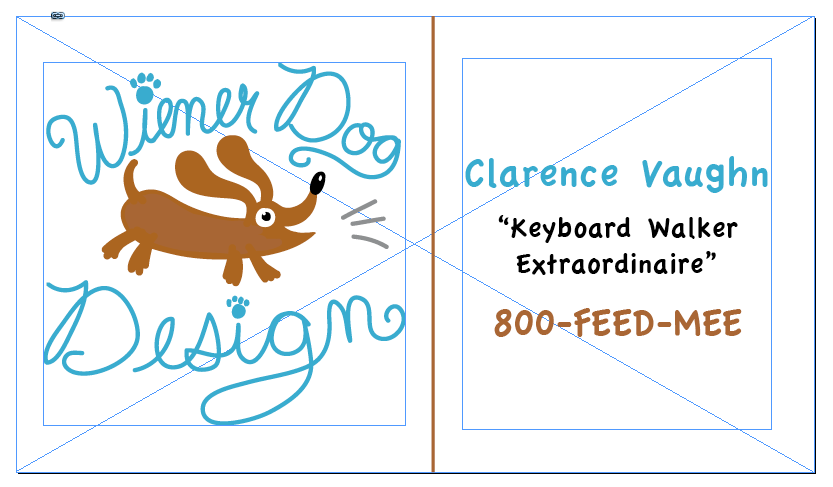
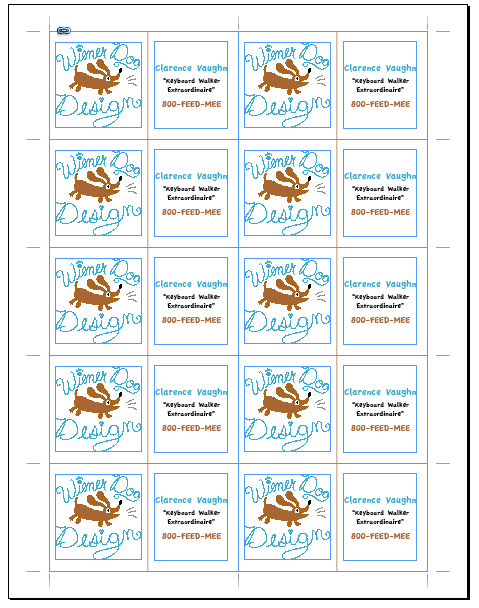
Your imposed cards will now look like this.
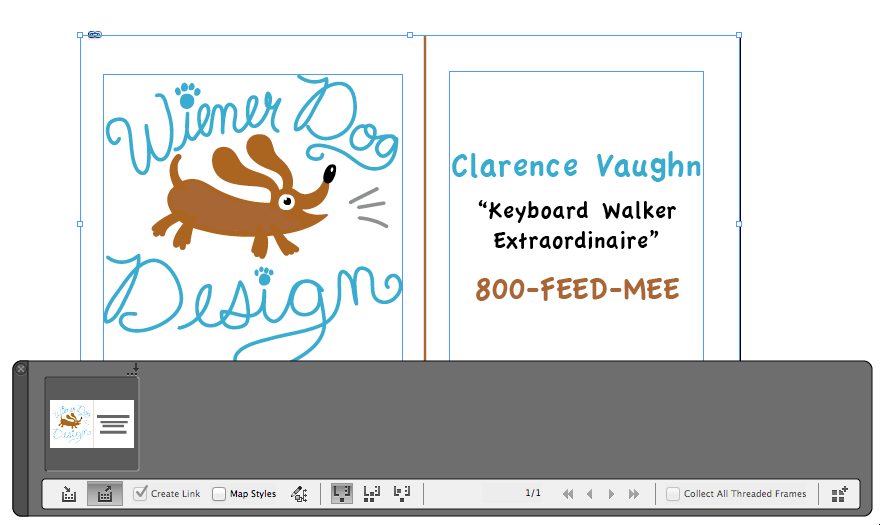
16. Now, let’s say that the client requests a change to their business card design. No problem. Just go back to page 1 and make your changes. In this case, there were two text changes: a name change and a title change.

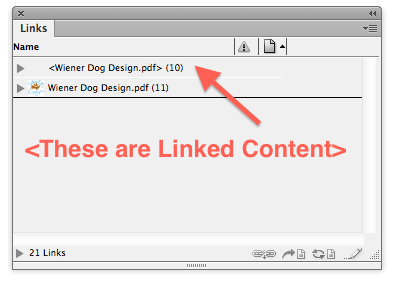
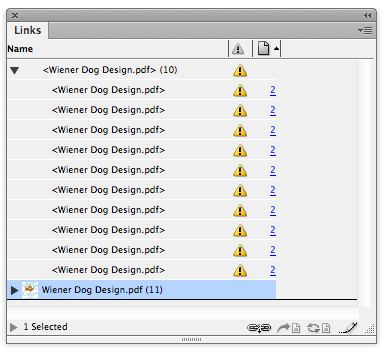
Notice below in the Links panel that it doesn’t recognize that anything has changed. That’s because the text that changed is part of a group within the graphic frame. Unfortunately, we need to somehow modify the text frame itself a bit in order to get the Linked Content to recognize that something has changed. (Note, this doesn’t hold true for independent text frames that have been placed and linked. This is just a weird instance where a text frame has been placed into a graphic frame, and that somehow causes an issue with updating the linked content.)
17. An easy way to get around this is to increase the size of the frame just a bit and then decrease it right back to the size that it was before. Somehow, that tricks InDesign into recognizing that the Linked Content has changed.
18. Now, click on the Update Link button to update the links. Finally, go to page 2 and take a look. All 10 business cards have been updated to reflect the change.

So what’s so magical about all that? It was kind of a lot of work just for a business card imposition. But wait, there’s more!
19. Go back to page 1. Delete the content of the frame (which is the entire business card design), leaving just the outer frame itself. Now, place some other content into the frame. See how InDesign gives you a status notification of the outdated links?

20. With one click on the Relink button in the Links panel, all 10 cards on page 2 are updated! It’s a magical self-imposing business card. This trick allows me have both my 1-up and my 10-up cards in the same file, and I don’t have to manually reimpose them every time something changes in the design. The thing I like most about this technique is that I can completely change the content of the 1-up design and replace it entirely with different content, and the 10-up file updates accordingly.

This article was last modified on December 30, 2021
This article was first published on January 17, 2013
Commenting is easier and faster when you're logged in!

Recommended for you

Linking & Syncing Content in InDesign
When you need to use a piece of content in different formats and places in InDes...

InDesign 101: Placing Images
Click? Drag? Move? Crop? There’s a wealth of options for what to do when an imag...

Printing Documents 2-Up (or n-up) on a Page in InDesign
There are no good ways to do n-up printing in InDesign, but there some excellent...