
I confess, I was never a big PageMaker fan. Compared to QuarkXPress, certain PageMaker features — single master pages, awkward drop caps, and window-shade text controls — seemed crude. But I found myself being forced to use it for a variety of reasons. Back around 1990, I taught PageMaker classes at several private computer schools as well as at New School University in New York City. Then around 1995, I wrote a step-by-step book about PageMaker for IDG. Sadly the publication was cancelled just before printing due to low interest in PageMaker. Throughout the ’90s, I used QuarkXPress for all my print work, but I switched to PageMaker to lay out “The Non-Designer’s Scan and Print Book.” I did because my co-author – Robin Williams — steadfastly refused to ever use QuarkXPress.
The No-Quark Option
As market share for QuarkXPress grew, PageMaker users dwindled down to a fervent, dedicated minority. They’d give up PageMaker only when pried from their cold, dead hands. So I was a bit surprised to learn that many of the first InDesign users had indeed moved over from PageMaker. Nearly half of the students in my first InDesign classes were ex-PageMaker users — a much higher percentage of converts than in the desktop publishing market overall. These early adopters correctly saw that there wasn’t much of a future for PageMaker, and they must have decided that sticking with an Adobe product was preferable to switching to QuarkXPress. (My co-author on the Non-Designer’s book was one of these early converts.)
Those of us who watch this industry closely saw the writing on the wall for PageMaker, too, especially after seeing so many PageMaker users jump ship. Then there was the business reality. After all, why would Adobe continue to support three separate page layout applications? FrameMaker serves a different audience, but InDesign and PageMaker were set on a collision course, and the money was on InDesign to win.
Finally, Adobe pulled the plug on PageMaker development, but the product lives on in the form of a PageMaker Plug-in Pack for InDesign — now bundled together as InDesign CS PageMaker Edition. Why bother? you might ask. Isn’t InDesign the more robust program? Yes, but PageMaker actually has features that InDesign doesn’t. Plus, the Plug-in Pack includes tools and resources that help make InDesign more familiar to former PageMaker users, especially business users. As a result, Adobe has made it even easier for the last of the survivors clinging to the good ship PageMaker to move over to InDesign. Most of the features are of little interest to former QuarkXPress users, but there are a few gems that make this package extremely attractive to all creative professionals.
The PageMaker Plug-in Pack
The complete package is an eclectic mix of features, enhancements, resources, and training videos. It adds the following features to InDesign:
- A Position tool, which lets you place, crop, resize, and move images within a frame using a single tool (see Figure 1). In PageMaker this tool was important as it was the only way to accomplish these tasks. In InDesign the tool seems a bit superfluous as all those functions exist in the Selection and Direct Selection tools. The position tool does offer an important benefit to all InDesign users, however. Instead of using the Direct Selection tool, which can change the position of points in a frame, the Position tool lets you move graphics without altering the points.
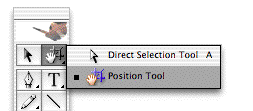
Figure 1: This Position tool combines some of the features of the Selection tool (black arrow) and the Direct Selection tool (white arrow).
- A Build booklet feature which uses a special edition (SE) of the InBooklet plug-in from A Lowly Apprentice Production (alap). This is an exceptionally powerful product that makes it very easy to create printer spreads from within InDesign(see Figure 2). (Printer spreads are pages that are arranged in the order that they appear in the physical pages of a book. For instance, page one of a printer spread is positioned to the right of the last page of a booklet.)InBooklet SE lets you impose pages both as saddle-stitched or as perfect-bound publications. It also provides control over margins, gaps, bleeds, creep, and crossover trapping. This is much more control than PageMaker’s primitive booklet feature which relied on a kludge of combining artwork onto oversized pages. The InBooklet SE plug-in is a terrific way to impose pages for in-house printing.If you need even more control, you should consider the full version of the plug-in from alap, which adds support for multiple documents in InDesign’s book feature and booklet styles.
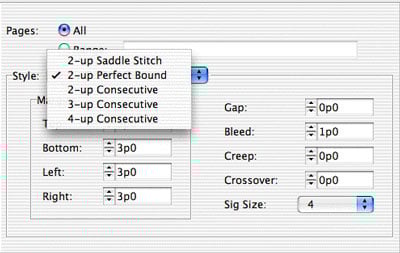
Figure 2: The InBooklet SE dialog box has an impressive set of controls for imposing pages into printer spreads.
- A Data Merge feature which lets you import database information merged into your InDesign layouts. This is a great feature which makes it easy to create personalize postcards, business cards, letterheads, etc. (see Figure 3). In addition, it allows you to tag image frames so that they automatically fill with individual graphics. Considering that a professional plug-in called InData from Em Software goes for $400, this simple database feature is a great bargain.
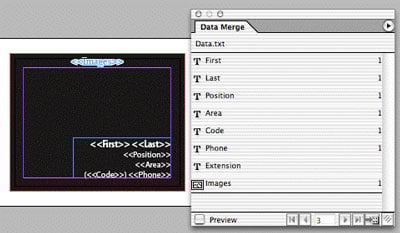
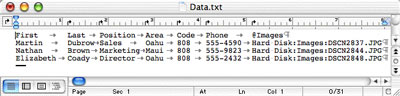
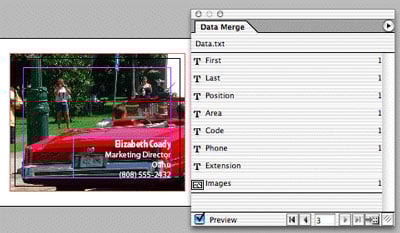
Figure 3: The Data Merge feature lets you set up templates with data fields. (top) These fields are mapped to a tabbed-delimited text file (middle). Finally, the imported data, as well as images, are automatically applied to the layout (bottom).
- A command to apply automatic bullets and numbers to paragraphs (see Figure 4). This is something I desperately want in InDesign. Sadly the feature in the Plug-in Pack is so primitive that I can’t use it at all. The problem is that I can’t insert a non-numbered paragraph in a numbered list and still keep the automatic numbering option. The numbered list restarts when broken by any other paragraph. However, I suspect this feature will be very helpful for many people who need to quickly format and apply numbers and bullets to simple lists.
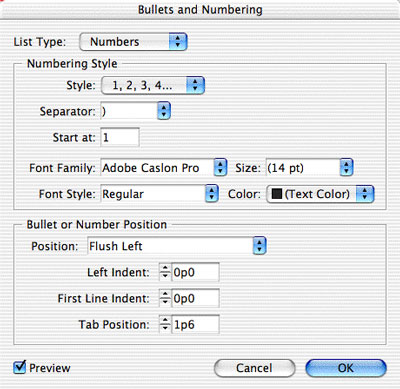
Figure 4: The Bullets and Numbering dialog box has only the most basic features for numbered lists.
Bells and Whistles
One of the more lame features is the PageMaker toolbar, which lets you access commonly used commands through icons on a toolbar. As the Adobe documentation says, this is “similar to those found in Adobe Acrobat and Microsoft Word.” Most of the creative professionals I know would never be caught using such a tool and instead use menus and keyboard shortcuts. However, for the large number of Microsoft-educated semi-creative professionals, this toolbar is a helpful crutch.
The publication converter adds the ability for InDesign CS to open PageMaker 6.0 documents. Without the Plug-in Pack, InDesign can only open PageMaker 6.5 and 7.0 documents. This gives PageMaker users who were working with 6.0 an upgrade path that regular InDesign CS does not.
Adobe also adds a set of PageMaker keyboard shortcuts to make it easier to remember your favorite shortcut. For instance, instead of the shortcut Cmd/Ctrl-M to open the Paragraph palette, the PageMaker shortcuts change it to Cmd/Ctrl-Opt/Alt-T. This is the sort of nuance that makes it easier to move from one program to another.
The Plug-in pack also includes Professionally designed templates described as “high-quality templates created especially for InDesign CS PageMaker Edition by leading designers.” While many of my creative professional friends sniff at anything remotely close to pre-packaged art, I have no such feelings. I really enjoy working and modifying the templates and clip art that shipped with Illustrator CS. So I was very interested in these PageMaker templates for projects such as labels, CD and DVD covers, newsletters, brochures, letterheads, business cards, and much more.
Unfortunately, while the template designs are excellent, the production values are not. All templates with images use RGB graphics saved as a JPEG at 72 ppi — hardly a proper image for professional output. Worse, some of the images have been scaled up so that the effective resolution is as little as 50 ppi! While I agree that most users will want to substitute their own images, these materials do a terrible job of educating users as to best practices for page layout.
However, for anyone working with templates, the template browser is a terrific feature that makes it easy to manage templates from one central location. This browser also lets you view thumbnails and perform searches based on metadata, including keywords, in each template (see Figure 5). I wish the Illustrator CS team had incorporated such a browser for its template files.
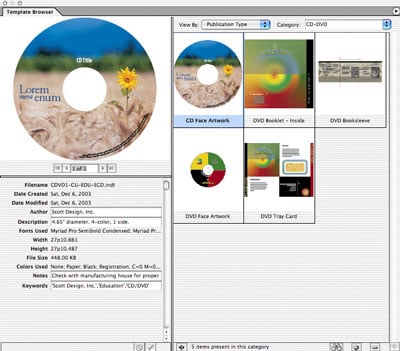
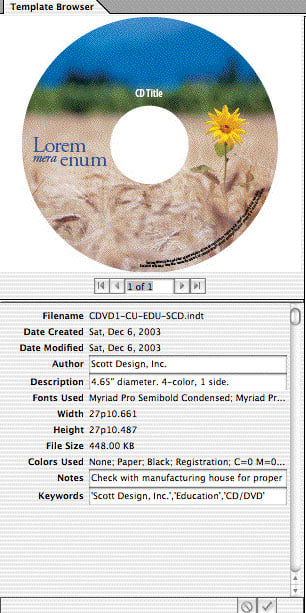
Figure 5: The Template Browser is an excellent way to organize and work with templates (detail, bottom).
Finally, Adobe has added special training materials for PageMaker users. This includes an extensive online Help system plus two Total Training Video Workshops (English only) on InDesign CS and migrating from PageMaker to InDesign CS. These are very good but once again, not necessarily something the high-end creative professional would need.
Special Upgrade Pricing
Adobe has also made it very easy for PageMaker users to switch to InDesign with a special upgrade price of $349 for InDesign CS with the PageMaker Plug-in Pack. However, anyone who buys the Adobe Creative Suite will get the PageMaker Plug-in Pack as part of the deal. (If you already own the Creative Suite, call Adobe Customer Service and ask them to send you the Plug-in Pack. It’s a freebie for all registered owners of the Creative Suite.)
Finally, what if you already have InDesign CS, and want the PageMaker plug-ins? Adobe will sell you the Plug-in Pack, on its own, for just $50. This is an incredible deal — the Data Merge feature alone is worth it!
Read more by Sandee Cohen.
This article was last modified on March 10, 2025
This article was first published on April 13, 2004
Commenting is easier and faster when you're logged in!

Recommended for you

dot-font: Finding Fonts
dot-font was a collection of short articles written by editor and typographer Jo...

Style Groups Good or Potentially Evil?
I just started working with the new CS3 feature of Style Groups. These are littl...

Design How-To: Working with Photos
This story is taken from “Before & After” Magazine. Creativepro....