Out of Gamut: (Almost) Everything You Wanted to Know about Sharpening in Photoshop but Were Afraid to Ask
Figure 3 shows the “wrong” sharpening applied to each image. The head shot has crunchy skin tones, and the cityscape looks out of focus. The culprit in both cases is the radius setting, which is now smaller than it should be in the case of the Figure 3a, and larger than optimal in Figure 3b.
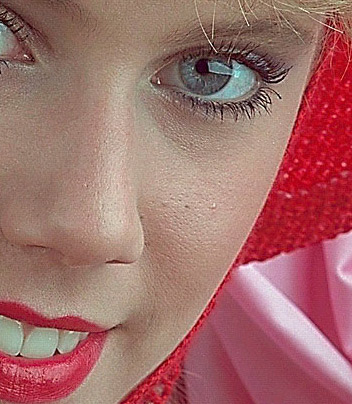
Figure 3a: Inappropriately sharpened, resulting in harsh skin tones
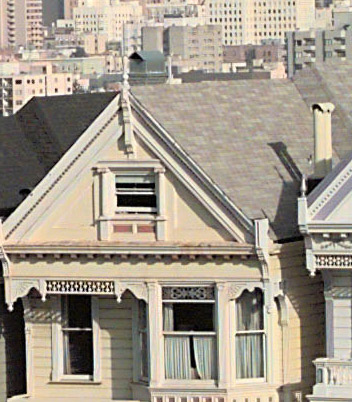
Figure 3b: An overly large Radius setting causes this detailed image to look out of focus.
Sharpening in Lab
A good many users like to convert the image to Lab (CIELAB), then sharpen only the Lightness channel. The idea here is to avoid unwanted color shifts. Frankly, I don’t often run into color shifts caused by the Unsharp Mask filter, but in those rare cases when I do, I prefer a simpler, faster, and less-destructive method than converting to Lab: Run the Unsharp Mask filter, then immediately go to Fade Unsharp Mask on the Edit menu and set the blending mode to Luminosity. This produces a result that’s visually identical to the convert to Lab, sharpen Lightness method, and it’s less destructive to 8-bit-per-channel images, because it avoids the quantization error you always get when you convert 8-bit channels to Lab.
Layer-Based Sharpening
The Unsharp Mask filter is a powerful tool, but it has two inherent disadvantages. First, Unsharp Mask sharpens everything, including noise. The filter works by evaluating pixel differences, and it doesn’t really know whether a pixel transition represents an edge that needs sharpening, a piece of dust, a scratch, a noise pixel, film grain, or any one of a number of other elements that one typically wouldn’t care to sharpen.
The other drawback: Unsharp Mask is a destructive edit, meaning that the edits are burned directly into the image data. You can use the History feature to go back and start over, but you can’t modify the sharpening once it’s been applied.
Layer-based sharpening addresses both issues. The sharpening is applied by an editable layer, without affecting the base image. Here’s a simple but very powerful technique for applying sharpening through a layer.
Start by duplicating the background layer, and set the blending mode for the duplicated layer to Soft Light (for a gentle sharpening) or Hard Light (for a stronger sharpening). Figure 4 shows the base image, and the image with a duplicate layer set to Soft Light.
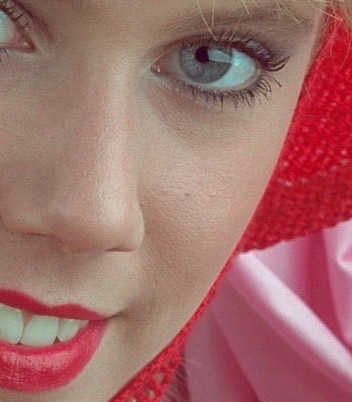
Figure 4a: Unsharpened
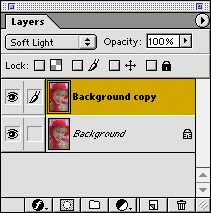
Figure 4b: Set the blending mode for the duplicated layer.
Figure 4c: The duplicate layer with a Soft Light blending mode chosen
At this point, all I’ve done is increase the contrast by adding the Soft Light layer. Where am I going? Well, sharpness is a local contrast function; Unsharp Mask actually works by increasing the contrast along edges. We achieve essentially the same goal with our sharpening layer by running the High Pass filter on our duplicated layer (it’s on the Other submenu in the Filter menu).
Bruce, How about including a review of Nik Sharpener Pro in this article? Where does it replace Unsharp Mask and where does it complement it? Also, look out for typos and missing .JPGs–there are a few in this piece, e.g, figure 2a is incomplete.
Thanks, lad.
Thanks for the feedback. We have a review of Nik Sharpener Pro in the works: Keep an eye out for it in the coming weeks.
You’ll be glad to know that Bruce Fraser was not responsible for the typos you mentioned. We haven’t found a problem with Figure 2a. If you continue to have problems viewing it, please let us know.
Again, thanks for speaking up.
Mitt Jones
Senior Editor, creativepro.com
Excellent
useful info for me, a comparative novice at photoshop.
Would Bruce or anyone else please tell me why fractional radius values are used, since there is no smaller unit than the pixel and we are told to work at output resolution?
Excellent article! Perhaps the best, plain-English explanations of Radius, Threshold, and Amount I’ve yet to come across. Will highly recommend this article to those trying to decipher the intracacies of image sharpening.
My only criticism is that the High Pass filter should have been defined and explained with equal clarity.
This is information that I am currently using and have a need for.
more-more
Outstanding feature – useful and clear
Usual helpful words from an expert Bruce Fraser.
I especially liked the clear explanation of spot sharpening techniques. This is a tip that I will use again and again.
I wish all “how to” articles were this well written and useful.
I have never quite known what to do with the Unsharp Mask filter and High Pass filter. But now, I know how to use these tools effectively on all or just parts of an image which is extremely helpful.
As a scanning newbie USM was beyond me. This helped enormously. Thanks.
I am sorry to ask what may be a basic question for anyone who knows photoshop but I am a “traditional/Film” photographer who has been moving to digital (with great satisfaction I may ad) and who is learning the “trade”.
In the article Bruce talks of painting the sharpening with a soft-edged brush and I got lost and was hoping that someone may be kind enough to explain.
Otherwise I tried the two pass approach and this is absolutely great combined with unsharpen. I am anxious to try the technique described in “Out of Gamut: (Almost) Everything You Wanted to Know about Sharpening in Photoshop but Were Afraid to Ask”.
Thanks,
JT
This is an excellent essay on image sharpening.
My experience is that sharpening of the full RGB picture can interfere with the colours; this can be avoided by applying the unsharpen filter to the lightness channel only in Lab colour mode. As this requires a lot of mouse clicks I have programmed a function key to switch to Lab mode, select the lightness channel, apply the filter and then revert to RGB mode.
Edwin
Unfortunately, most digital photographers have learned sharpening by fixed rules that specify exact values to use in Photoshop’s filters, and therefore neither understand why professionals use the tools they do, or how they might be using them rightly or wrongly. Portrait and nature photographers have one thing in common: we hate seeing sharpening artifacts on large blocks of color. Any underlying noise in the image tends to bubble up to visible, and skies or skin tones with too much detail in them don’t look as good as gently gradated ones.
I personally found this well written and informative. As a “beginner” digital photographer, I’ll take any advice I can. It’s like that hobby that you feel you know everything about by simply reading the manual, then come to find out that it’s just scratching the tip of the iceberg. Great post, and very well written. I guess I’ll have something this winter after I visit some used car dealership in los angeles.
People know that it’s really important to get know about this good topic. Buy custom essay papers at the research paper writing service just about this topic, because this is really interesting topic.
Your 4-step procedure is simple and elegant, and shows a very solid understanding of your tools.
Like so much in Photoshop, this technique is relatively simple ONCE you understand how to do it. This is a great article, here’s a very helpful technique for the toolbox that would have taken years to eventually discover otherwise.
Thanks for your advice. I also use Photoshop in my work. Which monitor is better to use when working with graphics CRT or TFT? Thank you and respect Roman:buy essay
I love sharpening photos before usage on the web or printing them out, its always good to make sure you don’t ruin gradients though and remember that you want the final product free of compression blocking.
Many Photoshop users have, at some point, tried a multipass sharpening approach. A few have made it work, but the vast majority have wound up creating grossly oversharpened printed images, usually by falling into one or more of potential pitfalls. The good news is that all of these problems are avoidable given sufficient attention, care, and skill. Building a multipass sharpening workflow is not a trivial undertaking, but neither is it impossible otherwise we wouldn’t have bothered writing this site.!
Hi there,
I second the other voices — what a well written piece, brief and pragmatically to the point: what, why, and how — but I also do agree with a couple of other comments, that it would be fantastic if the workings of the High Pass filter were explained with the same clarity. Presume that dwelling into details of blending modes was beyond the scope, although I guess it would be helpful to understand how it comes into play as well (!)
Finally, at the end of his article, Bruce wrote “The third alternative, which we’ll examine next time, is to create a mask, load it as a selection, then apply the Unsharp Mask filter to the selection” — ‘next time’ is a broken hyperlink to https://creativepro.com/article/out-gamut-two-pass-approach-sharpening-photoshop — would anyone know where to find that article?
Cheers,
-Tomasz
Hi Tomasz,
The link to the 3rd method is https://creativepro.com/article/out-gamut-a-two-pass-approach-sharpening-photoshop
Terri Stone
Editor in Chief, CreativePro.com
Much appreciated!
Awesome Photoshop Tutorial, it helps PS fans from your platform i want to share a really good blog that i found few days back while searching on web Photoshop Tutorials for beginners Photoshop step by step Tutorials
Sharpening has the effect of increasing the contrast; it can also have the undesirable affect of causing a color shift along the different edges that are being sharpened. You have explained effectively about LAB sharpening, it is fairly easy to do. You have raised a valid point that many users like to convert the image to LAB and then sharpen only the lightness channel. I also agree that while sharpening images avoiding unwanted color shifts should be a primary concern.
I really hate exaggerated photoshop, but this looks amazing! thanks for share this :D binaere optionen