
Sharing links is a big part of what makes Facebook’s social media world go ‘round. If you’re an active Facebooker, you may take pride in curating a steady stream of entertaining, informative, and thought-provoking articles, blog posts, and videos to share with your audience — in addition to sharing links to your own creative work from time to time.
But it doesn’t just matter what you share on Facebook. How you share those links can add significantly to their impact. After all, when you post links on Facebook, your goal is for your friends and fans to click on them. And since I’m writing this article for an audience of creative professionals, I’m sure I don’t have to point out that presentation matters in pretty much everything we do.
So in this article, I’m going to show you how you can make sure the links you post on Facebook have maximum impact, by optimizing them for the News Feed before you share them. First we’ll look at how you can customize the link preview area that Facebook automatically generates when you post a link — and then I’ll show you how to make sure that any web pages you create yourself look good when they get shared on Facebook, by yourself or by others.
Tip #1: Customize the Link Preview Area to Make It More Inviting
When you post a link on Facebook, Facebook automatically generates a link preview to accompany your post — a display area that shows the title, URL, description, and thumbnail image that accompany the link (assuming all of those elements are available).
In a sense, when you share a link on Facebook, you’re creating a little ad for it. Your job is to make sure that your posting communicates why your audience should click the link you’ve posted. In addition to considering the wording of your own message in the text area, ask yourself if the heading and description in the link preview area do a good job of conveying what’s interesting about the link. If not, you can take a few seconds to tweak them so they sell the link a little better.
But wait, what’s that sound I hear? Possibly it might be a few of you muttering that you had no idea it was even possible to tweak those things.
Which leads me to a trick you’ll find very useful if you don’t already know about it. Even many longtime Facebook users don’t realize that you can edit almost every element in the link preview with a click of the mouse.
Here’s an example. Let’s say I want to share my previous article for CreativePro on my Facebook Timeline. When I first paste the URL of the article in the publishing area, the link preview that Facebook automatically generates looks like this:

Figure 1: Pasting a URL in the text field of the publishing area automatically generates a link preview with a link title, URL, description, and thumbnail image (if one is available).
Notice that in the preview area, below where I’ve pasted in the URL of the article, the preview itself has four elements: 1) the link title, which in this case is the title of the article; 2) just underneath that, the URL that the link points to (in a lighter gray color, and truncated toward the end); 3) just below that, a paragraph of descriptive text for the link; 4) a thumbnail photo to the left of the text (unless there’s no image of the right dimensions available, in which case the image area of the preview will be empty).
Now, watch what happens when I click on the title for the link:
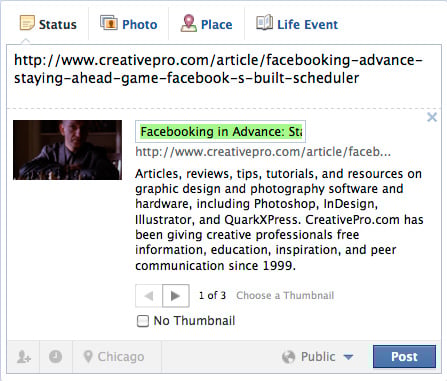
Figure 2: When you click on the title field, it becomes highlighted — which means it’s ready for editing.
In Figure 2, you can see that the title is now highlighted and has turned into an editable field, so I can tweak that if want to.
Why is this useful? Sometimes you might find yourself sharing a link where the link title that appears is incorrect somehow. If a specific title for the web page wasn’t specified when it was set up, the title area might just show the URL for the page instead of the headline for the article you’re sharing. Not exactly reader-friendly! In which case you can simply click to add the headline yourself.
Other times the link title might be unhelpfully vague — if you’re posting a link to a movie review, you might find that the title says something generic like “Movie Review of the Week.” In which case you could choose to add in the title of the particular movie that’s being reviewed. Specificity sells!
In the example above, the link title in the preview is in good shape, because it already contains the exact title of my article. But just as an example of something I could tweak — right now the link preview doesn’t include the name of the article’s author. So if I want to make it blindingly obvious to my friends and family that I’m posting an article I wrote myself, I might cast my famous modesty to the wind (twisting my own arm here!) and add a byline to the preview.
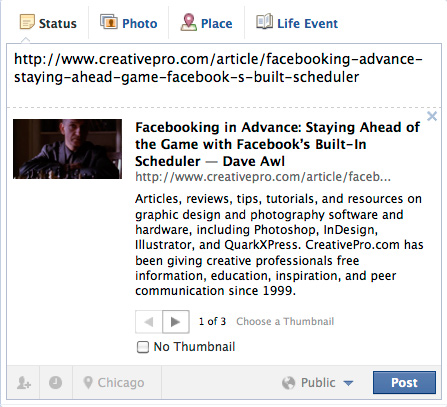
Figure 3: The title field has now been shamelessly tweaked. (I added a hyphen followed by my name at the end.)
Similarly, I can edit the description field for the link as well. Right now it’s got a general description of CreativePro and all of the wonderful things CreativePro offers to its readers. But in this case, I think adding in the subhead for the article would do a better job of conveying what this link is all about. So once again, I can click on the description field to make it active:
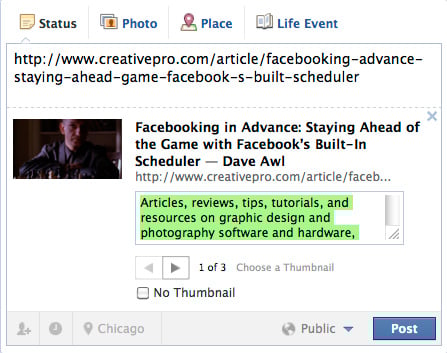
Figure 4: Just like the title field, you can click on the description field to edit it.
And now that it’s ready for editing, I can paste in the subhead for the article, like this:

Figure 5: I’ve now pasted the subhead for the article into the description field.
And voila! The title and the description in my preview are both more specific now.
Of course, you may notice that the one text area in the link preview that you can’t edit by clicking on it is the URL that appears under the link title. That’s understandable, because Facebook wants users to be able to see where the link they’re about to click on actually leads — in order to help protect against deceptive links posted by phishers and spammers.
But that still leaves one element of the preview that can be customized: the thumbnail image. Some links that you post will have more than one image available as thumbnails. If that’s the case, clicking the arrows at the bottom of the preview area will let you navigate through the available options, so you can choose the most relevant or appealing image to accompany the link.
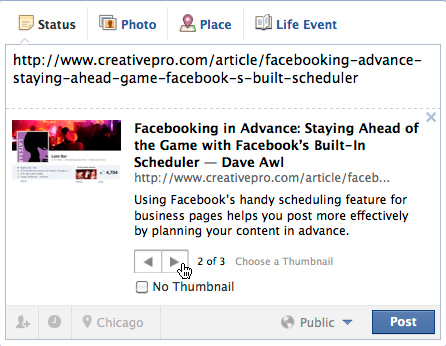
Figure 6: Clicking the arrows lets you choose from the available thumbnail images. (You can also select the No Thumbnail checkbox if none of the available images are appropriate.)
In Figure 6, above, you can see that in addition to the shot of Ben Kingsley, there are a couple of other images from the article that I can choose by clicking the arrows. (Of course, in this case I’m going to stick with Ben Kingsley.)
By the way, you may have had the frustrating experience of posting a link to a news article on Facebook, and finding that the one photo that best relates to the article doesn’t appear in the preview. Instead, you wind up with a small weather map, or a picture from a car ad, or a photo of an aardvark that happened to appear on the same page as a teaser thumbnail for a completely different article. And no matter how many times you click the arrows, the photo you want isn’t available. Your only choice is to select the checkbox to not include a photo, or else choose one of the unrelated ones.
Since in my experience people are much less likely to click on a link that doesn’t have an image to catch their attention, in that case I’ll usually just pick one of the non sequitur photos and make a joke about it (e.g., “Enjoy this bonus aardvark picture at no additional cost!”)
But still: Why are some photos on the page available for Facebook’s link preview, and others aren’t? Ultimately, it’s just another one of those unfair situations in life where size does indeed matter. The link preview will bypass images that are too big, and it prefers images that are square in shape — an image that’s too wide relative to its height may not appear, or may not display correctly. (More on those dimensions later, when I explain how to set up web pages to preview well on Facebook.)
Tip #2: Clean Up the Text Area by Deleting the URL
Here’s another little secret that many experienced Facebook users aren’t aware of: Once Facebook generates the preview for the link, it’s no longer necessary to leave the URL in the body of the post itself. You can delete it, and the link preview you’ve set up will stick around, just as you’ve customized it.
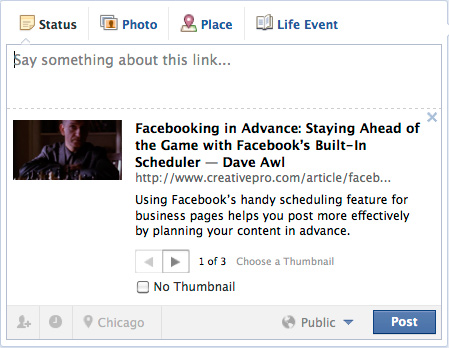
Figure 7: I’ve deleted the URL from the text area, but my customized link preview remains.
Why would you want to delete the URL? Because at this point, it’s unnecessary clutter. It makes the text for your posting look longer than it actually is, which might cause some of your more wordophobic readers to scroll by it without reading — and in some cases it might cause Facebook to hide part of your post behind a “see more” link. Even though Facebook doesn’t limit you to 140 characters like Twitter does, keeping your postings concise is still a good goal.
So most of the time, the best approach is to tidy up your post by zapping that redundant URL out of the text area once the preview has been generated.
Of course, I can think of a few circumstances where you might want to leave the URL in the text area. If you’re announcing the launch of a new website — or promoting awareness of an existing site — then you might want to emphasize the URL as much as possible by explicitly mentioning it in the text of your post.
For example, in the shot below I’m posting a link to my business website, Awlpoint.com, and I’m leaving the URL in to help publicize it:
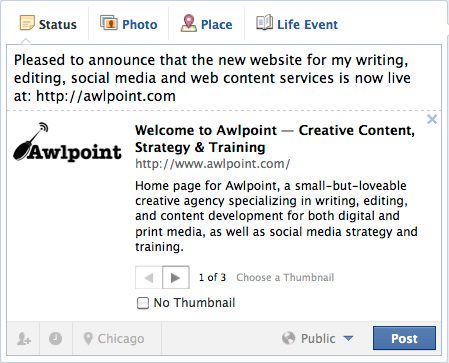
Figure 8: In this case, I’m leaving the URL for my website in the text area as part of my message, in order to help draw attention to it.
Tip #3: Make Sure the Web Pages You Create Yourself Are Ready for Their Facebook Close-Up
Now that we’ve talked about how link previews work and how they can be customized, if you have a website of your own (or build websites for others), you may be wondering what you can do to make sure your pages preview well on Facebook by default.
In order to help them look spiffy when they’re shared, there are three specific elements you’ll want to optimize for each page:
1) the page title
2) the meta tag that contains the description for the page
3) any photos on the page that you’d like to be available as thumbnails when the Facebook link preview is generated.
At the most basic level, you can control those things simply by taking them into consideration as you design and build your pages. For starters, make sure that the <title> tag is set correctly in the HTML header for each page on your site. By default, Facebook will use the page title as the link title in its preview unless there are meta tags that override it (as discussed below). And making sure that your pages are titled correctly is important for usability purposes anyway — you’re not serving your visitors well if the title bars for your web pages wind up reading “Mozilla Firefox.”

Figure 9: The title and description tags in the HTML header for the Awlpoint.com home page
Next, make sure that you’ve supplied a description meta tag for each page on your site, because Facebook can use that to fill in the description in the link preview. Make sure the description you provide accurately reflects what the page is all about — and also think about it as a kind of elevator pitch to people who may see the link in their News Feeds on Facebook.
And third, if there are one or more small images on the page that you’d like to be available to include in Facebook’s link preview, you’ll want to make sure that they’re smaller than 250×250 pixels and basically square in shape.
But the best approach, and the one that will give you the most precise control over how your content previews, is to make use of Facebook’s Open Graph tags. The Open Graph protocol was designed to help information from non-Facebook web pages translate gracefully when shared on Facebook, and it comes with special meta tags that include the prefix “og”.
Here are the three Open Graph meta tags you’ll want to include for every page on your site. They go in the HTML header, where the other more traditional meta tags live:

The first tag show above lets you specify the exact title for your page — and that’s what will appear as the link title in Facebook’s link preview.
The second tag works the same way, for the description area in the link preview.
The third tag lets you specify a thumbnail image that will serve as the default thumbnail that appears in the link preview. Once again, for best results, you’ll want to make sure that your thumbnail is square in shape and smaller than 250×250 pixels. And it needs to be in one of Facebook’s supported image formats. (I’d recommend sticking with a JPG or a PNG.) Then upload it to your web server, and paste the URL for the thumbnail into the appropriate place in the image tag shown above.
Presto — your three Open Graph meta tags will now function almost like little personal assistants for your web page, making sure it’s dressed to kill when it’s time for its appearance as a link on Facebook.
Of course, testing is always a crucial last step in the process of publishing anything on the web. You should add checking the Facebook link preview for each page as one of the steps in your testing phase if you aren’t already doing it. Drop the URL for your new page into Facebook’s publishing area (or use the share button if you have one available) and take a look at the link preview it generates. Are you getting the title, description, and thumbnail image you want? If not, now’s the time to solve any problems you spot.
One caveat, though. I’ve had a few experiences where I’ve tested the Facebook link preview for a just-published page, and found a typo or other error in the description meta tag. But strangely, even after I go back and correct the meta tag, the error persists in the link preview when I test it on Facebook again. My best explanation for this is that once Facebook generates a preview for a given link, it may store that preview in a cache for some period of time, rather than taking a fresh look at the page. I’m not sure how long this effect persists, or whether it affects all users who try to post the link, or only the original poster. But the only way I’ve been able to fix this problem in the short term is to actually change the URL for the new page ever so slightly after correcting the error — which forces Facebook to treat at it as a brand-new link, and generate the preview from scratch.
So, the moral is: Proofread your meta tags extra-carefully before checking the Facebook link preview … or be prepared to tweak your URLs if necessary!
This article was last modified on December 14, 2022
This article was first published on December 12, 2012
Commenting is easier and faster when you're logged in!

Recommended for you

Grace Under Fire: Tips for Responding to Negative Feedback via Social Media
If you were anywhere near the Internet last week, chances are good that you read...
New Mohawk Logo Designed by Pentagram
The 81-year-old paper company Mohawk unveiled a new logo that it says will let i...

GO: A Kidd’s Guide to Graphic Design, by Chip Kidd
Mention the name Chip Kidd to most designers, and you will inevitably get a rais...