
InDesign Workarounds
A compendium of workarounds, fixes, and stopgaps for every InDesign user

This article appears in Issue 66 of InDesign Magazine.
InDesign is an industrial-strength page-layout tool, but not even its biggest fans would claim it can do everything. Experienced users can easily rattle off a lengthy list of feature requests, but when the clock’s ticking, and the boss or client is waiting, you can’t really wait around for Adobe to add or fix a feature. You need to get the job done now—or preferably sooner. And since necessity is the mother of invention, you look at the tools you have at your disposal, get creative, and improvise. In short, you come up with a workaround. We asked a distinguished panel of InDesign experts, “How do you make InDesign do something it can’t do?” Here’s what they came up with.
1. Table Calculations and Linking
Tables in InDesign are incredibly powerful and allow a high degree of customization. However, one of the first questions I hear from people after they dive in and start working with tables is, “Can I do calculations in tables like I can in Excel?” The answer, unfortunately, is a definitive no… but that doesn’t mean that there isn’t an alternative solution. Why not harness the power of both Excel and InDesign to achieve the desired result? InDesign, as we all know, provides the creative control that we need to make the tables look good, and Excel provides the data calculation capabilities that we often need to perform the math in the content of the table. It’s a well-known fact that you can place an Excel spreadsheet into your InDesign layout. Users figure out very quickly, however, that once they place the Excel spreadsheet, it will not update if the spreadsheet is modified. To make these two extraordinary programs work together, we need an Excel spreadsheet (.XLS or .XLSX), and we need to enable
an InDesign preference that maintains a link to that spreadsheet. To enable this preference, go to InDesign/Edit > Preferences > File Handling, and click Create Links When Placing Text and Spreadsheet Files in the Links section of the dialog box (Figure 1).

Figure 1: Enable this option so that InDesign creates a link to the Excel spreadsheet.

Figure 2: The Excel file appears in the Links panel.
2. Join Tables Together
It’s frustrating that InDesign doesn’t allow me to join two tables. I’m showing you a simple example (Figure 3), but some tables can be quite tricky, with lots of cells, divisions, and so on.

Figure 3: Dearly beloved, we are gathered here to join these two objects in tabular matrimony.

Figure 4: I now pronounce you…a single table.
3. Text Wrap in Table Cells
Sometimes people use tables for designs that don’t look anything like tables. I’ve seen a whole single-page ad laid out as cells in a table. While there’s nothing technically wrong with doing this, there are things you just can’t do in tables and table cells. For example, text wrap doesn’t usually work the way you’d expect. The only way to create text wrap within a table cell is to anchor the object within that cell’s text. Even then, unfortunately, the text wrap applies only in that one cell; if you want text wrap to affect multiple cells, it might be saner to just use soft returns (or tabs) to shape your table text. –Claudia McCue
4. Applying Multiple Clipping Paths
InDesign allows you to turn on and off clipping paths for only one image at a time, by selecting that graphic, choosing Object > Clipping Path > Options, and then taking the additional step of selecting the Photoshop Path (Figure 5).
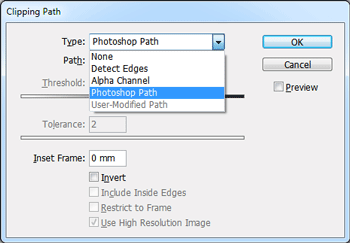
Figure 5: Choosing a Photoshop path as a clipping path.
5. Simplify Text Wrap Contour Options
If you have an image with a transparent background or a clipping path, sometimes text wrap doesn’t behave the way that you’d like or expect. InDesign does let you adjust the text wrap path manually using the Direct Selection and Pen tools, but it can be incredibly frustrating. Instead, skip all that, and jump over to Photoshop to create a new alpha channel. Convert your existing path or channel into a selection (marching ants), and then choose Select > Modify > Expand and enter 5 pixels (or whatever change you want to make). You might need to manually clean up your selection to make it more appealing, but when you’re finished, save the selection as a new channel. Back inside InDesign, select the object, and open the Text Wrap panel. From there you can set Contour Options to Alpha Channel, and the Alpha pop-up menu to the channel that you created (Figure 6).
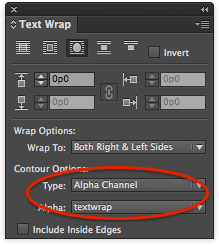
Figure 6: Select your alpha channel in the Contour Options area of the Text Wrap panel.
6. Using Blend Modes from Photoshop
If you create a drop shadow on its own layer in Photoshop (for example, to make a custom shadow shape) and then import that PSD into InDesign, the shadow may appear opaque—even if you have applied a blending mode such as Multiply to it in Photoshop (Figure 7)! The reason is that blending modes applied to individual layers in Photoshop are not honored by InDesign!

Figure 7: Photoshop’s Multiply blend mode (applied to the shadow) is not honored in the placed image.
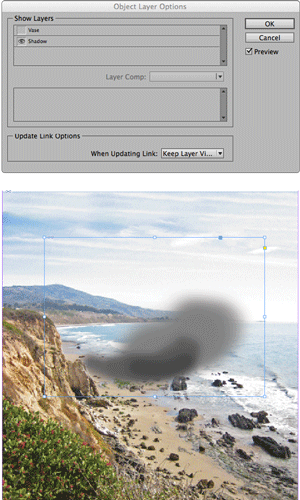
Figure 8: Hiding the vase and revealing only the shadow in the placed image via Object Layer Options.

Figure 9: The finished product: a proper drop shadow using the Multiply blend mode from Photoshop.
7. Cast Shadows on Native Objects
Here’s another method of making simple cast shadows for native InDesign objects. Copy and paste the object in place. Set the fill (and stroke, if any) to Paper. Set the blending mode to Multiply. This makes the object fully transparent. Now add a drop shadow, and in the Effects dialog box, set the distance to zero (so the shadow is in the exact same location as the object). Select the option Shadow Honors Other Effects, and deselect the option Object Knocks Out Shadow (Figure 10).

Figure 10: The key Drop Shadow settings for a cast shadow
8. Selecting the Right Spot Color
Ever need to add a spot color swatch from a Pantone library? You can either scroll an endless list or you can type in the name of the swatch (usually its number). But the problem with the latter method is that it can be tricky to get the right color. Depending on your typing speed, you can easily get 1235 C when you type (and want) just 123. The solution is surprisingly simple: type a space after the last number. –Mike Rankin
9. Colorizing Grayscale Images With Transparency
You can create a lot of great effects by colorizing placed grayscale images. You just double-click them to select the graphic (instead of the frame) and choose a color from your Swatches panel. All the grayscale pixels are colored with the swatch color. Too bad it doesn’t work if your grayscale image contains transparency. But there’s a solution! Instead of grayscale, use a monotone image, and map its ink to whatever you want. Start in Photoshop: convert the grayscale image to a single channel image by choosing Image > Mode > Duotone. In the dialog box, make sure the Type pop-up menu is set to Monotone. Click the color picker, and choose any spot color for the channel (it doesn’t matter which, because you’re going to replace it later). You can even give it a helpful name like DON’T FORGET TO MAP ME (Figure 11).

Figure 11: Give your spot color a name that stands out from the real colors you want to use in your document.

Figure 12: Alias the Photoshop spot color channel to a spot color in InDesign, which you can then convert to process.
10. Check Assigned ICC Profiles
Did you ever need to know which ICC profile is assigned to your InDesign document? Unlike Photoshop, where it’s easy to find, in InDesign it’s not obvious at all. Some people believe you can view the current document’s profiles by choosing Edit > Color Settings, but this is not so; the Color Settings dialog box shows the default settings for new documents you create, not the current document. The easiest way to get this information is to choose Edit > Convert to Profile, where you can see the assigned profiles under Source Space (Figure 13). Be sure to click Cancel to dismiss this dialog box to prevent unwanted color transformations.
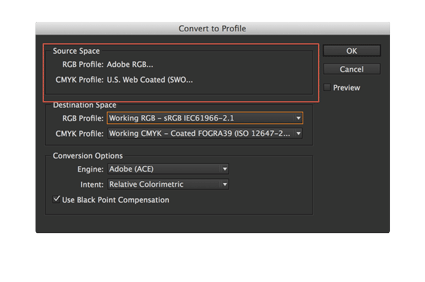
Figure 13: The Convert to Profile dialog box
11. Data Merge Directory
InDesign’s Data Merge is a powerful feature for combining a database of variable information into single or multiple records. But if you’re trying to create a single story, like a directory or index of variable information, you’re out of luck. Fortunately, French scripter Loic Aigon has created a free script called InLine Merge that will solve your problem. Simply create a document with standard Data Merge fields (Figure 14). Then select the frame with the Selection tool.
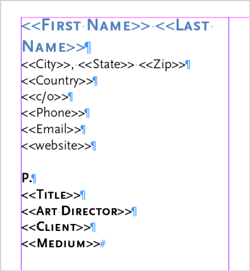
Figure 14: Fields to be populated by the InLine Merge script.

Figure 15: The finished product: a directory courtesy of Data Merge
12. A-sorting We Will Go!
Have you ever created an InDesign layout that contained a list of items that need to appear in alphabetical order? It’s extremely frustrating when you receive additions to the list and have to manually drop them in at the correct location. It might not be too bad for a short list, but as the list grows, it becomes more and more time-consuming to update with new information. What InDesign needs is a sort paragraphs feature! And while it doesn’t have a native Sort feature, it does actually ship with a script that will sort selected paragraphs alphabetically in ascending or descending order! To access the script, choose Window > Utilities > Scripts. When the Scripts panel displays, open Application > Samples > Javascript to display more than 20 useful scripts, many of which may improve your design life significantly, including the one we’re looking for, called SortParagraphs.jsx. To use the script, first use the Type tool to select any number of paragraphs that you want to sort. Then double-click SortParagraphs.jsx in the Scripts panel, and a dialog box will appear with options on how to sort the selected paragraphs (Figure 16).
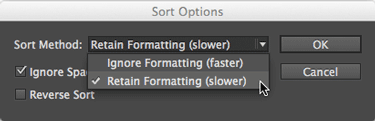
Figure 16: The SortParagraphs.jsx script offers several options to control how selected paragraphs will be sorted.
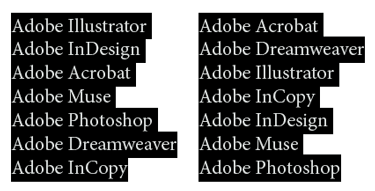
Figure 17: The selected text before sorting (left) and the selected text after sorting (right).
How to Install and Run a Script
Several of these InDesign workarounds involve installing and running scripts. Don’t be intimidated by scripts! Installing them is as simple as copying them to the proper folder using File Explorer (Windows 8.x), Windows Explorer (Windows 7), or Finder (Mac). For Windows, copy them to C:UsersusernameAppDataRoamingAdobeInDesignversionlanguageScriptsScripts Panel. For Mac, copy them to: Application folder: Scripts: Scripts Panel. The scripts will then be available to you in your Scripts panel (Window > Utilities > Scripts). Running them is as simple as double-clicking them. For scripts you use frequently, you can assign a keyboard shortcut to speed things up even further.
13. Rename Linked Files
In today’s cross-platform world, a best practice is to stick to standard alphanumeric characters in filenames for any content placed in InDesign. Among the problems that can crop up when using extended or platform-specific illegal characters is the failure to package files properly or broken links when moving content cross platform. Even images that have spaces in their filenames can cause problems! EPUB problems have also been reported, as these characters can be badly mangled in HTML. Enter RelinkImages, a free script to clean up all of those links (Figure 18). The direct download for the script is here.
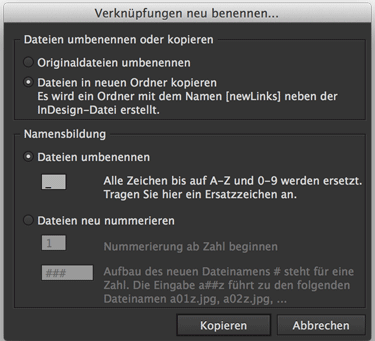
Figure 18: Here’s your chance to learn a little German, and benefit from a great script.
14. Straight Margins in Rounded Corner Text Frames
Have you ever put text in a frame with a rounded corner effect? It can mess up the margins of the text at the corners. To avoid this, simply increase the inset value on the text frame to be equal to or greater than the corner radius (Figure 19).

Figure 19: Insets keep text far enough away from the rounded corners in this frame to maintain straight margins.
15. Transpose characters
Some old editorial and word processing systems featured a “transpose” feature that would interchange two characters, and people have asked for this feature in InDesign. Indeed, InCopy even has a transpose feature (Edit > Transpose), but alas, not InDesign! But of course, this can be remedied with a simple script I wrote (Figure 20).

Figure 20: Before and after running the Transpose script
16. Convert InDesign Files into Other Formats
Have you ever had to create a bunch of PDFs from a bunch of InDesign files? Or maybe you needed to down-save a series of InDesign projects to an earlier version by exporting to IDML. These common situations can become tedious if you have more than a few files, since you need to manually go through the export process for each file. Thankfully, there is a fantastic free script called Batch Convert by Peter Kahrel, which you can download here. You’ll need to put all of the InDesign files into one folder. When you run the script, choose that folder as the input folder, and then choose where you want the converted file to be saved to (Figure 21).
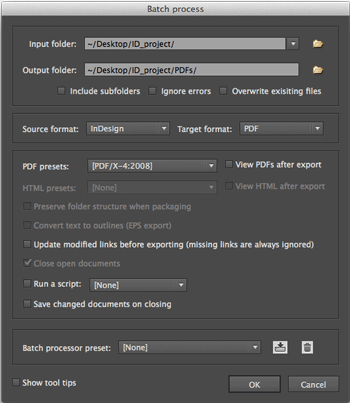
Figure 21: The dialog box for Peter Kahrel’s Batch Process script is loaded with useful options.
17. Left-align to Text Centered on the Page
Ever have a situation where you want Phone, Fax, and Email listings to line up at the left, but the block of text has to be centered on a page, relative to the width of the email address? This can be difficult, of course, because email address sizes vary a lot. The solution? Auto-Size in the Text Frame Options dialog box. First, set up the tab stops as required (in my example, I used 17mm). Then, in the Text Frame Options dialog box, select the Auto-Size tab, and choose Width Only from the Auto-Sizing drop-down menu. Using this option, the text frame will take its width from the widest line of text. Typically (as in this example) this would be the email line, but if no email existed for this client, then the type would be centered on the phone/fax numbers (Figure 22).
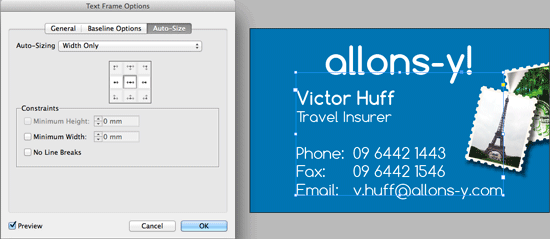
Figure 22: Contact information is centered on the page by using the auto-Size Width Only option.
18. Convert InDesign Notes to PDF Sticky Notes
Have you ever wanted to convert InDesign Notes to PDF sticky notes (annotations)? Do you need a more efficient way to communicate with clients on PDF drafts, such as asking questions about specific content or images? PDF commenting doesn’t have to just go one way! You can use PDF commenting to ask questions of your clients, while keeping the question in the proper context of the design or document. InDesign’s editorial sibling, InCopy, can make PDF sticky notes out of the box. Unfortunately, InDesign can’t without a little help from an affordable plug-in: PDFStickies, by Kerntiff Publishing Systems (£UK 30.00) (Figure 23). The plug-in does have some limitations: it doesn’t maintain the InDesign Note author name for the PDF Sticky note author name, and it doesn’t change the default sticky note icon and color. But these things can easily be changed in Acrobat. For instructions on fully utilizing PDFStickies, check out this post.

Figure 23: An InDesign comment (top) becomes a PDF sticky note, with the help of PDFStickies.
19. Show No Break
The No Break attribute (in the Control panel menu) is an easy way to keep text from breaking at the end of a line. This is handy for keeping long URLs together or for fixing a short line at the end of a paragraph (a “runt”). The problem with using this feature is that there is no way to “see” where this attribute has been applied. This can be maddening if you inherit a long, text-intensive document from someone else, and are trying to edit the text or manipulate line breaks. Peter Kahrel has written a script that solves this pain point. Download and install the No Break script. When you run the script, any text with the No Break attribute applied will appear with a light blue highlight. From then on, you can enable or disable the highlighting in the Conditional Text panel. –Keith Gilbert
20. Adding a Second Animation to an Object
InDesign some has pretty impressive animation capabilities, and with the ability to use them as HTML5 increasing (for example, with the in5 plug-in), it’s worth looking at these capabilities again. However, one of the weak spots with animation in InDesign is the inability to add more than one animation to a single object. Fortunately, there is a little trick that you can use to overcome this. After you add the initial animation to your object, draw a no fill/no stroke rectangle, and group it with the original object. The animation will remain in place, but you’ll be able to add a second animation to the group. (The group acts like a different object.) Use the Timing panel to set the proper timing for the two animations. –Bob Levine
Commenting is easier and faster when you're logged in!

Recommended for you

Extending InDesign Nested Styles for Exceptions
Add flexibility to your nested styles with the use of nonbreaking spaces

InDesign Magazine Issue 66: Workarounds
We’re happy to announce that InDesign Magazine Issue 66 (October, 2014) is...

Excluding Items with Specific Formatting in InDesign Find/Change
Did you ever wish you could modify all text or objects that are not formatted a...