
Like all Adobe apps, Illustrator has an elaborate Preferences dialog box bristling with settings that control how the program looks and works. Of course no group of settings is perfect for everyone, so to get the most out of Illustrator you should spend some time getting familiar with its preferences and customize them to your liking. Here are a few tips from Illustrator pros on tweaking preferences to make your work more enjoyable and productive.
Getting a Fresh Set of Preferences
If you need to install a new version of Illustrator, use the Creative Cloud desktop app. To install the new version as an update, the CC app offers to import your previous settings and preferences. Turn off this option if you want to start fresh with all new factory default preferences.

Resetting existing preferences
Even when you’re not upgrading, Illustrator gives you a way to start fresh. First, navigate to Preferences:
- On Windows Choose Edit > Preferences > General or type Control-K.
- On macOS Choose Illustrator > Preferences > General or type Command-K.
- You’ll also find a Preferences button on the Control bar when nothing is selected in your document.

Click the Reset Preferences button at the bottom of the dialog box when you’re in the General section. You will be prompted to restart Illustrator to activate the fresh Preferences file (you may have to close the dialog box to see the warning). Go ahead and restart Illustrator.

Changing Your Preferences
Illustrator can be set up to work the way you prefer, so I like thinking of the Preferences as yours, rather than the application’s. The 15 sections in the Preferences dialog box can seem overwhelming. Here are a few of the settings worth changing.
Appearance Preferences
The appearance of Illustrator’s tools, panels, guides, and grids can be customized to suit your wishes. These settings are not merely cosmetic: They can help make the user interface elements less obtrusive for improved focus on your art.
You’ll need to visit several sections of the Preferences dialog to find all the options. Start with the User Interface section and set the application Brightness. I prefer a lighter interface which is selected here. Any option you click on is applied immediately.

Next set the Canvas color. That’s the area behind your artboards. You can choose pure white or have the Canvas match the overall interface brightness.
You can change the colors of guides in two places: Guides & Grid, and Smart Guides. Illustrator’s default colors for guides are saturated and highly visible, so I find them distracting. Click any of the color swatches shown in Preferences to customize them with your operating system’s color pickers.
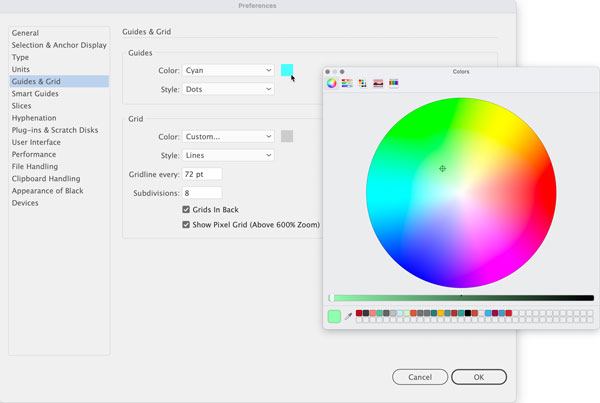
Changing the Guides’ color with the macOS color picker
Another guide setting worth changing is suggested by Carlos Garro from Astute Graphics (Instagram): He changes the Guides Style from the default Lines to Dots. This helps set guides apart visually from your artwork’s paths.
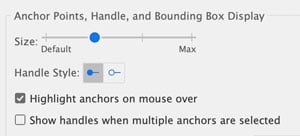
The default appearance of path anchors, handles and bounding boxes is also up to you: Click on Selection & Anchor Display to adjust these. Many Illustrator pros I consulted with change the defaults to better differentiate anchors and handles and make them easier to grab.
Units, Measures and Increments
Which measuring units and increments work best in Illustrator? The answer depends on the type of artwork you create, and Illustrator’s defaults will rarely suit every need. Set these preferences in the General, Type, Unit, Guides & Grid, and Smart Guides sections.
Starting with General, adjust the keyboard increment to gain control over moving selections with your arrow keys. Remember that holding down Shift while pressing an arrow key moves by 10 times the amount specified here. Make the default small for fine control. I’ve set it as low as 1 pt or pixel. Conversely, when your artwork is measured in feet or meters, you’ll want to greatly increase this increment, or you will hardly see items move when using the arrow keys.
Under Type, adjust the default Tracking and Baseline Shift values to gain finer control over the placement of glyphs when adjusting them with the keyboard shortcuts Alt/Option+Left/Right Arrow (Tracking & Kerning), and Shift+Alt/Option+Up/Down Arrow (Baseline Shift).
Set your default Units next: Pixels are great for screen-ready elements; Points, Picas, Inches, Millimeters and Centimeters and are widely used for printed matter. Feet, Yards, and Meters make sense for signage and environmental graphics.
You previously set colors for Guides & Grids. Return to this section to set up grid spacing and Subdivisions. It’s often helpful to set grid spacing to an increment that matches your Units.
Other Defaults Worth Changing
Several other default preferences are worth changing, and experimentation with these settings may be necessary to determine the option that works best for you.
In the Performance section, GPU Performance is often turned on by default. Margaret Trauth, a prolific illustrator (website), recommends turning this off. Margaret and other illustrators – including me – encounter display and preview glitches when this setting is left on, even with a compatible graphics card and processor. You can easily toggle the GPU on or off outside of Preferences from the View menu or by pressing Cmd/Ctrl-E. Your documents’ tabs indicate when CPU preview is being used.
Carlos Garro changes the default selection behavior in the Selection & Anchor Display section, where there are many options. Specifically, he checks the Object Selection by Path Only box. This reduces instances of objects being selected accidently with stray clicks, and that’s particularly helpful when working with complex artwork.
Another setting in this section that many illustrator users tell me they change to reduce clutter as they work: Corner Widgets. By default, they’re hidden for angles greater than 177°. Change this to a lower value as small as 3° and they won’t be visible most of the time even if toggled on from the View menu.

Then, when you want to use a corner widget, just press the Command/Ctrl key to make them appear temporarily.
Commenting is easier and faster when you're logged in!

Recommended for you
How to Alternate Text Styles in InDesign
Learn how to create and alternating fill pattern in your InDesign text using par...


How to Name and Rearrange Artboards in Illustrator
Learn how to create Illustrator artboards from individual items on the page, the...