


Getting Started with Premiere
Gain video editing skills to expand your creative toolkit.

This article appears in Issue 59 of CreativePro Magazine.
“Premiere? But I’m a print designer!”
Graphic design is an increasingly competitive field. By adding video capabilities to your skill set, you increase your marketability. And fluency in editing and animation affords you creative control over every detail of the final product.
In this article, I’ll share the basics of Premiere to help get you started with everything, taking you from navigating the interface to exporting a basic video project.
Navigating the Interface
If you mainly work with Photoshop, Illustrator, or InDesign, Premiere is going to look a little different. While you’ll find some parts of Premiere, such as panels and workspaces, similar to other Adobe apps, you’ll notice the program has separate modes: screens that focus on a particular activity and are presented from left to right in the order of a typical workflow.
Using modes
When you first launch Premiere, you’ll see three modes (Import, Edit, and Export) as tab-like links at the top-left of your application window, just below the menu bar (Figure 1).
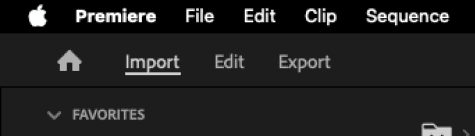
into three modes: Import, Edit, and Export.
You can complete a project entirely in Edit mode—switching to Import mode or Export mode whenever you’d like to take advantage of the additional options each offers. You can let Premiere step you through each mode, or you can choose whichever one most closely matches what you want to do.
Working with panels
/wp:heading –>In Edit mode, you’ll find a variety of panels. As in other Adobe applications, you can open or close panels, rearrange them, and increase their width and height. You can save these panels and their positions on your screen as a custom workspace.
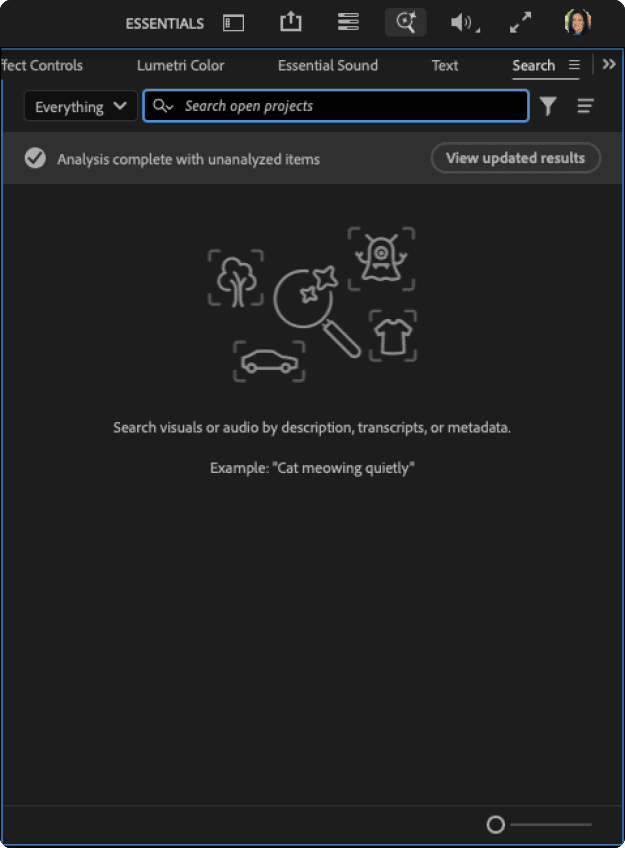
Despite the familiar Search icon and field, Premiere doesn’t let you look for panels, techniques, tools, or tutorials as Photoshop and Illustrator do with their Discover panel. Instead, Premiere searches metadata to help you find content in your project (Figure 2).
Setting workspaces
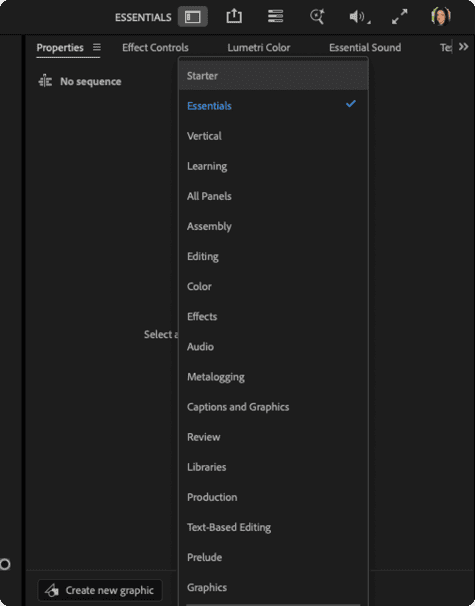
You can change the configuration of panels by switching workspaces, either in the menu (Window > Workspaces) or by going to the Workspaces icon in the upper-right of the interface.
The workspaces are alphabetized in the Window menu, but if you look at the list from the Workflows icon, you’ll see them arranged in somewhat of a procedural order (Figure 3).
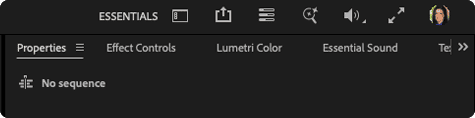
Tip: The Starter workspace has minimal panels, but you could also start with the Essentials workspace, which has a similar layout but includes additional panels nested within the visible panels (Figure 4).
Opening and closing panels
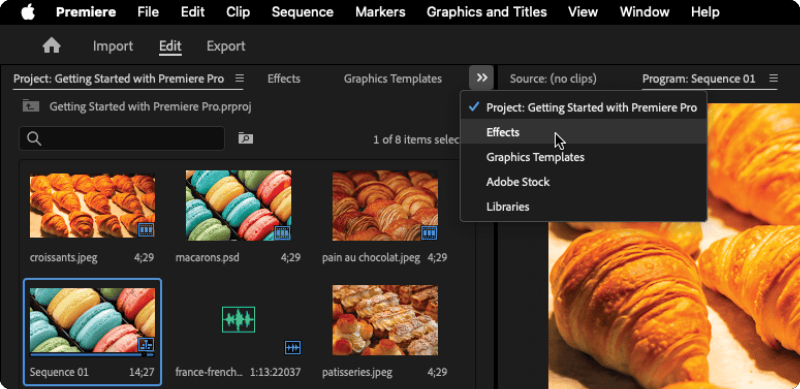
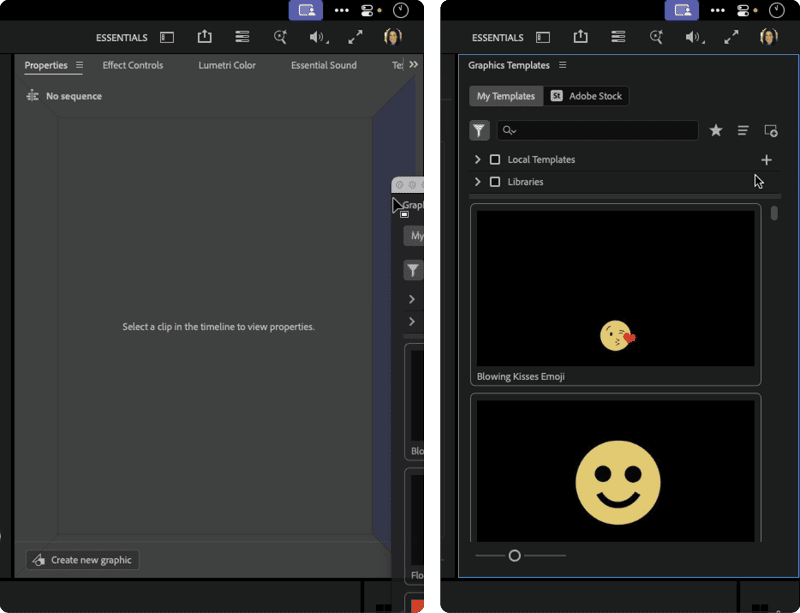
To open a panel, you can click its panel tab if it’s visibly part of a panel group, click the double arrows for the panel group if its tab isn’t visible (Figure 5), or choose the panel name from the Window menu. When you do the latter, Premiere brings it into focus if it’s already a part of a panel group or opens it if it isn’t. You can see a panel has focus when it’s highlighted with a thin blue frame.
To close a panel, click its flyout menu and choose Close Panel.
Rearranging panels
As with other Adobe applications, you can rearrange panels by dragging a panel tab to another panel group. You’ll notice, however, that Premiere’s docking works a little differently.
When you drag a panel over another panel group, the overall panel group and all the panel tabs dim to gray. Within that active panel group, the center space appears blue as you hover over it, as will the tabs, the inner rectangle within the panel group, and the top, right, bottom, and left regions that buffer the panel group space (Figure 6).
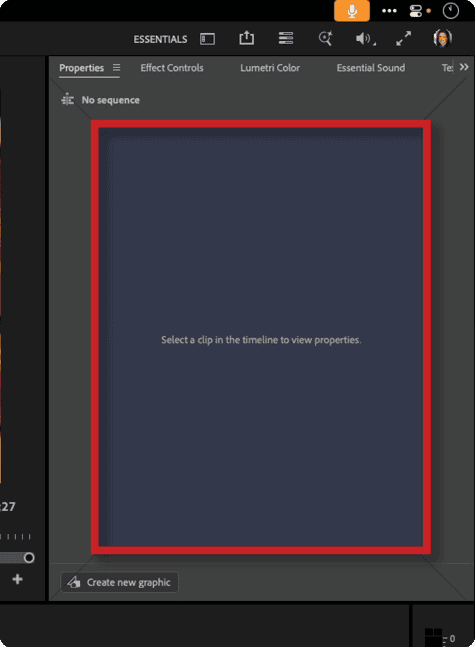
Where you stop dragging determines whether the panel will be added to the group or whether it will be added independently, adjacent to the group (and, if so, where).
If you drop the panel over that highlighted blue center rectangle, Premiere adds the panel to the group as the last tab.
When you drop it over the panel tabs, Premiere also adds it to the group, but you can drag it to determine its position within the tabs (Figure 7).
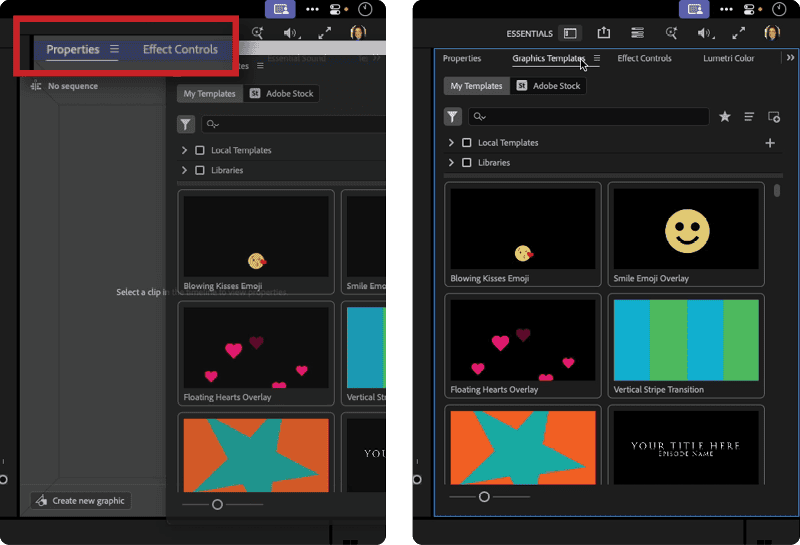
If you drop it in any of the trapezoid shapes above, below, left, or right of the panel, it will dock separately on the selected side (Figure 8).
For more information about Premiere’s interface, see my CreativePro video “Navigating the Premiere Interface.”
Creating a New Project
Create a new project by clicking the New Project button or choosing File > New > Project.
You can use templates if you’d like guidelines for specific types of projects (e.g., broadcast or social media). By default, Premiere will open in Import mode, where you can import assets such as video clips, audio clips, or images, though you can turn on the option to skip that routine and jump right to editing.
Importing Assets
If you import assets, you can do so either from Import mode or Edit mode. If you import a layered file in either mode, Premiere gives you options for which layers to import and whether and how to merge them. Import mode gives you additional import options.
Tip: If you’re new to video production, think of the process in three steps: First, you’re importing assets into Premiere for future use. Next, you will pull those assets into your video timeline, the main panel where you control which clips of audio and video are interacting at any point in time, indicated by the playhead (the vertical throughline that you can drag horizontally). That’s mainly where you will use Premiere’s capabilities to modify or animate the content and add effects like transitions. Finally, you’re exporting your timeline.
Importing assets using Import mode
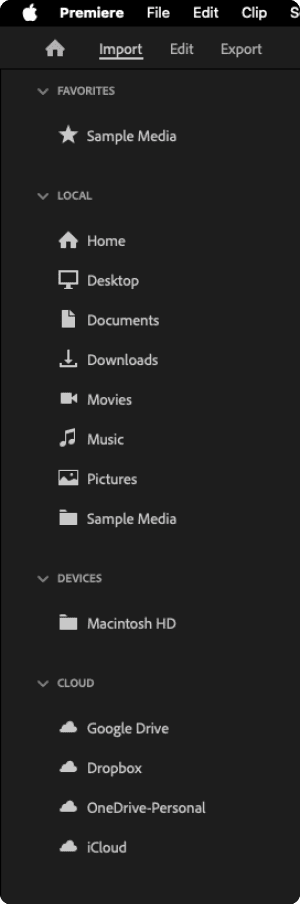
To import content in Import mode, use the links on the left side of the screen to browse your folders and files (Figure 9).
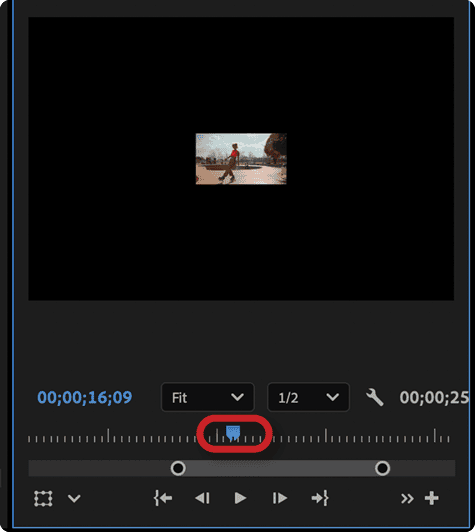
Video files are scrubbable (Figure 10), which means that as you move a slider horizontally (scrub), you can see a preview of the frame at a given timecode. (The blue control tab in the timeline is called the playhead.)
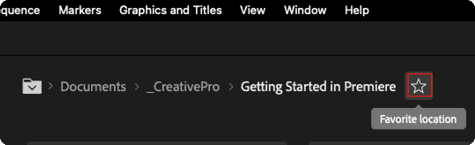
You can add a specific location to your Favorites by clicking the star at the top and to the right of the breadcrumb trail (Figure 11). Clicking the star again removes it.
You can select files to mark them for import. When you find an asset to import, select it, and it’ll show a checkmark and a blue highlight. You can continue adding assets to import, including those from different folders.
You’ll see the selected assets appear at the bottom of the screen in sequence. You cannot change their order. You’ll have to undo your selections and reselect them or wait to change their order as part of the editing process once they’re imported.
Import settings on the right side give you the option to organize media, copy media, create and name a new sequence, enable automatic transcription with various transcription preferences, and use media analysis to scan and catalog your content for easy searching (Figure 12).
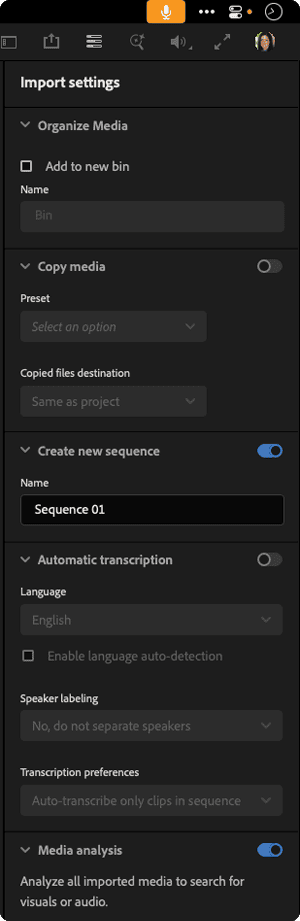
As you’re getting started, you can use the default import settings, which have the Create New Sequence option and Media Analysis option enabled.
After selecting your assets, click Import.
Importing assets in Edit mode
If you opted to skip Import mode, Premiere opens directly in Edit mode, where you have multiple ways to import assets.
From the File menu:
Choose File > Import or using the keyboard shortcut Ctrl+I (Windows) or Command+I (macOS).
From the Project panel:
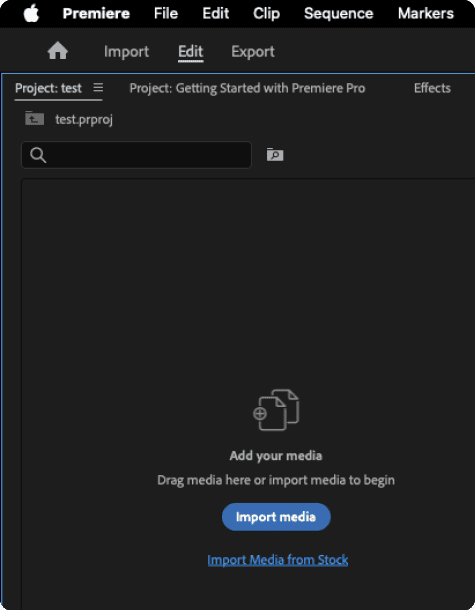
Click the Import media button in the Project panel in a new project.
Click the Import Media From Stock link, which opens the Adobe Stock panel within Premiere for searching and acquiring media.
Right-click or double-click in the Project panel’s Add Your Media section to get a system file browser.
Drag assets into the Project panel’s Add Your Media section (Figure 13).
From the Media Browser panel:
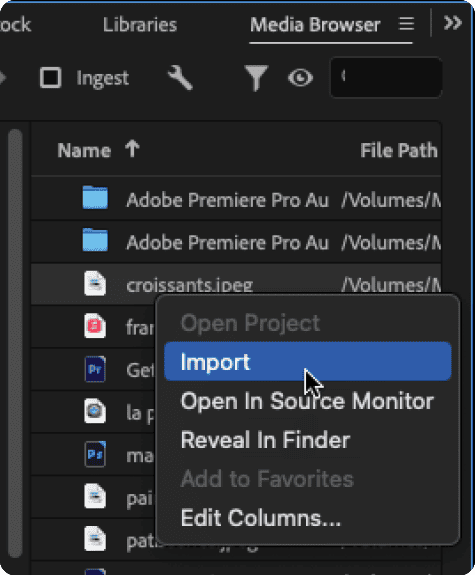
Premiere has a dedicated panel, the Media Browser panel (Window > Media Browser), to navigate through your assets.
Select your asset in the Media Browser and then:
Right-click it and select Import (Figure 14).
Choose File > Import from Media Browser or Ctrl+Alt+I (Windows)/Command+Option+I (macOS).
Setting options for importing layered assets
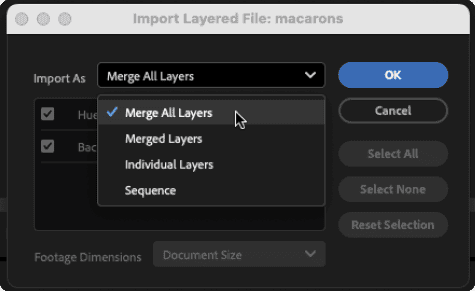
If you import assets that are layered files, you’ll see a dialog box with options for how to import the content, including:
- Merge All Layers, which flattens all the layers into one layer
- Merged Layers, which lets you select which layers to flatten into one layer
- Individual Layers, which lets you select individual layers to import separately
- Sequence, which lets you select individual layers to import and helps you create a sequence with those layers (Figure 15)
Making a Sequence
A sequence collects an arrangement of one or more of your still images, video, and/or audio files. You can have Premiere make a sequence automatically when you import files, or you can create one manually.
You can modify the settings of your sequence at any time, whether you have Premiere make it while importing content or you create it manually.
Automatically make a sequence during Import mode
When you create a new project and select assets through Import mode, Premiere automatically puts those assets in a new sequence by default. The Create New Sequence Import setting automatically arranges your assets in the order in which they were selected.
Premiere will use the dimensions of the first asset selected, if it’s a video or image file. If you select audio first, which doesn’t have dimensions, then Premiere uses the default 1920 × 1080 pixels at 29.97 frames per second (fps) for the sequence settings.
Premiere turns still image files into 5-second clips (Figure 16).
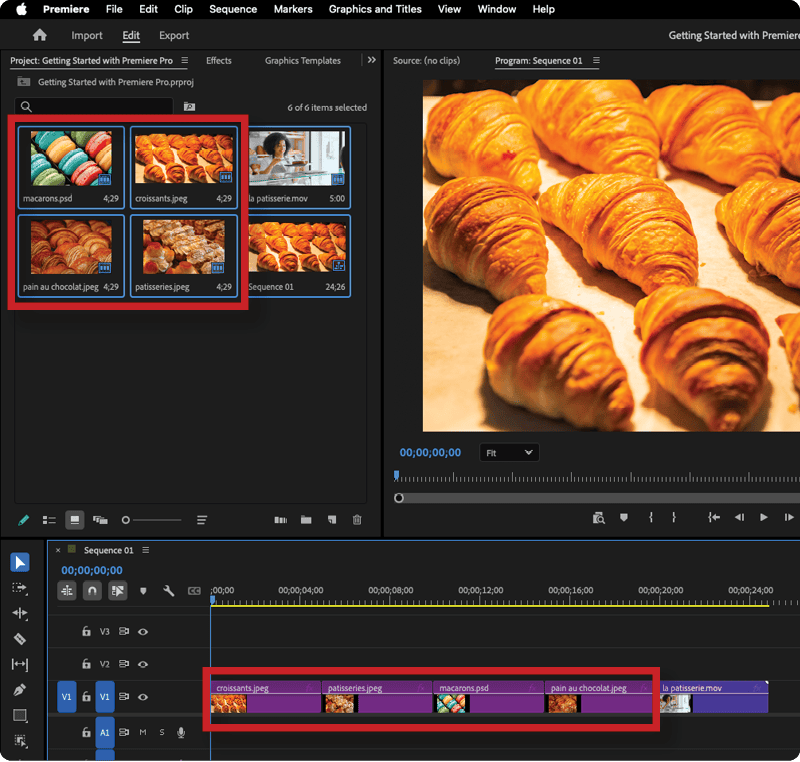
Creating a new sequence
If you skipped Import mode or would like to make an additional sequence, choose File > New > Sequence and specify your settings. A new empty sequence will appear in the Timeline panel.
Adding content
You can add content either from the Project panel or the Source Monitor (Window > Source Monitor), a panel that displays source content.
Adding content from the Project panel
You can easily select one or more assets from the Project panel and drag the content to the timeline. Just as with creating a sequence via Import mode, when you drag multiple assets, the content appears in the order in which you selected it.
Adding content from the Source Monitor
You can easily make content appear in the Source Monitor by double-clicking it from the Project panel or from the timeline. Many of Premiere’s default workspaces don’t include the Source Monitor, but double-clicking the content will automatically open the panel.
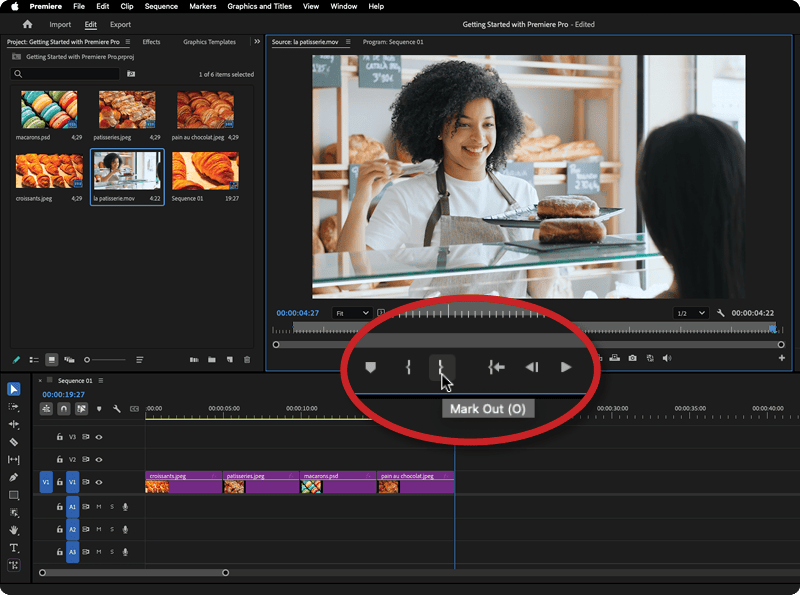
While you’re in the Source Monitor, you can set In and Out points if you’d like to use a portion of a video or audio clip.
Tip: Think of trimming content by setting In and Out points like cropping for time.
The In point is the designated start time, and the Out point is the designated end time. Move the position of your clip’s playhead—the blue downward-pointing shape in the timeline—to the frame where you want the clip to start. You can adjust its position by dragging it or changing the time indicator in the Source Monitor.
Once you’ve selected the frame, click the Mark In left bracket at the bottom of the Source Monitor. Then select the frame for the Out point and click the Mark Out right bracket (Figure 17). You can drag either the In or Out point to adjust its position.
You can also clear the In and Out range by choosing Markers > Clear In And Out or by right-clicking over the timeline in the Source Monitor and choosing Clear In and Out.
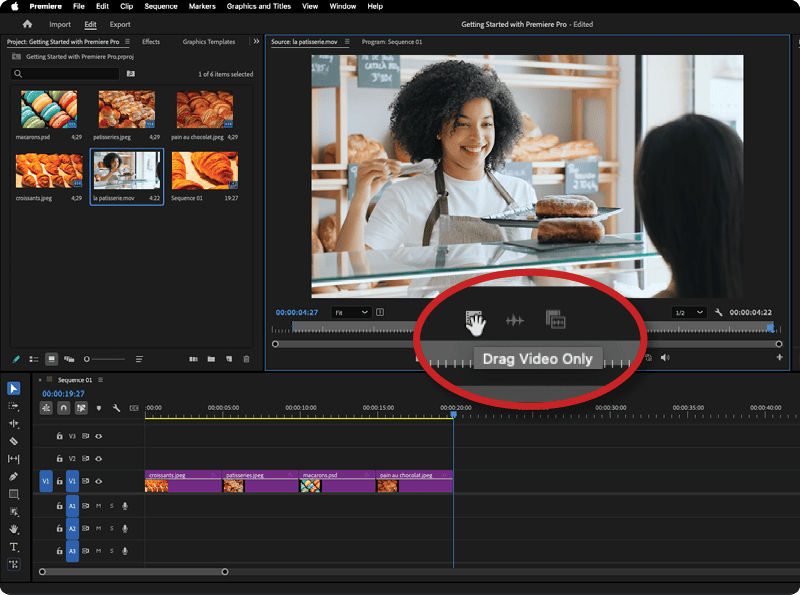
From the Source Monitor, you can drag your content into your sequence in the Timeline panel. Click above the time indicator in the Source Monitor to choose whether to drag video only, audio only, or both video and audio if your content contains both. Premiere grays out options that don’t apply to the selected content (Figure 18).
Modifying sequence settings
However the sequence was made, you can change its settings by choosing Sequence > Sequence Settings.
Adjusting and Animating Properties
Video clips and still images have properties—such as position, scale, and opacity—that you can adjust and animate.
You can adjust your assets to fill the frame, and you can also create simple animations to move, reveal, or hide content.
Filling the frame
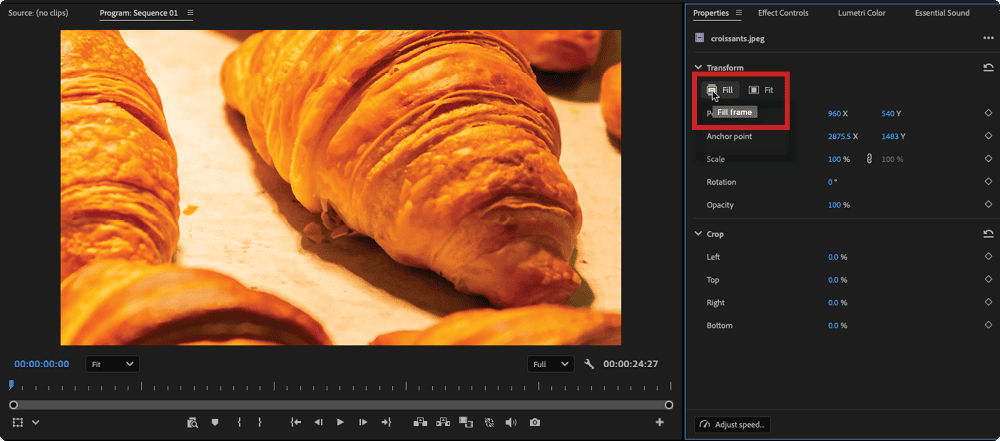
One way to quickly make your content fill the frame without any letterboxing (empty black space above and below the content) or pillarboxing (empty space to the left and right of the content) is to click Fill in the Transform section of the Properties panel (Figure 19). Depending on the clip’s aspect ratio, part of the content could be positioned outside of the frame.
Tip: InDesign users can think of letterboxing and pillarboxing as what happens when you fit content proportionally into a frame that is not proportional. Your image is centered with extra space either on the top and bottom or the left and right.
Making adjustments
You can adjust your content in a few different ways. To change values in the Properties panel or the Effect Controls panel visually, click the disclosure triangle to expose a slider that you can adjust, or you can click the number and enter a new value (Figure 20).
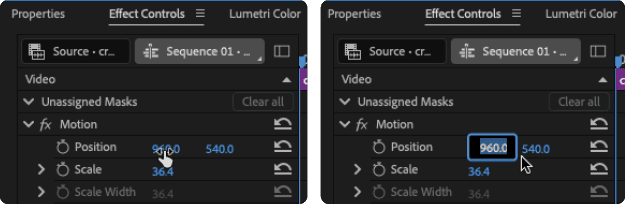
You can also transform the clip’s properties directly in the Program Monitor, the panel where the sequence is displayed. If the clip you want to transform is on the top video track, which is like a layer, then double-click it to enable transformations.
You can drag to position the clip, use the transform handles to scale it, hover over a corner to access the tool to rotate it, and click the circle with the crosshairs to move the anchor point, which determines the clip’s pivot point.
Tip: The anchor point is like the reference point in Photoshop.
If your clip is not on the top video track in the Timeline, you can select it and then select Motion or any of the Motion parameters in the Effect Controls panel. Once those are selected, you can access that clip’s transform controls in the Program Monitor (Figure 21).
Enabling animation and adding keyframes
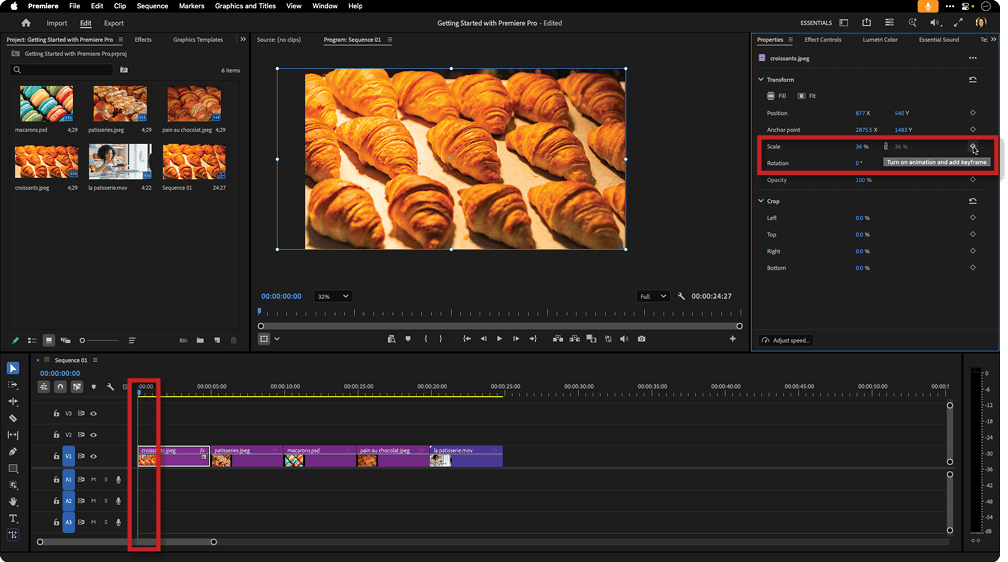
If you’re new to working with a timeline, you should get familiar with keyframes, which mark points in your timeline where you change a clip’s property.
When you enable animation, you tell Premiere that you intend to make changes between keyframes. The incremental changes between the values of two keyframes are known as interpolation.
You can enable animation and add keyframes in either the Properties panel or the Effect Controls panel.
Animating in the Properties panel
Select a clip and open the Properties panel. When you click the keyframe icon (the diamond to the right of a property), Premiere automatically enables animation and adds a keyframe using the current values for the property at the current location of the playhead (Figure 22).
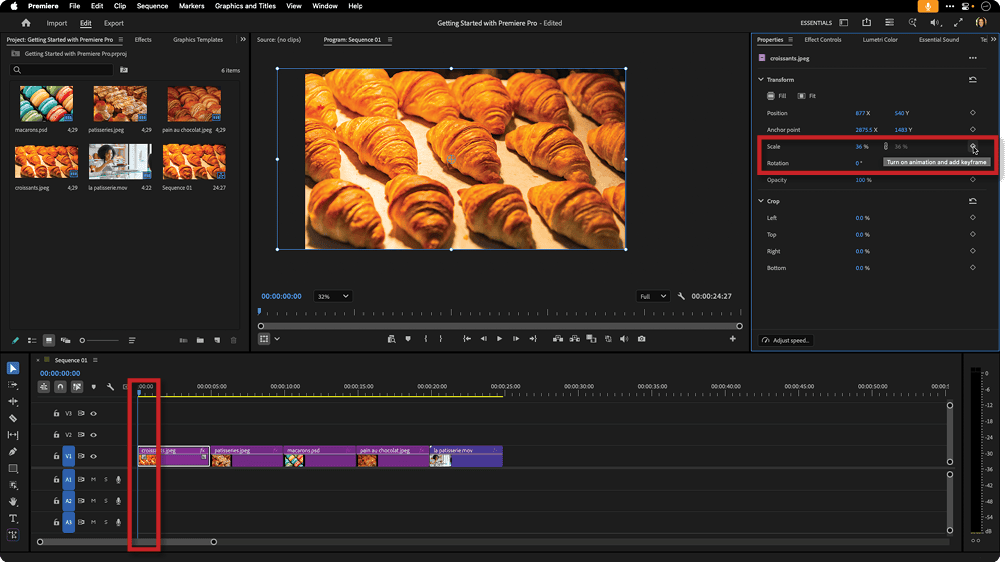
To add another keyframe using the Properties panel, move the playhead and change the value for that same property.
Animating in the Effect Controls panel
Another way you can animate is to select a clip, open the Effect Controls panel, then click the stopwatch icon on a property. The stopwatch icon will turn blue and show a second hand, indicating that Premiere has automatically added a keyframe for that property’s current values where the playhead is.
A diamond icon, representing that keyframe, will also appear in the mini-timeline that appears in the upper-right corner of the Effect Controls panel menu.
To add another keyframe using the panel, move the playhead and change the value for that property (Figure 23). Changing the value automatically adds a new keyframe or modifies the value of an existing keyframe.
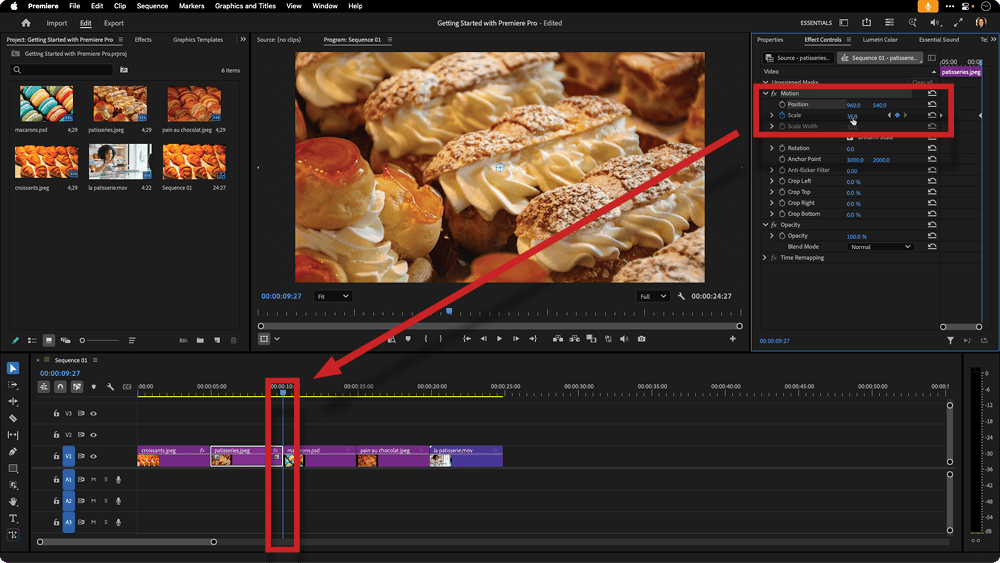
Tip: I prefer setting keyframes in the Effect Controls panel because I can see and modify the keyframes in the mini timeline.
The mini timeline corresponds to the main timeline, although it shows the timeline only as it applies to the selected clip. You can copy and paste keyframes from one clip’s mini timeline to another’s.
Modifying keyframes
When you play back your timeline, you can adjust various aspects of the animated property by modifying the keyframes.
In the Effect Controls panel, you can move one or more keyframes by selecting and dragging them. Moving keyframes closer together speeds up an animated effect. Moving keyframes farther apart slows it down.
By default, keyframes make linear motion—in other words, the effect in the animation you’re creating between the keyframes will appear as a constant speed. But the speed of motion isn’t typically linear, so adding acceleration or deceleration can make an effect look more realistic.
You can change the speed of the animation by selecting the keyframes in the Effect Controls panel and right-clicking to access some options.
The context menu will show temporal interpolation options and, for some properties, spatial interpolation options.
Choose Temporal Interpolation from the context menu. Then you can set the temporal interpolation to Linear, Bezier, Auto Bezier, Continuous Bezier, Hold, Ease In, or Ease Out. Ease In and Ease Out, respectively, slow down and speed up the animation (Figure 24).
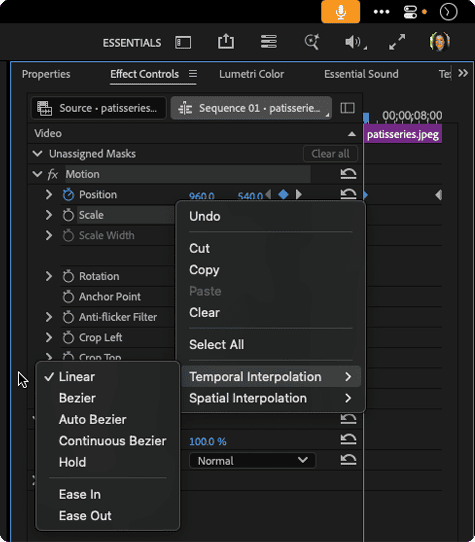
It may seem a little counterintuitive, but you would typically put Ease Out on the first keyframe to ease out from it. And you would put Ease In on the second keyframe to ease into it.
Working with Text
In addition to your video, audio, and still images, you might also want to include text—a process that should make users of other Adobe programs feel much more at home. You can add text manually, or you can modify Graphic Templates that include editable text with preset effects.
Adding and editing text manually
To add text manually, select the Type tool in the toolbar, either click or drag to make a rectangle, and then type—a process that feels familiar to users of InDesign, Illustrator, or Photoshop.
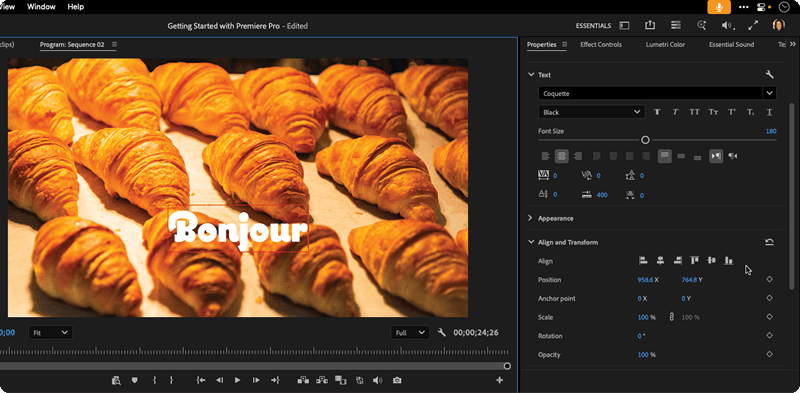
To set character and paragraph attributes, select the text and go to the Properties panel. You can also set character and paragraph attributes in the Effect Controls panel by clicking the exposure triangle next to the Text attribute.
Tip: I often set the attributes in the Properties panel because I can then scroll down to the Align And Transform section to position the text (Figure 25).
Adding and editing Graphics Templates
If you want to add text with preset effects, you can use the Graphics Templates (Window > Graphics Templates). Graphics Templates include a variety of free and premium designs for animated graphics, titles, and lower thirds (Figure 26).
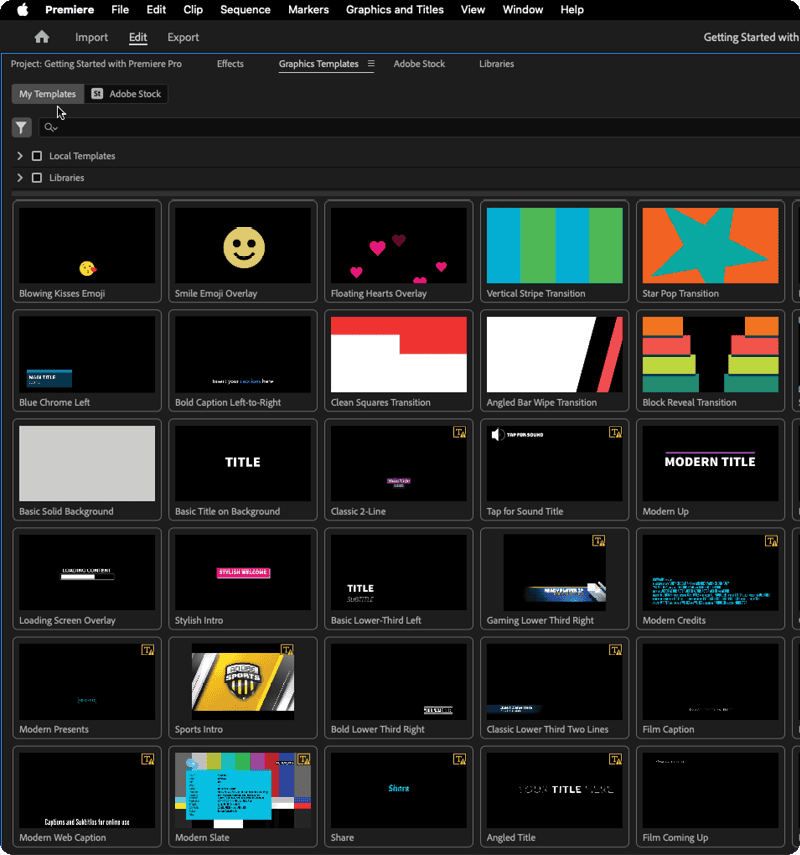
When you find a template that you like, drag it out to the timeline. To edit the text, double-click it with the Selection tool, which switches to the Type tool, or simply select it and use the Type tool.
Unless access has been restricted within a specific template, you can make changes to its text attributes and alignment in the Properties panel.
Applying Effects
You can apply effects to assets such as videos, still images, shapes, text, or audio.
You’ll find a variety of customizable video effects in the Effects panel (Window > Effects).
Adding effects from the Effects panel
For video effects, go to the Effects panel. Click the disclosure triangle on the Video Effects folder to see more folders with descriptive titles. If you know the type of effect you want—applying a drop shadow to text, for example—you can filter the effects using the search field at the top of the panel (Figure 27).
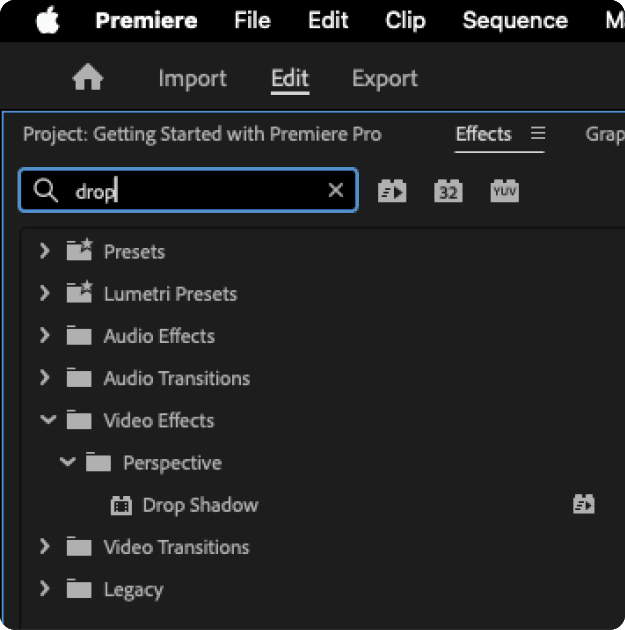
To apply an effect to a clip, either select the clip and double-click the effect, or drag the effect onto the clip in the timeline.
Adding Film Impact effects from the Film Impact Dashboard
In 2025, Adobe acquired the library of Film Impact, previously a third-party developer that created effects for Premiere. These effects now appear within various folders in the Effects panel, and you can also preview and apply them from within the Film Impact Dashboard (Figure 28).
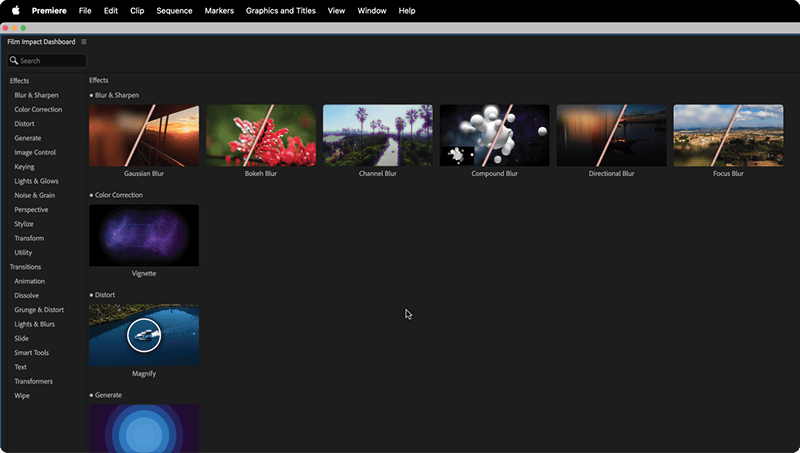
To apply one of these effects from the dashboard, first select the clip on the timeline and click the effect’s corresponding Apply button.
To see an example of previewing and applying the Film Impact effects and transitions using the dashboard, see my CreativePro video “Animating a Photoshop Document in Premiere.”
Customizing effects
Once you’ve added an effect, you can modify its parameters in the Effect Controls panel, just as you would for a clip’s properties.
Adding Video Transitions
Video transitions are like video effects, but they are specifically added to the beginning and/or the end of a clip to transition either to or from black or to or from another clip. Without any set transition, a clip cuts immediately to the next one in the sequence.
You can apply transitions to a single clip or multiple clips at once. You can also customize transitions.
Applying a video transition to a single clip
Video transitions are applied in the same way as effects from the Effects panel, except you drag them onto the desired end of the clip in the timeline.
Film Impact transitions can be previewed and applied simultaneously to both ends of a selected clip when you click the transition’s Apply button in the Film Impact Dashboard.
Applying a video transition to multiple clips
The Film Impact Dashboard lets you apply a particular transition to multiple clips with one click. Select the target clips in the timeline, and in the Film Impact Dashboard click Apply.
There is a way to apply a Cross Dissolve video transition to multiple clips even though it isn’t a Film Impact transition. Cross Dissolve happens to be the default video transition, so you can select the target clips and choose Sequence > Apply Default Transition To Selection.
Customizing video transitions
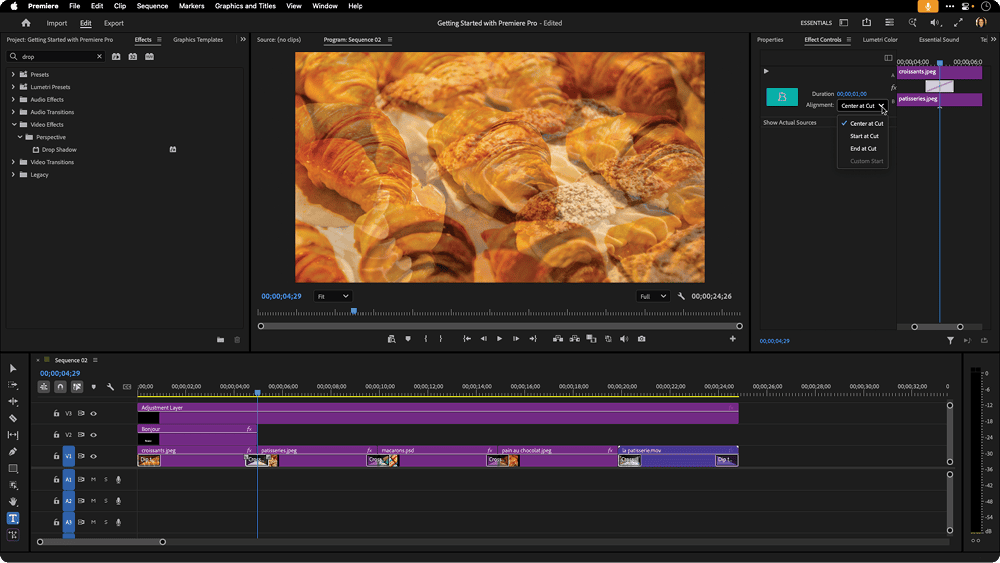
You can modify video transitions in the Effect Controls panel, just as you would a clip’s properties or effects. You can change its duration in the Effect Controls panel, by double-clicking it in the timeline or by dragging its handle in the timeline (Figure 29).
Working with Audio
Many Premiere projects include audio. Video assets might include audio. You can add an audio clip with speech recorded separately (which is known as a voice-over). You can also add music and sound effects.
Adding audio assets
Video assets can include both video and audio. When you drag a video clip with audio directly to the timeline, the video portion appears on a video track, and the audio portion appears on an audio track.
When you add an audio clip to play at the same time as narration, such as sound effects or music, put it on a separate audio track. If you drag it over another audio clip, Premiere replaces that audio with the new audio.
If you’d like to work separately with the audio that is a part of a video clip, you can unlink it from the video. Select the clip, and either choose Clip > Unlink or right-click and choose Unlink from the context menu.
You can also drag audio files directly to an audio track in the timeline or use the Source Monitor to add audio content as described in “Adding content from the Source Monitor,” above.
You can even record directly in Premiere by clicking the microphone icon to the left of an audio track.
Acquiring music and sound effects
You can find music and sound effects in the Essential Sound panel when you click the Browse tab. Click the disclosure triangles to select options for moods, genres, and other criteria. You can filter results to include Free, Premium, or both types of audio.
Making music fit the duration
If your music is too long for your clip, you can trim it down. To shorten it, hover over the end of the clip until you see the pointer change to a bracket with an arrow, then drag it.
So that the music doesn’t end abruptly, you can fade it out using an audio transition from the Effects panel or by dragging the handle at the end of the clip. Dragging it to the left increases the duration of the fade out. Dragging it up or down adjusts the curve that corresponds to the fade’s rate of change.
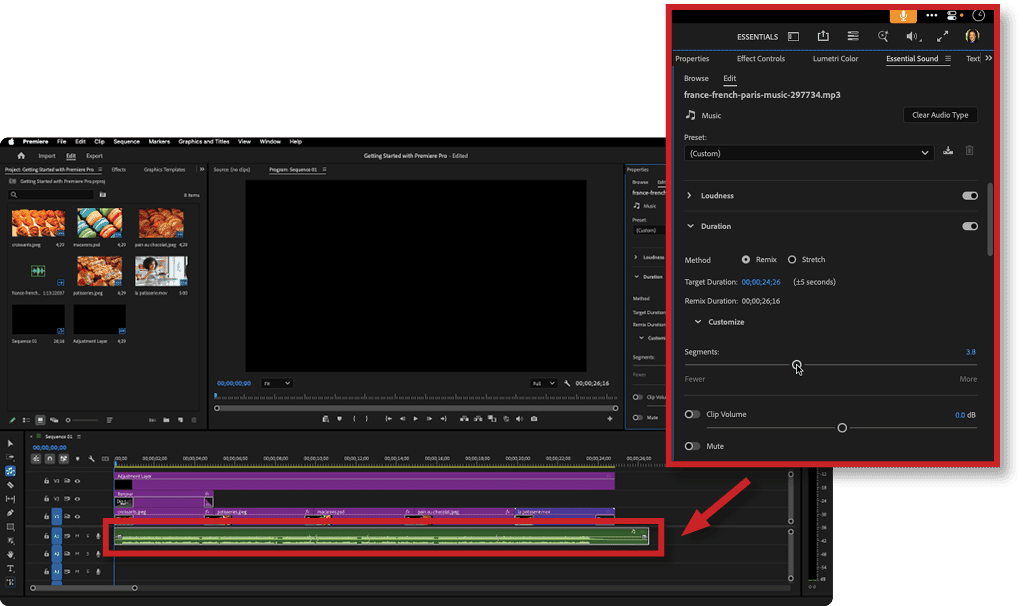
The Remix tool, which is nested with the Ripple Edit Tool in the toolbar, lets you drag your music to the duration you want and uses AI to trim out or extend parts automatically so that it sounds natural.
You can fine-tune the remixed results in the Essential Sound panel (Window > Essential Sound) (Figure 30).
Exporting
When you’ve completed your project, you’re ready to export. You can export either from Export mode or Edit mode.
Exporting using Export mode
Enter Export mode, and move through the settings from left to right.
First, set the destination. You can save your work in any number of standard video and audio file formats, such as MP4 or animated GIF, to your hard drive or publish it to any of six available social media channels. You can also FTP it.
When you’re exporting a local copy, use the next column’s settings to set the filename, location, preset, and format. Premiere uses either the preset or the custom settings you set. You can change the export settings to use a different preset or format, and you can further adjust the settings in the options below.
The next section includes a preview of the content to export, a timeline you can scrub, and media controls. The brackets on either side of the media controls are In and Out points you can use if you want to export just a portion. You can set the In and Out points with the brackets in the same way you would set them in the Source Monitor. Then you can use the Range drop-down menu to set the range to Source In/Out. You can also set it back to Entire Source if you want the full timeline.
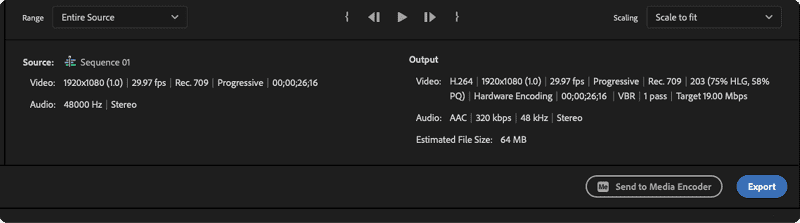
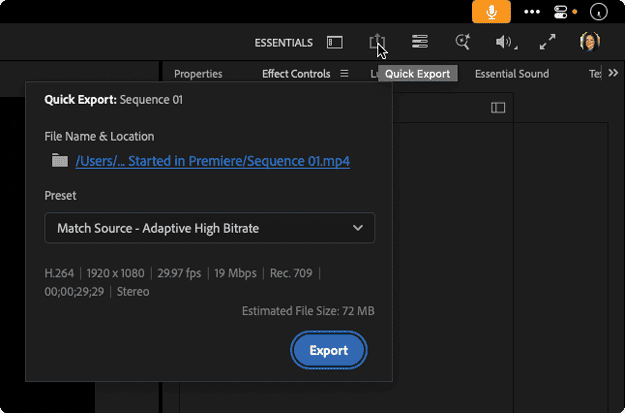
At the bottom of the screen, you can either click Export or Send To Media Encoder to export. Media Encoder is a separate application that you can use for batch processing and accessing additional settings. Another advantage is you can return to work in Premiere while it exports (Figure 31).
Using Quick Export in Edit mode
You can also export within Edit mode. In the upper-right of the Edit mode screen, you’ll see a Quick Export option to the right of the Workspaces button.
Quick Export shows you the name and destination for saving the video. You can change the preset if you want, then click Export (Figure 32).
Wrapping Up
Premiere is an application with a lot of panels and tools that may seem complex and intimidating. If you’ve been using other Adobe applications and then try Premiere, you’ll see that there are parts that do look familiar.
Start small! Try making a short sequence as a video or animated GIF, and build from there.
I hope you’ll discover that you don’t have to make Hollywood blockbusters to find uses for Premiere as a designer.
For more ideas for using Premiere as a designer, see my article “Premiere: It’s Not Just for Video” in CreativePro Magazine Issue #56.
If you’d like to see a video where I put together a sequence from start to finish and explain the process, please see my CreativePro Members-Only Video: “Getting Started in Adobe Premiere.”
Commenting is easier and faster when you're logged in!

Recommended for you
Replacing the Standard Poster for Video and Sound Files
If you create interactive PDFs from InDesign, you probably know that y...
How to Fix Missing Content Problems in Premiere
Learn what the media warnings in Premiere mean and how to address them
How to Animate Flashing Lights in Photoshop
Learn how to create a flashing lights animation from individual Photoshop layers...