
From Print to Ebook
Your guide to producing great-looking EPUB ebooks from print projects.


This article appears in Issue 17 of CreativePro Magazine.
“My design looks like that?!” one art director exclaimed after I showed her an ebook I had made from her newest print book.
“Yes. Yes, it does,” was my reply.
I am no longer defensive about how much the ebooks I produce deviate from the versions designed for print. In fact, I embrace those differences.
That’s because my ebooks are built from the same content but for different audiences with different expectations and priorities. Print readers cherish a certain feel and texture—and even smell—when they open a book. Ebook readers want convenience, variety, connectivity, and choice. They want to customize their fonts, access linked notes, and use text-to-speech features.
The print edition always comes first, so that will be the starting point. I’ll adapt only the important elements that make sense for an ebook. And I’ll use ebook-native solutions when they make sense. In my experience, that’s the only sensible way to go about it. The point is to create an ebook that looks and functions well as an ebook, not as a poor stand-in for the print version.
How We Read (and Do More with) Ebooks
We all grew up reading print books. We know how they’re organized, how they feel in our hands, how our eyes scan the pages, and how our brains absorb the information.
A print volume is designed in double-page spreads, which a reader can scan to see what to read first (choosing among text, sidebars, pull quotes, images, and captions). Online content like news sites and newsletters similarly have design elements that compete for a reader’s attention. In contrast, ebooks present content in linear order, showing everything in the sequence the designer and editor choose. Material flows from one screen to the next, and sometimes it gets broken up in unfortunate places.
It can be a little uncomfortable reading a reflowable ebook at first. There are font, text size, background color, and orientation decisions for readers to discover, consider, and make. As a reader, you can get a little confused as you swap fonts and suddenly find the text is too small. Subheads may land at the bottom of the screen; you don’t remember what the cover looks like; you don’t have a sense of the individual book you’re reading; you don’t know how far along you are in the book; and so on.
Reading lots of ebooks alleviates that discomfort. I borrow books from my local library using Libby. I also buy ebooks and download samples just to see how they are designed.
There’s no substitute for first-hand knowledge. I tell clients and other designers to fully explore the ebook reading experience: Read on tablets, on phones, and on a laptop. Adjust all the settings. Turn on the text-to-speech feature and listen to the book. What do you like? What do you hate? You’ll see solutions to the problems you’ve been wrestling with—and you’ll see problems with no solutions that everyone deals with. The more you read and fully interact with ebooks, the more you will build your intuition for designing them well.
Decisions, decisions
Your first decision is whether to produce a reflowable or a fixed-layout EPUB.
Reflowable EPUB3 is the only way to go with any text-heavy book. Readers depend on the software’s many options to make text more readable. Fixed-format ebooks are stuck at a single size in the original font, with only pinching and zooming available for the reader to get a closer look at the text.
Reflowable ebooks are accessible for readers who use assistive tools such as text-to-speech features. Fixed-format ebooks are not; text may be embedded in the image, and images may not have alt text. So, a whole segment of the potential audience is not served and is lost.
You’ll notice in a reflowable ebook when text is live and when it’s an image. Which is more pleasing? Which is more helpful to all potential readers?
Whenever possible I use live text in place of display type, rather than capturing it as an image (with the exception of the title page; see below). The book loses its lovely chapter opener, but it gains usability. And my chapter opener can be lovely, too, using the print design as a starting point. Live text is available for text to speech and makes for a more responsive presentation as users change preferences.
Adapt, don’t convert
An ebook edition is as important as the print edition, and it requires as much care.
I decided early in the process of making ebooks that I don’t convert print documents to reflowable EPUB3. Convert implies a mechanical process with thought given only to “making it work.”
Instead, I adapt print layouts because reflowable ebooks shouldn’t be reproductions of their print counterparts. Even the most straightforward of novels takes some thought and redesigning. Complex ebooks need almost as much attention to detail and process as their print counterparts.
A savvy ebook developer has to look at the print designer’s choices and decide if they’ll make a usable, accessible ebook. Some of these choices will, others won’t.
Key Terms
Before we get into the nuts and bolts of making ebooks, let’s start with a quick glossary of some terms I use in this article.
- Reading system: The combination of hardware and software used to create an environment for reading an ebook.
- EPUB3: The file format used by ebook devices and such apps as Kindle, Nook, Apple Books, Libby, and Kobo. Note: Older versions of InDesign defaulted to EPUB2 (an obsolete format) in the Export dialog box. This is no longer the case with InDesign 2023 (version 18.1), but it’s still worth keeping an eye on. Always choose EPUB3 when you export (Figure 1).
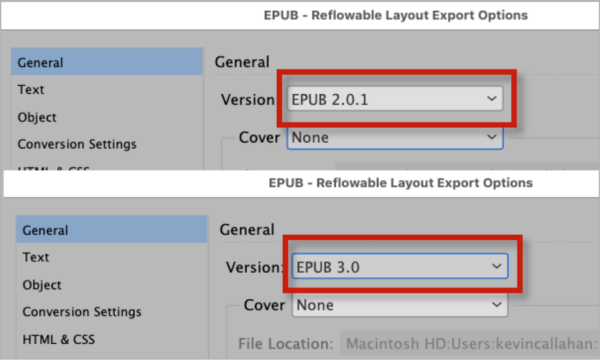
Figure 1. If you’re using InDesign 18.0 or older, make sure to change Version from EPUB 2.01 (top) to EPUB 3.0 (bottom).
- XHTML, CSS, classes: EPUBs are built on the same technology as websites; XHTML is a version of HTML that is also valid XML. For most books, each chapter is in its own XHTML file within the EPUB. Each XHTML file begins a new screen. The CSS (cascading style sheet) contains display instructions: font, font size, color, spacing, and so on. These attributes are described in classes. For example, <p class=”spaceabove”> indicates a paragraph with extra space above. You can assign class names in the Edit All Export Tags dialog box, which we’ll discuss in later in this article.
- Semantic XHTML: Semantic markup is another way of saying grammatical XHTML. Every book element has a tag (e.g., h1, h2; p; blockquote). The reading system reads these tags and, if there is no CSS for them, displays content with built-in attributes (e.g., h1 heads are bigger than h2; blockquote is indented left and right with space above and below, and so on).
- Mapping: Mapping styles allows you to create one set of paragraph and character styles and use them through the entire production process. You apply styles to text in Word, map them to InDesign styles during import, and then map those to CSS styles in the Edit All Export Tags dialog box, which you can find in the Paragraph Styles or Character Styles panels’ panel menus. (See “Edit All Export Tags” below)
- Screen: I use the word screen (as opposed to page) whenever describing an ebook display. It helps to remember that we’re not looking at a physical book anymore.
- Validation: This is a check to determine if the EPUB file passes current standards. Validation apps and services check your work. Pagina EPUB-Checker is popular, powerful, and always up to date. FlightDeck is an affordable subscription service that provides retailer-specific feedback and several helpful editing tools. Ace by DAISY checks for all important accessibility features.
- Navigation TOC: A table of contents that is built into the software of a reading system, in contrast to a TOC that is part of the ebook’s content.
A Sample Project
I’ve prepared a short sample book to illustrate the ideas in this article. It includes two chapters, along with some front matter elements. I’ll be showing screenshots from this book and from the resulting ebook to give you an idea of the before and after.
You can download this sample to follow along. The package includes:
- Finished print layouts
- Export-ready layouts
- EPUB3 file
- PDF showing some CSS interventions I’ve made to finesse the export
In this article, I’ll be moving from front to back of a typical nonfiction book. While I’ll be discussing some common book elements, there are many more you’ll come across. Take what you read here and apply it to whatever is in front of you.
Front matter
The front matter of a print title can include half-title and full-title pages, a copyright page, a dedication page, an epigraph page, a preface, a foreword, the table of contents, lists of illustrations and tables, and more. Most of these elements can remain in place for the ebook, but some might move or be presented differently.
Half title: Print editions sometimes include half titles. Though traditionally included in a printed book, they’re not important for an ebook and are usually left out.
Title page: The title page, also known as the full title, usually has an eye-catching design. Editorially, it includes only a few elements: the book title and subtitle, the name(s) of the author(s), and the publisher’s name and logo. In addition to capturing the vibe of the book with the design, the title page is usually the reader’s first look inside the book.
I always convert title pages to images to preserve the design. If we use live text, we can’t rely on e-readers to display them consistently and well.
To ensure the ebook opens to the image of the title page:
- Group all elements on the page.
- Choose Object > Object Export Options, and, in the EPUB and HTML tab, select Rasterize Container from the Preserve Appearance from Layout menu.
- Type bodymatter titlepage in the epub:type field (Figure 2).
- Navigate to the Alt Text tab, and select Custom from the Alt Text Source menu. Include all pertinent information from the title page in the large field.

Figure 2. Specify bodymatter and titlepage to ensure your ebook opens to the title page.
Tip: Keep an InDesign template with a suite of object, paragraph, and character styles—ready to be applied and set up with these object export settings—and import these styles into each new project. You can see these styles in action in the downloadable files for this article.
Copyright page: I often move the copyright page to the end of the ebook. Usually filled with boilerplate language, it doesn’t contribute much information to the Look Inside preview that retailers offer, which can show the first 10–15% of the book’s content. But you should keep the copyright page up front if it includes credits that are important for marketing.
Wherever it appears, the copyright page should begin a new screen (with a page break before). I spec the copyright text to be smaller than body text, usually at .9 em (about 10 pt type). Readers can always adjust font size.
Tip: To force an element to begin on a new screen—by creating a new XHTML file in the EPUB—I insert a paragraph return above the content and apply one of my paragraph styles (pagebreak), which has Split Document (EPUB only) selected in its Export Tagging definitions.
Dedication, epigraph: These are on their own print pages as well, and the ebook should follow suit. Redefine these paragraph styles to select Split Document, or insert a paragraph formatted with the pagebreak style above the text.
Table of contents: Even if a print layout doesn’t include a table of contents in its front matter, the ebook must. This is in addition to the Navigation TOC used by e-reader software.
Generate your ebook’s table of contents (Layout > Table of Contents), which will let you define your TOC anew or use existing Table of Contents Styles. Place the generated TOC in the front matter and specify this TOC when exporting (Figure 3). I keep chapter number and name on a single line, instead of stacking them, to condense the list and avoid bad breaks (like a chapter number orphaned at the bottom of a screen).
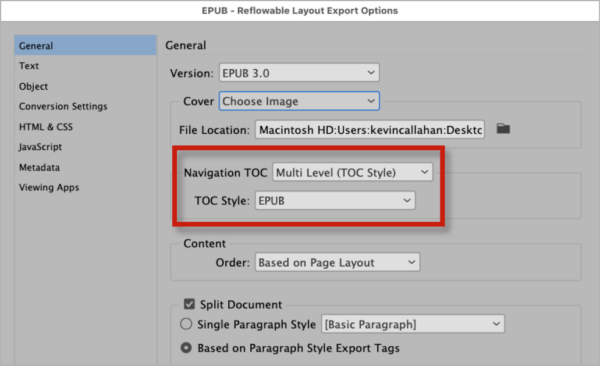
Figure 3. Choose your InDesign-built table of contents for your EPUB.
Other listings: You can create any number of listings using Table of Contents Styles. In the sample for this article, I’ve included listings for illustrations and media.
When prepping to export to EPUB, place these additional listings in the document, usually right after the main TOC. Make sure to include them as entries in the ebook’s Table of Contents and Navigation TOC.
Acknowledgments, preface, foreword, introduction: Each of these sections in the front matter should begin a new screen in the ebook. Set each by editing the paragraph style assigned to the section title, choosing Split Document (EPUB Only) in the Export Tagging area of the Paragraph Style Options dialog box.
Body of the book
Now let’s consider the elements that compose the bulk of the content you’ll be dealing with: the body of the book.
Part and chapter openers: Part and chapter openers often combine intricate type treatments with flourishes or other dingbats, placed in specific places on the page.
Transforming them for ebook use can be challenging because we can’t trust e-readers to consistently display complicated typography. What’s the solution? There are four options.
- Capture the display as an image and embed alt text.
- Capture the display as an image and anchor it in a text frame that includes the live text, using a paragraph style to make the live text present for text to speech but invisible on the page.
- Keep the text live but simplify the design so it resembles the print version. You will sacrifice tightly integrated typography and decoration.
- Try to reproduce the print design using CSS, hoping for the best across all-reading platforms.
I’ve tried all four. My least favorite is the last. Who wants to send a book out without knowing whether it’ll look good or bad for some readers?
My preference is number 3. It’s the most direct and reliable way to provide a good reading experience, and it is easiest to implement.
But sometimes editors and designers demand that we use the print design as an image. In that case, I go with choice number 2. You can export the entire page as a JPG or PNG, crop it to the section needed, and replace what’s in the layout with the image. Or you can group everything on the page and export it as a rasterized image.
In either case, you will need the title text to create the TOC. So, I create a new text frame, type in the information (e.g., Chapter One: Wall Art), and assign it a paragraph style matching its place in the book’s hierarchy (h1, h2, etc.).
I’ll use this paragraph style behind the scenes to set up the table of contents and to split the EPUB into XHTML files. Because we don’t want to see the text in the print layout—we’re using a graphic from the print edition—I adjust the exported CSS to give it attributes to make it invisible (a color of None will work). See the annotated sample and “CSS Tips” PDF for more information.
Drop caps: Ebooks do not reliably display drop caps or any other nested images or display elements, so I never use them. Narrow screens can make paragraphs with such styles very difficult to read, and they can turn eye-catching runarounds for images or sidebars or quotes into a catastrophe for your reader.
If the text really needs something to set it apart, I will sometimes replace a drop cap with a first letter or word set in bold.
Images and captions
Always include color images if available (as RGB, not CMYK). Here are some other guidelines.
Anchor photos and illustrations with captions to the most appropriate spot in the text, usually following a text reference. The cleanest export results when the caption is in the text thread, with the image anchored to the end of the preceding paragraph. That might necessitate redoing some layouts when prepping for export if captions are in separate frames.
Go horizontal: Images are sometimes stacked one above the other. I group these horizontally. Horizontal (landscape) groups fit in the width of the screen, and the caption will sit beneath. Vertical (portrait) images can push the caption to the next screen, which makes lots of editors and designers very upset (Figure 4).
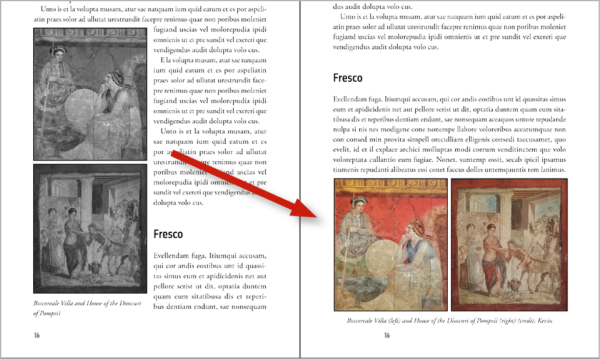
Figure 4. I rearrange stacked images to fit better on screen. Be sure to change the caption to reflect the new positions. Also note the switch from the black-and-white print version to color for the ebook.
Note: Captions are prone to jump to the next screen if a reader uses a very large font size on a small screen. There’s nothing we can do about that.
Transparency: Kindles cannot display transparency. A PNG image with a transparent background will have a solid white box behind the image.
File names: Be sure to use only letters, numbers, and dashes in image file names. Some glyphs, like percent signs (%), and empty spaces, are unreadable by some reading systems. So, instead of My Favorite Song.jpg, go with MyFavoriteSong.jpg.
Tip: Use this script to rename selected images by Gerald Singlemann to go through your document and easily fix problem names in your images without needing to leave InDesign or relink files.
Alt text: The content of every image should be available to every reader, including those using assistive technology. Images are made accessible by alt text, which is embedded in the <img> tag in the XHTML. Add alt text through Object Export Options (Figure 5), either by typing it in yourself (select Custom for the source) or accessing it from metadata embedded in the image (select the specific field).
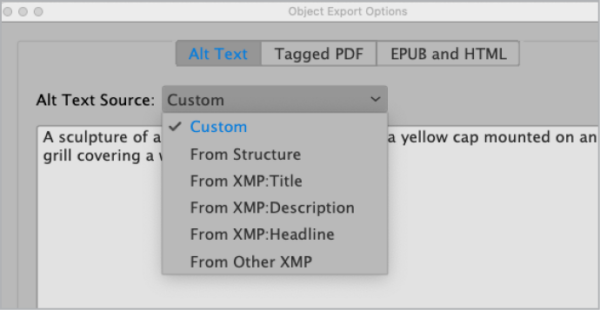
Figure 5. Use Object Export Options to add custom image metadata or import it from the image’s metadata with the Alt Text Source menu.
Tip: Authors and editors are responsible for writing alt text. Generally, any image that is not fully explained in surrounding text or caption needs this information for assistive devices. For example, we need alt text if a story about a rare bird doesn’t describe the bird in the text but relies solely on an illustration that a sighted reader can view.
Color
Most books are printed in one color because of budget constraints. But ebooks can handle color for free, so I go for it (Figure 6). I include color images whenever available, and I add color to chapter titles, decorative flourishes, tables, and charts.

Figure 6. Even if the print edition (left) is printed in one color, you have no such constraints with the ebook version.
Warning: Never use color to indicate meaning—don’t say “as shown in red in the pie chart.” Your reader might have color blindness or be reading your file on a grayscale ebook device or reader. This is something that an author or editor would be responsible for rewriting.
Choose colors that can translate into distinctive shades of gray on grayscale screens; light tones might not. If you’re converting display type to an image, check the contrast of the text against its background. While white text on a light gray background might print beautifully, it might be illegible on a grayscale e-reader. You can simulate these devices online by using sites such as Adobe Color.
Also, you need to plan for Night View reading, where the user can invert the colors, so the screen is black with text in white. Some colors might not reverse well, making text invisible or hard to read.
Pull quotes: You can export pull quotes from the print edition with most of their styling intact; just be sure to anchor the quote in the appropriate spot in the flow of the text.
I’ve worked with editors who remove pull quotes altogether from the ebook. In print, the quotes can be anywhere on a spread, but in the ebook, they often land directly before or after the source text. In that context, they can seem redundant and break the flow of the text.
Sidebars: Sidebars in print often have a tinted background. Some e-readers don’t accurately render the start and finish of the background, so you might see a bit of the tone at the bottom of a screen preceding text that begins on the next screen, or the background might extend to a new screen, even after the end of the text.
The background tells the reader that the content is separate from the main text.
Since a sidebar might run on for two or more screens, we should cue the user that they’re reading a sidebar and whether they’re at its beginning, middle, or end. Here are some ways to do that:
- Enclose the sidebar in a ruled box.
The box may extend before or after the sidebar text, but isn’t as noticeable as a background tint. I’ve provided a CSS solution in this article’s downloads. - Use a sans-serif font if the main body text is serif and vice versa. You can assign this in InDesign in the paragraph styles for sidebar heads and text.
- Increase left and right margins and center the sidebar block so that it takes up less horizontal space in the ebook (Figure 7).

Figure 7. Print sidebar (left) and ebook (right). Note that I’ve swapped a color image for the ebook and added dark red lines at top and bottom.
To make sure your XHTML will be correct under the hood, assign an object style to the frame holding the sidebar if it isn’t in the main text thread. In Edit All Export Tags (see “Edit All Export Tags” below), type in the tag aside, which is XHTML-speak for secondary content. Any properties you assign to the object style will export to the EPUB. I show some sample settings in the annotated sample.
Marginal notes: The marginal notes (sometimes called blurbs or marginalia) in the sample design are flush left when they appear on the left page and flush right on the right page. This makes sense for print but would be confusing in an ebook, where the notes will not float to the left or right but instead be placed between paragraphs.
For the sample ebook, I make all notes centered, keeping the font size and style, and I have InDesign export the file with a single CSS class (Figure 8). As with sidebars, I assign an object style to the text frame that contains the note. InDesign will create a CSS class with the attributes intact.
Then I anchor the text box in place in the appropriate spot.
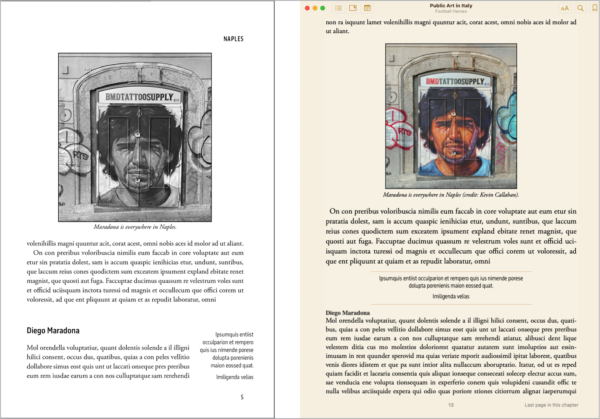
Figure 8. A marginal note moved into the text flow for the ebook. Note that I swapped in the color image.
Tables: Table design is one of the thorniest issues in adapting a print book to a reflowable ebook. Narrow and short reading devices, like smaller smartphones, squeeze columns and run long tables over multiple screens.
Some software, like Kindle and Apple Books, show the full view of a table if you tap the screen. But not everyone knows that, and not every ebook device does it, so you need to make some adjustments.
Columns: One ebook publisher and device manufacturer, Kobo, recommends that tables have no more than five columns, a good principle. But you have to also consider the type of language in the table. For example, medical books have long terms that can run to 15 or 20 letters—too long to display on a small screen. Fewer columns with very long words might be problematic, too.
Rows: Some e-reading devices are short and can’t fit many rows on a single screen, and so they will extend the table vertically to multiple screens. Table heads will not repeat at the top of each screen, as they can in InDesign.
So, what can you do for tables that are wide and/or long?
- Break them into chunks. Work with editors to find logical breaks in long tables and create shorter bits, each including column heads.
- Rewrite. Can the table be adapted to include subheads and lists? Work with your book’s editor to explore the possibilities.
See the annotated sample in this article’s download for a couple of solutions for adapting a large table into text (Figure 9).
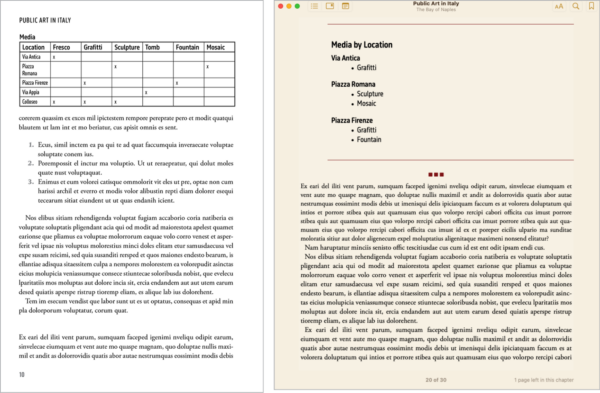
Figure 9. This table is more effective as a sidebar list in the ebook version. Note the narrative pause boxes just below the table, in color.
Lists
As long as they’re tagged correctly, you don’t need to add any custom attributes for a list to indent properly in an ebook.
Assign paragraph styles that specify whether a list is numbered or bulleted. InDesign exports these as ordered <ol>
and unordered <ul> lists, respectively.
Be careful with multilevel lists. Because XHTML has built-in indention levels that get increasingly narrow, small screens can display multilevel lists poorly. You may run into trouble if you go past three levels. Can you rewrite the list to contain fewer levels? Again, work with your editor.
Tip: Stay on the lookout for text following a list indenting when it shouldn’t in your exported ebook, as if it were included in the indention hierarchy. On export, InDesign sometimes fails to end a list at the correct spot, extending it a few paragraphs. The only way to fix this is in the XHTML itself, by moving the list’s closing tags to their correct location.
Block quotes: Like lists, the blockquote tag is a semantic XHTML element. Reading systems automatically indent block quotes, with space above and below. You don’t need to style these attributes for export.
In Edit All Export Tags, type blockquote in the Tag column. Add a class name; InDesign may not export the tag without a class assigned.
If you assign the blockquote tag to every paragraph in a multi-paragraph block quote, the ebook will display each one as a separate block, which is not what you want. See the CSS PDF for markup that will enclose all paragraphs in a single block quote entity.
Narrative pauses: In print, pauses are usually indicated by a one- or two-line space followed by a non-indented paragraph. That’s sufficient, because text doesn’t flow, and the pause will always be in that spot.
Because ebooks can reflow, we don’t have any idea where that pause will land. It may be at the top of a new screen, where the reader may not notice that the new paragraph has no indent.
To account for this, I add some kind of divider, whether a row of three or four bullets or boxes, a single line, or a decorative glyph used as an image (Figure 10).

Figure 10. In this example, three decorative squares are used to convey a narrative pause to the reader.
Endnotes: Some books present endnotes at the close of each chapter; others have a section in the back matter for all of them together. The best position in an ebook is at the end of each chapter, where they’re immediately available to readers.
You’ll want to hyperlink from the text reference to the note and from the note back to the reference. Use cross-references to build these links, and they will export to EPUB. See Issue 79 of InDesign Magazine for the details of working with cross-references.
Photo credits: Photo and illustration credits are often included either on the copyright page or on a separate page in the front or back matter, and they’re usually keyed to the print page number. Ebooks don’t follow that pagination, so you need to handle credits in another manner. I usually append them to the end of captions in parentheses (Figure 11).
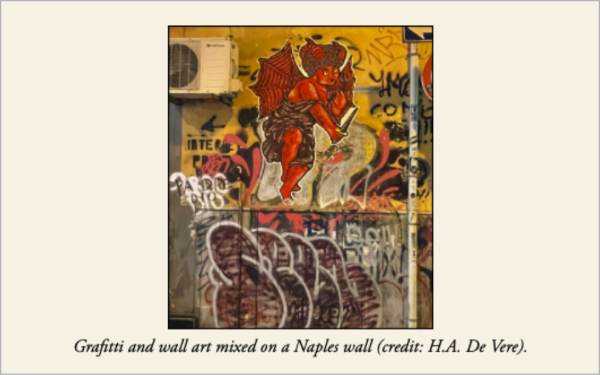
Figure 11. Since fixed page numbers don’t exist in EPUB, it’s best to put photo credits with the each photo.
Index: If you’re lucky, your book will have an index created either with InDesign’s native tools or by an indexing plug-in that hyperlinks the index to the text reference.
If you’re not that lucky, try Live Index ($69, Id-Extras). It creates links from the print index entries to the top of the ebook page where the indexed terms are located, not to the text reference itself. It will get your readers close, but they might have to scroll to find what they’re looking for.
Tip: I run Live Index before I move any elements in preparation for EPUB export to make the links as accurate as possible.
Typography and Page Composition
Print designers micro-adjust letterspacing in display type, and compositors keep an eye out for stacked hyphens, rivers of white space running down a page, and other typographic faux pas.
As ebook designers, our typographic control is limited. We can embed fonts or spec serif, sans-serif, and monospace styles; we can use caps and small caps, as well as letterspacing and color. But fine-tuning display type is out, and rivers change with every adjustment to font size. You just have to accept that readers have the final say in the appearance of the ebook and try to make something that they can’t break.
Should you embed fonts?
Technically, you can embed fonts if you:
- Have an ebook-specific license to use the font that permits embedding
- Have an OpenType version of the font
- Don’t mind the fact that users can override your font choice
However, I almost never embed fonts in reflowable ebooks. Licensing is often the reason. But there’s also the fact that print designers don’t usually consider ebook use when choosing fonts. What looks great in print may not reproduce well on screen.
The fonts in the Adobe Fonts library are licensed for ebook use without extra expense. Other foundries have varying costs for ebook font licensing.
InDesign gives you the choice to embed when exporting to EPUB. It doesn’t ask for proof of license, but it will not embed any non-OpenType fonts.
Font size and variation
I like to pare down type variation in ebooks. Print designers often use variety in size and case—small caps for the first few words in a chapter or a smaller size for photo credits within captions. But for ebooks, those choices may be either unnoticeable or, worse, distracting. Readers use a multitude of screen sizes, fonts, and font sizes. So, you can improve the user experience by keeping text designs simple.
InDesign gives you an idea of what you’ll export in the Export Tagging section of the Paragraph Styles dialog box (Figure 12). While it uses pixels in the preview, it will export font size in ems (1 em = 12 pt = 12 px).
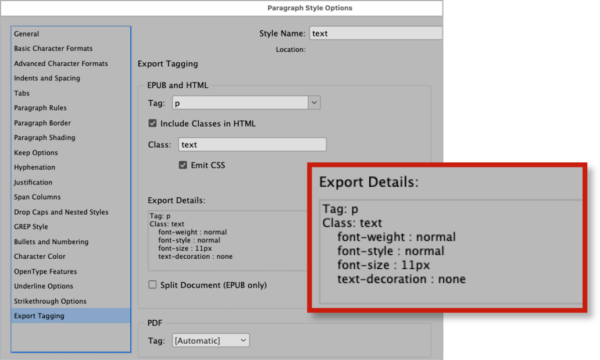
Figure 12. InDesign lets you preview the CSS that will result from your settings, so you can adjust the InDesign styles before you export.
I make all body text the same size; in my own CSS, I spec body text at 1 em, which translates to 12 pt in InDesign. So, if you’re using 10 pt type in your layout, InDesign will export something about .9 em. If you want to change that you can always go into the CSS after export and make the adjustment.
I set table text at .9 em, so more of it fits in the table cells when viewed on a smaller screen. I also make figure captions .9 em in an attempt to keep them on the same screen with the images they describe.
Hyphenation
Across devices, ebook hyphenation is inconsistent at best and often poor (hyphenating after two letters, for example). I do keep running text hyphenated. But I never hyphenate heads in ebooks. If you turn hyphenation off in an InDesign paragraph style, that setting will carry over in the exported CSS (-epub-hyphens:none;).
I turn off hyphenation within InDesign for display items like pull quotes, dedication, and epigraphs. I’ll also do so in any context where the type is larger and stands on its own, where hyphenation could be ugly.
Leading/line spacing/line height
Line height is the CSS term for leading or line spacing. Readers may find tight line spacing in ebooks difficult to read, so I use a generous amount. My usual line height is 1.5 em, which is roughly 16 pt in InDesign.
Some reading systems apply their own line height or allow users to adjust it. But I like starting out with what I think will work well.
Subheads
I remove space below subheads to keep them closer to the first paragraph of the text that follows. It won’t completely prevent heads being orphaned at the bottom of the screen, but it may help. There is CSS to keep a head with the next paragraph (page-break-after: avoid !important;) but I don’t know of a reading system that obeys it.
As the name suggests, reflowable ebooks are meant to reflow. The flexibility to have content fit different devices and user settings is the essence of the file format. Pushing a head to a new screen to keep it with the next paragraph may leave a lot of empty space behind. Some designers prefer a big gap to an orphan at the bottom of a screen (I’m among them), but we have to live with what the reading systems do.
Alignment
I always make running body text flush left/rag right (Align Left in InDesign). Justifying paragraphs in ebooks can lead to bad hyphenation and word spacing.
Some reading systems override your decision and leave it to the user to choose justified or rag right. But I recommend starting out with your own preference.
Edit All Export Tags
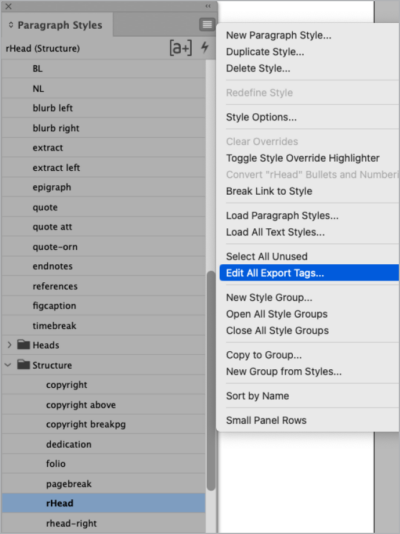
Figure 13. Open Edit All Export Tags from the Paragraph or Character Styles panel menus.
The Edit All Export Tags dialog box is an essential tool for getting content out of InDesign and into ebook format efficiently. I’ve mentioned it a few times so far; now let’s see it work. You can access the Edit All Export Tags dialog box from the Paragraph, Character, and Object Styles panels (Figure 13).
All styles in the document are listed. Paragraph style names are listed first, then character styles, followed by object styles.
In the column labeled Tag, choose whether the style is a paragraph (p) or head (h1–h6), or if you want to let InDesign decide. I always explicitly specify the tags for heads (Figure 14).
In the next column, Split EPUB, you add a check to create a new XHTML file every time the style is used. Doing so will designate chapter breaks in your ebook, along with any other spots where you want to ensure the content begins a new screen.
The next three columns—Include in HTML, Class, and Emit CSS—work together. Class is where you can provide a name of your choosing, as succinct as you can make it. Once you’ve created a Class name, make sure Include in HTML is checked. Emit CSS tells InDesign to write CSS code for that class.
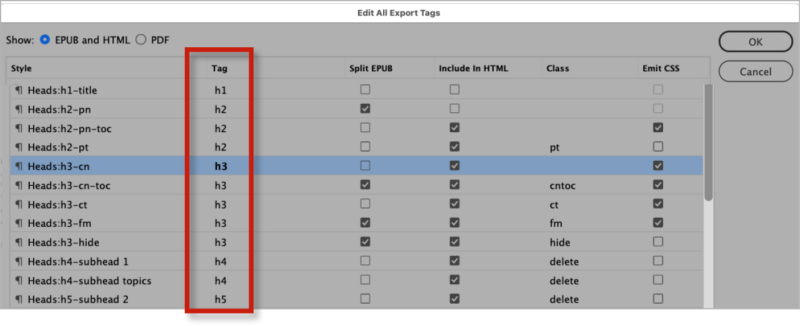
Figure 14. While you can let InDesign choose the tags for each heading style, it’s better to do it yourself so there are no surprises.
You can use the same class for a number of similar styles. This article’s sample InDesign document has several paragraph styles for text, each designating a different value for tracking. Since the EPUB format doesn’t use tracking, all versions of text can export to the same class (Figure 15). That’s an efficient way to work, but just be aware that if you Emit CSS for all, then InDesign will clog your files with many iterations of the same information. So, you want to Emit CSS only once.

Figure 15. These four text styles only differ in the amount of kerning they apply, so they should all have the same class.
Besides <p> and <h1…h6> tags, you can write in aside, figure, and blockquote, as shown in Figure 16. I’ve included Class names and checked Emit CSS. InDesign might drop the tag altogether for tags you’ve typed in if you leave Class empty.
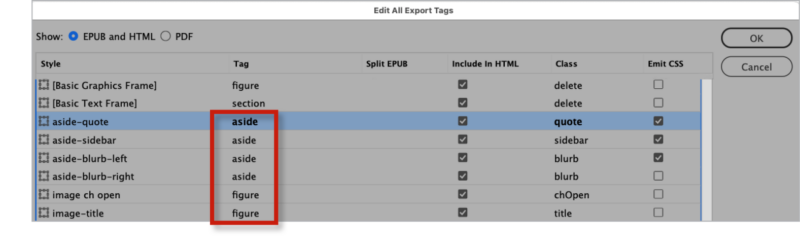
Figure 16. You can type in the name of the tag you want to use for any style.
You can enter all this information in individual Paragraph Styles menus. However, I’ve found that edits I’ve made in individual style settings can disappear and have to be fixed in Edit All Export Tags. So, I always make sure to review Edit All Export Tags before I move forward.
Cracking Open the EPUB
It’s inevitable that you will have to modify some aspects of your EPUB after it’s exported from InDesign. EPUBs are folders of files, including XHTML and CSS documents, zipped and saved as a package. You can’t just unzip them with your computer’s operating system, though. Here are some ideas for getting access to the files.
Sigil (Windows and macOS; free) opens the entire EPUB in a single window and provides lots of editing tools. And it’s free!
You can edit your XHTML and CSS with any HTML editor; I work in Dreamweaver, part of Adobe Creative Cloud. I open and rezip the EPUB with eCanCrusher.
Test Until It’s Right
The great thing about using InDesign to build ebooks is that you can keep working on them until you’re satisfied. You can export over and over, testing and tweaking each time.
Once you’ve moved from InDesign to working on the EPUB files themselves, use a browser to test CSS adjustments. Just open the XHTML in a browser (drag and drop the file into a browser window), go back to the working files to make an adjustment, making sure to save your changes, then refresh the browser.
Adapt and Thrive
Coming from a print background, it took me a while to realize that developing ebooks requires a different approach to book design and production. In most cases, ebook content and presentation are separate realms.
If we accept the premise that a reflowable ebook cannot look exactly like the beautifully designed print edition—nor should it!—we can separate text from design and reassemble it, delivering it in a useful, accessible, and beautiful way that plays to the platform’s strengths in the service of the reader.
Ebooks have one tremendous advantage over print: Many more people can read them than can access print. Assistive technology enables visually impaired readers to hear a book and navigate through it.
For detailed instructions on making ebooks accessible, see “Building Accessible EPUBs with InDesign” in CreativePro Magazine, Issue 14. I wrote this piece for InDesign Magazine in 2017, and Laura Brady updated it in late 2022 with the most recent best practices and methodologies. The article also appears in CreativePro’s Accessibility SuperGuide, which is free to members and addresses ebooks, PDFs, and the nuts and bolts of accessible color, alt text, forms, and more.
What if you want your ebook to look different depending on whether, say, the reader is using a laptop screen or reading on a phone? With web development, you can use media queries—code in your CSS file that can detect the size of the screen on which the page is being viewed and other characteristics of the user’s environment—and then change design specifications in your CSS file.
Most ebook software can’t do that. I eliminate design choices that work on some platforms but not others.
Amazon Kindles, however, do allow for media queries, where Kindle-specific CSS can give you control over a set of attributes that differs from those used by other reading apps. You can find instructions for including these customized design elements in the Kindle Publishing Guidelines.
There’s a lot more to making ebooks than any single article can describe. Here are some resources to continue learning.
- I started my EPUB–making life watching Anne-Marie Concepción’s videos. She provides excellent step-by-step demonstrations, like this one.
- Laura Brady is a leader in making ebooks accessible. She has a suite of videos on YouTube, where you also can find her demonstration of accessibility features in action. You can also find her courses on LinkedIn Learning (including EPUB Accessibility Using InDesign and Editing Ebooks).
- Joshua Tallent is a trailblazer who set the standard for ebook excellence. See his course Ebook Quality Assurance on LinkedIn Learning.
Commenting is easier and faster when you're logged in!

Recommended for you

dot-font: Acrobatics—Putting the Story on the Screen
dot-font was a collection of short articles written by editor and typographer Jo...
Announcing a New CreativePro Ebook: TypeTalk Volume 1
No doubt, fans of Ilene Strizver’s TypeTalk column have missed her writing...

Packaging Graphics on the Pasteboard with the Book Panel
If you have to send packaged files and for whatever reason still have important...