
Editorial Review Workflows
The right digital proofing method can simplify your process and help your whole team work more efficiently.


This article appears in Issue 23 of CreativePro Magazine.
Adobe has been trying to drum up interest in on-screen proofing for many years, going way back to early versions of Acrobat. And now the company has recently ramped things up with the addition of Share for Review in several Creative Cloud products. But despite Adobe’s relentless promotion, getting people to use these features (and use them consistently, correctly, and efficiently) can be difficult. But the payoff makes it worth trying! With everyone on board, a digital proofing cycle can simplify your workflow, increase accuracy, and help you work more efficiently. In this article, we’ll look at a half dozen proofing workflows—Share for Review, three methods of Acrobat-based review, and workflows outside of Adobe’s tools—and help you determine which is best for your specific needs. I’ll pay special attention to the needs of an editorial workflow centered around InDesign, because this presents some unique challenges to commenting accuracy. But many of the workflows and tools described here also apply to proofing work that is done in Illustrator or Photoshop.
Share for Review
The new kid on the block is Share for Review, which works similarly in InDesign, Illustrator, and Photoshop and offers a low-friction workflow for both the review initiator and the reviewers themselves. This browser-based system is absolutely the easiest way to set up a multi-person review of an InDesign, Illustrator, or Photoshop file.
Getting started
Share for Review is accessed right from within InDesign, Illustrator, or Photoshop by clicking the Share button in the upper-right corner of the screen. Alternatively:
- In InDesign, Illustrator, or Photoshop, choose File > Share For Review.
- In InDesign, click the Create Link button in the Review panel (Window > Comments > Review).
- In Illustrator or Photoshop, click the Create Link button in the Comments panel (Window > Comments).
After you give the review a name and click Create Link, the Share for Review dialog box (Figure 1) lets you invite any number of reviewers, and choose if the review should be public or private. If you make a review public by choosing “Anyone with the link can comment,” you create a review with a very low barrier to entry, which is ideal for many uses.
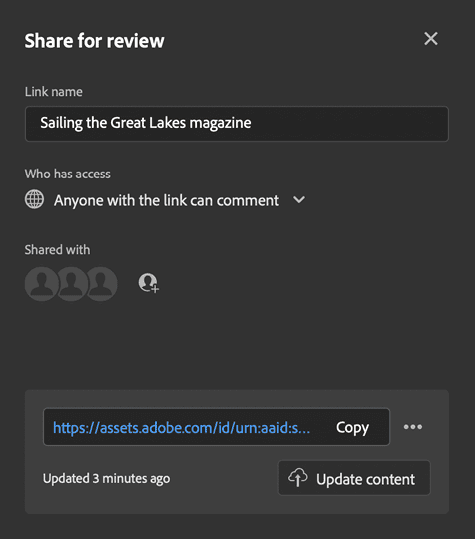
Figure 1. The Share for Review dialog box in InDesign enables you make a shared review private or public, add a password, invite others to the review, and copy a link to the review.
How it works
Once a reviewer clicks through the invitation email generated by Share for Review or clicks the URL you send to them, they will see a pixel-perfect replica of each page in their browser, along with commenting tools (five tools for reviews initiated in InDesign, as shown in Figure 2, or two tools for those initiated in Illustrator or Photoshop).

Figure 2. Share for Review provides five easy-to-use commenting tools for reviewers to review InDesign files: a pin to indicate a location on the page a comment refers to, a highlight text tool, a strikethrough text tool, a replace text tool, and a free-form pencil tool. Notably missing is an insert text tool.
Strengths:
- You do not need to export, store, share, and manage PDFs.
- The workflow is very low friction with a low barrier to entry for reviewers. Reviewers need only a browser and the review URL. No additional software, plug-ins, or Adobe ID needed.
- You can accommodate multiple, simultaneous reviewers. Everyone can see everyone else’s comments.
- Comments appear in the Review panel (InDesign) or Comments panel (Illustrator and Photoshop) in near-real time.
- Users on mobile devices do not need an app to participate in a review cycle.
- The workflow and user experience are similar across InDesign, Illustrator, and Photoshop.
- You can add a password to a review to protect the public link from unauthorized users.
Weaknesses:
- You can’t automatically accept editorial comments in InDesign.
- There’s no great way to “@mention” other reviewers without Adobe IDs, because reviewers don’t need to log in. Only those who log in can communicate within the workflow.
- The workflow is seamless for only a single review per document. In other words, there isn’t a straightforward way to send pages 1–8 to one reviewer and pages 9–16 to a second reviewer, nor to initiate one review with one set of visible layers and a second review with a different set of layers.
- Though it could undermine the simplicity of the process, a few more types of commenting tools, like one for inserting text, would be nice.
Best for:
This review method is a good choice for reviews by groups of reviewers you don’t know well or who have limited patience and skill with technology. The low barrier to entry for reviewers all but guarantees they’ll be able to participate no matter what their skill level, hardware, or technical acumen might be.
Acrobat’s Send for Comments
Acrobat has had the ability to add comments to PDFs since—well, it seems like forever. Yet I find that many people don’t know about (or are confused by) Acrobat’s useful Send for Comments feature.
Getting started
First, you export a PDF from whatever program you’re using. Then, open the PDF in Acrobat Pro (the version that comes with your Creative Cloud membership). Warning: Adobe is rolling out radical changes in the Acrobat interface in what it calls the New Acrobat Experience. Use View > Disable New Acrobat to follow along with these menu items and shortcuts that presume you’re using the traditional UI. Next, either choose File > Share File, click the Share this File with Others icon in the upper-right corner, or click the Send for Comments tool. In the dialog box that appears, ensure that Allow Comments is toggled on, set an optional deadline, then click Send (Figure 3). A copy of the PDF is uploaded to your Adobe Cloud storage, and a shareable link is generated.
How it works
Anyone you share this link with will be able to view and comment on the file using only a browser. As with the Share for Review feature in InDesign, Illustrator, and Photoshop, recipients don’t need an Adobe ID to add comments. When you open the file within your Document Cloud, you will see all the comments made by reviewers. Once the reviewers are finished with their work, you can save a local copy of the PDF that includes all the comments. Then, if you are using InDesign, you can choose File > Import Comments to import the PDF comments into the original InDesign file. The comments will appear in the PDF Comments panel (Window > Comments > PDF Comments), as well as overlaid on the page. This entire workflow is very similar to the Share for Review workflow, with the additional burden of exporting and managing PDFs. But this workflow has a couple of small advantages over Share for Review. First, you can assign a deadline to the review. Second, if reviewers use the Strikethrough tool, you can accept the deletion in InDesign’s PDF Comments panel with a single click.
The Achilles heel of this workflow is the fact that you will likely begin with a PDF stored locally on your computer or network. But then, when you initiate the Send for Comments workflow, a copy is stored in your Adobe Cloud storage (which is separate from your Creative Cloud storage).
Strengths:
- Because it will accommodate PDFs from any source—not just from InDesign, Illustrator, and Photoshop—this workflow might be preferred if your reviewers regularly need to review and mark up content from a variety of sources.
- You can specify an end date for the review.
- InDesign will automatically accept deletion (strikethrough) comments.
- It is possible to manage multiple reviews of the same source document. Just use it to generate multiple PDFs—for example, one for different page ranges or different combinations of visible layers.
Weaknesses:
- You must export a PDF from your source files and then manage local and cloud copies of the same file. This can be confusing.
- You can generate only public review links. You can’t use private review links or password protection.
Best for:
- Working with teams of reviewers who need to regularly mark up content from lots of different sources and who wish to use a single tool and workflow
- Workflows where more flexibility is required than the Share for Review workflow can deliver
- Teams that wish to do a shared review in house, without employing additional cloud services
PDF Review with Manual Distribution
Getting started
How it works
Strengths:
- Reviewers can leverage the precision, speed, and flexibility of multiple commenting tools.
- You can integrate certain types of editorial comments back into Adobe InDesign automatically. See this post for more information.
- You can design your own workflow. For example, who will receive the PDFs? How will they send comments back? Which features should they use to make comments?
Weaknesses:
- Recipients need to be well-behaved. For best results, they must open the file in Acrobat or Reader, not in Apple’s Preview or another third-party PDF reader.
- The workflow is clunky for multiple reviewers performing parallel reviews, because reviewers can’t see one another’s comments.
- You will need to keep track of routing PDF files, deadlines, and other administrative details of the review cycle.
Best for:
Auto-routed Email-Based Review
Getting started
Strengths:
- In addition to all the strengths of a PDF review with manual distribution enumerated above, this method adds some helpful email routing features.
- Comments from each reviewer are routed back to you for easier merging into a single PDF at the end of the review cycle.
Weaknesses:
Best for:
Third-Party Proofing Services
Best for:
Build Your Own Solution with Cloud Storage
Project Management Services
How to Choose?
Commenting is easier and faster when you're logged in!

Recommended for you

Quark to Open Silicon Valley Office
Quark Inc. announced today that the company is expanding its operations with a n...

100 Great InDesign Tips
We scoured every past issue of InDesign Magazine to bring you the best of the be...
Fonts for High Definition DVD (HD DVD) Announced
Ascender Corporation, a leading provider of advanced font products, today announ...