

I was asked recently:
I have an InDesign document with a lot of tables in a story that spans many pages. The tables are wider than the text frames. Is there a way to change them automatically?
The answer to these kinds of questions is almost always: “sure, if you can find a script, or get someone to write one.”
But sometimes you just gotta knock it out fast and you can’t get a script installed. (I’ll give you a link to a script at the bottom of this article.)
So… okay, here’s a cool solution that you should know about: Use Tagged Text.
First, place the text cursor in the story (not in a table), choose File > Export, and choose Tagged Text from the Format pop-up menu. When it asks, choose Verbose and click OK.

Now open that .txt file you exported in a text editor (I use Text Wrangler or BBedit on the Mac, but you can use Notepad or any of hundreds of other text editors).
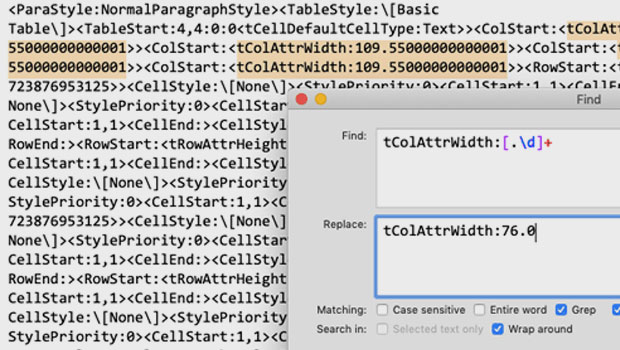
Search for: tColAttrWidth:
There will be a number after it. That’s the width of the column. In a 4-column table, you’ll see four of these, very close to each other, like this:

As you can guess: If you change the numbers, you change the width of the column! You can use Find/Change to change them all at the same time, if you want all the columns to be the same.
In the image above, you can see that I’m using a GREP expression to search for all strings of numbers or decimal points, and then replace those with an absolute value. So in this case, every column of every table in this story will end up 76 points (6p4) wide. Of course, you could create more complicated find/change queries (especially with GREP) to adjust each column separately.
Save the file, then use File > Place to import that file back into InDesign (you should delete the original story first, of course, and then place the story into a blank frame).
Of course, there are other solutions, too… like scripts! If you need this often, then a script may be the better solution. Jamie wrote about one here.
This article was last modified on July 19, 2021
This article was first published on July 19, 2021
Commenting is easier and faster when you're logged in!

Recommended for you

HELP! New Ways to Find It in CS3
Everyone needs help sometimes. InDesign CS3 and the CS3 applications now give yo...

How to Move Gradient Swatches Between Illustrator and InDesign
Using Illustrator gradients in InDesign is easy—if you know the trick for copyin...

Tip of the Week: Instant Pull Quotes
This tip was sent to Tip of the Week email subscribers on May 28, 2015. Sign up...