

Greetings InDesign users! My name is Rufus Deuchler and I am a graphic designer, trainer and consultant currently living in beautiful Florence, Italy. I am very excited about this opportunity that has been given to me to contribute to InDesign Secrets, and this is my first post.
I was reading Sandee’s post about the Free Transform Tool and it reminded me of cool technique for creating cast shadows using that very tool.
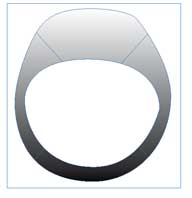
In some cases, InDesign’s Drop Shadow just does not yield the expected, or graphically correct, results. To give you an example, let’s imagine that we need to create shadows for a catalogue of rings. In this case, the ring already has a clipping path which has been activated by choosing: Object > Clipping Path, and, by applying a Drop Shadow, this is what you would get:

Not exactly realistic… right?
Here’s a way to create a cast shadow in InDesign:
- Be sure that the image you are using has a clipping path and activate by choosing: Object > Clipping Path .
- Select the frame containing the image and ‘clone’ it by doing a Copy and then a Paste in Place. Just to be sure that you now have two identical overlapping objects you can check in your Links palette and see that there are now two instances of the same object.
- Control click (or click on the right button of your mouse) to open the contextual menu over the image you just pasted and choose ‘Convert Clipping Path to Frame’.
- Select the image with the Direct Selection Tool (aka “white arrow”) and delete the content of the frame.
- Now use the Gradient Tool and draw a Black to White gradient in the frame. This is what you should get (remember, the second ring is still behind that gradient):
- To make your shadow more realistic you’ll have to feather it a little. With the frame selected choose: Object > Feather, and tweak your feathering so that the edges are blurred like those of a “real” shadow. You’ll start seeing the image behind the gradient.
- Now, with the Free Transform Tool (as Sandee pointed out) click on the top middle point of your frame and only then hold down the Cmd/Ctrl key; the cursor will change into a horizontal double-headed pointer. Drag the point into the position that suits you and let go.

- Send the frame to the back and you are done.

A couple of thoughts for optimizing this technique:
- In the gradient for the cast shadow use a rich black; most blacks in placed images contain other colors too. If you use only black [100%K] in the shadow it is likely that the effect will look anomalous in print.
- Save the gradient in your swatches so that you can make changes to all of your cast shadows globally.
- You may also want to save an Object Style for your cast shadows (including the Feathering effect) so that you can change many aspects of your shadows later.
This article was last modified on December 18, 2021
This article was first published on March 26, 2007
Commenting is easier and faster when you're logged in!

Recommended for you

How to Make a Solid Gold Ring With Photoshop
When a Welsh friend wanted to propose to his girlfriend, he thought it would be...

New Handwriting Font Release
Press Release Monotype Imaging Holdings Inc. (Nasdaq: TYPE), a leading global pr...
Five Favorite Design and Marketing Resources
A taste of the resources you’ll discover in Theresa Jackson’s upcoming session a...