

We’re all familiar with panorama photography, and you may have used Photoshop’s excellent tools for combining a series of shots into a single, wide image.
But did you know you can take the process one step further? Using Photoshop’s Polar Coordinates filter, you’re able to turn that panorama into a miniature planet. It’s an impressive and novel way to view a landscape—visually, it shouldn’t work, but somehow it just does.

Shooting the original photographs is the hardest part of the job. That’s because the massive distortion created by the Polar Coordinates filter places stringent requirements on the kind of image you can use. Let’s begin by looking at the sort of images that don’t work, before going on to an image that does.
The Wrong Way to Shoot the Photos
The shot below of London by night might seem a prime example for the planetary treatment. It’s composed of several images joined together, with buildings jutting up from the horizon, and the lit-up London Eye making a strong feature on the right.

However, when I run the Polar Coordinates filter on that panorama, a couple of things are clearly wrong.

For a start, the London Eye has distorted into an ugly balloon-like shape. To prevent this sort of distortion, avoid images that include prominent circles, as they’re always going to look wrong. But there’s another issue. All the buildings converge on the center point, and the result is ugly. Despite the interesting array of buildings around the perimeter, the eye is immediately drawn to this high-contrast region. The lesson to be learned here is that these planetary images always look better when there’s some ground at the bottom of the original picture, since this forms the surface of the planet from which the buildings and other elements can spring.
The photograph below should work well. It has a few buildings sticking up, and I’ve extended the boat and buildings to the right of the clock tower to make a seamless join. There’s plenty of water in the foreground, which should make a good ground surface.

Here’s the result after applying Polar Coordinates:

The buildings wrap around in a circle well enough, but all those flat-on lower parts form a donut shape that detracts from the final appearance. The horizontal line between the water and the buildings is just too dominant. The main problem, though, is the extent to which the tower on the left (and the clock tower itself) have been distorted. They took up so much of the original picture that they’ve formed themselves into wedge shapes that instantly look wrong. The lesson here: Make sure feature elements aren’t too wide in the original photograph.
The Right Way to Shoot the Photos
The ideal method is to take 360 degrees of photographs, to form a true panorama. But in real life, this isn’t always practical: There may be some ugly buildings on one side, or you may be standing so close to a wall that you can’t photograph the top of it. It’s important to try to get both the ground and the sky into every shot. When you can’t manage this, as I couldn’t–in one of the shots below, the tree goes off the top of the frame–you can fix it later in Photoshop.

On to Photoshop
There are two ways to start the process. Either open all your images in Photoshop and choose File > Automate > Photomerge, or select them in Adobe Bridge and choose Tools > Photoshop > Photomerge. Either way, you’ll see this dialog:

Select Auto as the layout type, and press OK. Photoshop then attempts to align, distort, and adjust all the images in order to combine them in a single seamless montage.

This is a good beginning. If you have Photoshop CS5, you can use Content-Aware Fill to patch the missing portions. Select them with the Magic Wand tool and go to Select > Modify > Expand to make the selection one pixel wider. Then hit Shift-Backspace and choose Content Aware Fill in the resulting dialog. If you have an earlier version of Photoshop, use the Clone Tool to sample and patch the missing areas from the surrounding region. You should end up with a result something like this:

The only problem with not using a 360-degree panorama is that the edges won’t match each other, but it’s easy enough to fix this. First, drag the merged image to one side so that the edge of the image appears in the center of the frame.

Switch to the Move tool (V) and hold Alt/Option (to make a copy) and Shift (to drag horizontally), and drag the layer to make a duplicate.

The large tree in the center will be too dominant in the final result, so let’s hide it by joining those two paths so that they form a single element. Move the new layer so that the paths coincide, and add a Layer Mask to the copied layer. Using a soft-edged brush, paint in black on this mask to hide the edge. The aim is to blend the left and right images together. As we can see, the lighting is different on the two halves: we can fix that next.

Make a new Curves Adjustment Layer, and click the button at the bottom of the Curves dialog to use the layer beneath as a Clipping Mask. Drag upwards on the line to create a curve, which will brighten the layer.

Here’s how the image looks after you’ve added the Curves adjustment:

The left and right sides of that center path now blend together in a much more convincing way. The trouble is, though, that the adjustment has been applied to the entire layer: The middle may be correct, but the edges will no longer match. See how the tower on the right is much brighter than the tower on the left?
Each time you create an Adjustment Layer, it comes with a built-in mask. You can use this to hide the effect of the adjustment. Set the foreground color to black and the background color to white (the shortcut to do this is D). Using the Gradient tool, drag from right to left over the right-hand image. This will mask the adjustment fully on the right, fading away so the adjustment is not masked at all on the left; in other words, it’s at full strength. The towers are now the same on both sides of the image.

You don’t want the tower to appear twice in the final image twice, so you need to make a selection that includes it only once. The best way to do this is to drag a rectangular marquee that goes through the center of the tower on the left, and the center of the tower on the right. With the selection made, choose Edit > Copy Merged to make a copy of the selection that includes both layers and the Adjustment Layer.

Choose File > New to make a new document. The size will automatically default to the size of the image copied to the clipboard. Paste the copied image into the new document. To make the Polar Coordinates filter work, you now need to resize this image to square, since that’s the way you can guarantee a circular result. Choose Image > Image Size, and look at the dimensions. In this example, the image is 9233 pixels wide by 3047 pixels high.

Uncheck the Constrain Proportions checkbox at the bottom of the dialog, and type the same figure in for the width as is already present for the height (3047 pixels in this case).

When you hit OK, the image will be distorted to make it a perfect square:

Everything has been distorted to make it square, and note how half the greatly elongated tower now appears on each side of the picture. Because these elements are at the edges, when you apply the filter they’ll join together right at the top.
To use the Polar Coordinates filter, you need to flip the image so that the ground appears at the top. You can do this using Image > Transform > Flip Vertical. But a better method is to rotate it, so that picture elements retain their correct order. Choose Image > Transform > Rotate 180°.

Now you’re ready for the Photoshop filter. Go to page 2 for the final steps.
Return to page 1.
Time for the filter, at last! Choose Filter > Distort > Polar Coordinates, and set the option to Rectangular to Polar. You’ll see a zoomed-in portion of the center of the image. For a better overview, zoom out.

Here’s how the image looks after the Polar Coordinates filter has been applied. It has all been perfectly wrapped into a circle, and see how the two halves of the tower have correctly joined together? But note, also, how the corners have gone awry: Photoshop has streaked out colors from the image into these areas. One solution would be to make a circular selection of the center part, invert it and delete the corners, but there’s a better way.

Take a section of sky from the original, undistorted image, and run the Polar Coordinates filter to turn it into a ball. Here’s how it looks:

I’ve included a piece of tree in order to get a large enough sky area, but this doesn’t matter, as I’ll hide it in the next step.
Add a Layer Mask to the new sky layer, and paint it out in the center so that the planet shows through. The new sky patches the corners well, effectively hiding those ugly streaks. The image is now complete:

Click the above image to see a larger version.
You can use the most ordinary of original shots to create intriguing polar images. Here, I’ve started with a photograph of rooftops in Egypt:
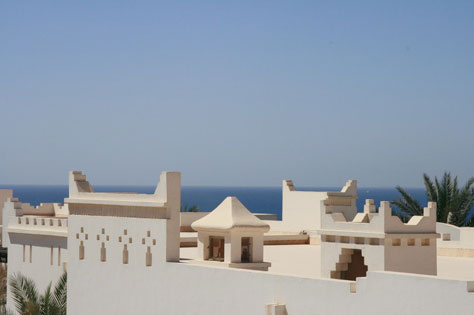
I removed the sky from the image, and duplicated part of the building on the right so that it joined onto the building on the left. This produces a more seamless result; otherwise, there’d be an ugly join.

And here’s the result: a geometric shape that appears more graphic than photographic, with an almost Escher-like quality to those windows and staircases.

This article was last modified on July 11, 2023
This article was first published on July 18, 2011
Commenting is easier and faster when you're logged in!

Recommended for you

Building an Underwater Scene in Photoshop, Part 1
The Oscar-winning film The Shape of Water opens with a stunning sequence in whic...

Classic Concert Posters Reimagined
With the tools in your design toolbox, and some inspiration from iconic artists,...

The Digital Art Studio: Quick Fixes #4 (Exactly Correcting Proportion)
The most common request I get from colleagues is for help with prepping photos o...