
The Tilt-Shift effect makes aerial views of landscapes look like model villages. Why? Because when you photograph a scene from a distance – from a mountain top, or a plane – everything is so far away that it’s all in focus. When you photography a model village, you’re so close to the subject that the foreground and background tend to be out of focus. You can replicate this effect in Photoshop, using the Tilt-Shift Blur filter.
Step 1: Choose your starting image
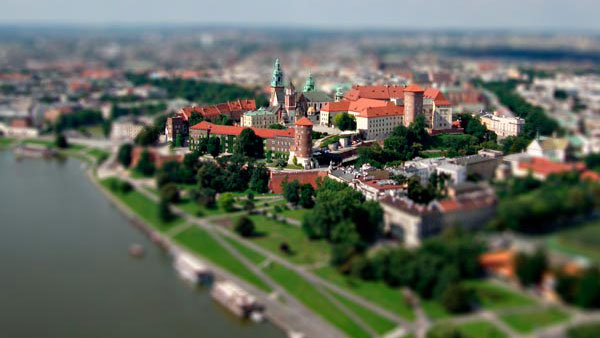
You need a photograph taken from high up, with the subject roughly center. A shot taken at ground level won’t work, since Tilt-Shift works by blurring the foreground and background – and at ground level, the background will be mainly sky. This image of the Polish city of Krakow (a beautiful place, you should visit) comes from pxhere.com, and you can download it for free here.

Step 2: Start the blur
First, use Layer > Smart Objects > Convert to Smart Object, which will allow you to edit the filter effect later. Then choose Filter > Blur Gallery > Tilt-Shift to open the dialog. You can already see the effect starting to take place.
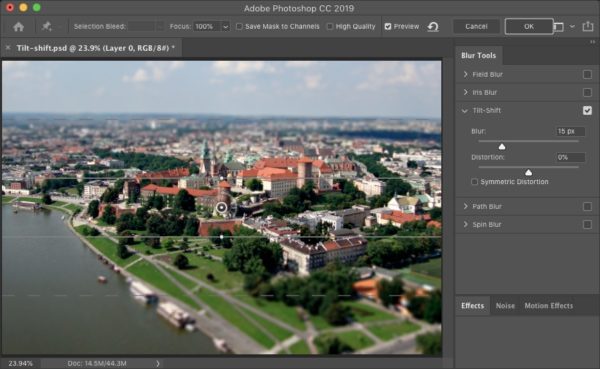
Step 3: Adjust the in-focus area
The inner horizontal lines in this filter mark out the area that’s in focus. The default setting places these too low, so grab each line and drag it up so that they border the main building section in the middle. Don’t grab the tempting white dots, as these are used to rotate the effect.

Step 4: Adjust the out-of-focus area
The upper and lower dashed lines set the point at which the blur is at its maximum. In the foreground, the blur should take place fairly gradually; but in the background, where the distance is compressed, it should be more sudden. To achieve this, drag the top dashed line down towards the upper in-focus bound.
The problem here is that although the foreground and background are neatly blurred, the sides are still crisp, because they’re on the same horizontal level as the main buildings. But they’re further away, so you need to blur them as well. To do this, check the Field Blur box and switch to that filter’s controls (without leaving the Blur Gallery dialog).

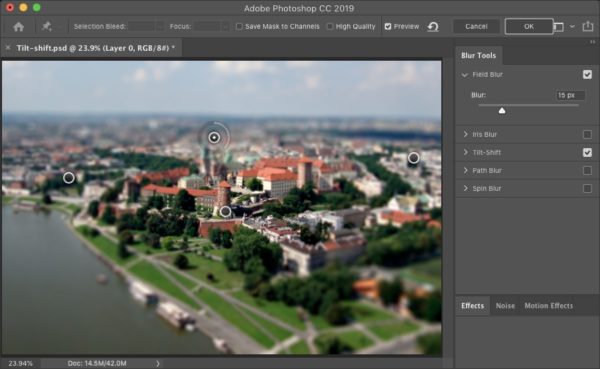
Step 5: Using Field Blur
When you switch to Field Blur, it will by default apply a 15 px blur to the whole image, apparently wiping out the Tilt-Shift effect. To remove it, set the Blur value to 0.

Step 6: Zero Field Blur
Here’s the result when the Field Blur is turned right down. It returns us to the effect as we left it with the Tilt-Shift effect – but with that important zero-blur marker in the middle.

Step 7: Add a Field Blur spot
Click on the left, over the in-focus buildings, to add a Field Blur marker there. It will again default to 15 px – but because the center marker has a zero blur, it won’t extend all the way into the middle.

Step 8: Add more Field Blur spots
You can continue to click on the image to add further localized blurs. Here, I’ve added a blur spot on the right, and one above the buildings in the center. When you’re done, click OK.
Step 9: The blur so far
Here’s the result of applying those two blur filters. There are places where the blur shouldn’t be applied – notably, on the towers, which are horizontally higher up the image but which are not further into the distance than the buildings to which they’re attached.
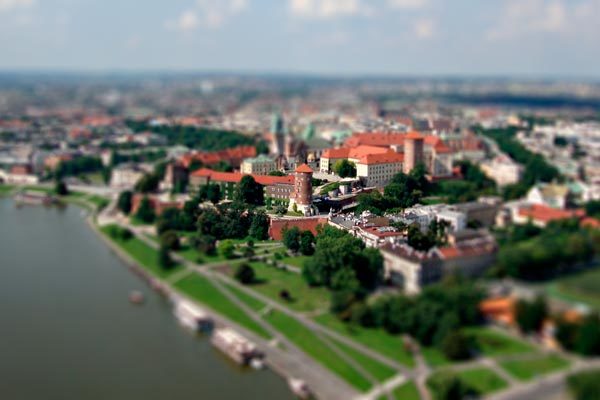
Step 10: Paint out the effect
Because you turned the image into a Smart Object before applying the two Blur filters, those filters appear as Smart Filters with a Mask attached. This means you can paint out the blur where it shouldn’t logically be applied by painting in black on the mask, producing a more convincing model village effect.

This article was last modified on June 10, 2019
This article was first published on June 10, 2019
Commenting is easier and faster when you're logged in!

Recommended for you

How to Tie Someone Up in Red Tape in Photoshop
Learn how to create realistic looking red tape (or ribbon) wrapped around any su...

Peachpit Announced the Publication of Layers: The Complete Guide to Photoshop’s Most Powerful Feature
Peachpit announced the publication of Layers: The Complete Guide to Photoshop’s...

Compositing a Scene into a Head in Photoshop
However much you may toy with people’s expressions using the Liquify filte...