

Pros: Great price; very good interfaces. Adjust offers nice adaptive control; Detail is a very capable, simple sharpener; Simplify offers better natural media effects than Photoshop’s built-in filters.
Cons: It’s easy to overdo it with Adjust and Detail. A user comfortable with Photoshop’s masking and color and tone correction tools won’t find anything especially compelling in Adjust.
Score: 8.5/10
Topaz is a software company that makes well-regarded Photoshop plug-ins. Their Plug-In Bundle includes five filters: Adjust, Clean, DeJPEG, DeNoise, Detail Remask, and Simplify. With these filters, you can correct color and tone; sharpen; mask; and more. The entire bundle is only $179.99. While the filters aren’t based on the very latest cutting-edge technology, this collection is a great value if you need its features only occasionally, or if you don’t want to spend the time learning how to perform its functions in Photoshop proper.
The Topaz Plug-In Bundle is compatible with several versions of Photoshop. On Windows, it’s also compatible with Irfanview, Paintshop Pro, and others. On the Mac, you can also use it with Aperture 2, Lightroom, and iPhoto. See the compatibility page for details.
Topaz Adjust 4
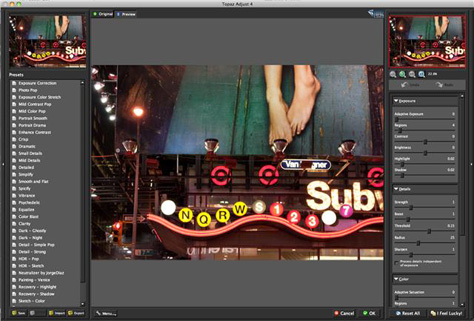
Adjust is the most widely applicable filter in the bundle. Its color, contrast, and exposure controls make your images pop; that is, they increase contrast and saturation so that colors are brighter and details sharper. Adjust has a single window with a large preview; a pane for selecting presets; and a pane with slider controls divided into four sections: Exposure, Detail, Color, and Noise (Figure 1).
Figure 1. The Adjust interface. Click the image below to see a larger version.

The Exposure section adjusts brightness and contrast. Its “adaptive” controls try to intelligently apply adjustments to only those tones that need it. The Details controls alter microcontrast effects to exaggerate edges. The Color options alter saturation and hue, and like Exposure, includes adaptive saturation adjustments. The Noise controls are a very simple noise reduction scheme.
The Adjust filter ships with 35 presets. (You can also save a collection of settings as a preset.) Topaz’s Preset mechanism is excellent. Hover your mouse over a preset name, and the preset thumbnail image updates immediately to show you that preset’s effects. In addition, you can specify a description for each preset that then appears as a tooltip when you hover the mouse over the preset name.
Separate tabs in the preview window let you switch between your original and processed images, but it would be nice to have a split view so you could view before and afters simultaneously. Unfortunately, Topaz doesn’t update its preview as you move sliders. You must make an adjustment, and then wait for a new preview to generate. This can be frustrating if you’re accustomed to Photoshop’s live updating.
As far as the effects themselves, Adjust can do a good job at livening up dull images (Figure 2).
Figure 2. With just a few simple slider adjustments, I improved the color and contrast in this image. Click the image below to see a larger version.

Adjust’s adaptive color and exposure controls are practically idiot-proof. Dial in more of each, and you’ll have more contrast and better color applied appropriately to your whole image, without having to cut masks or paint in localized adjustment (Figure 3).
Figure 3. The original shot, which is the top image of the three below, was too flat. Adjust’s presets improved it, as demonstrated in the middle and bottom versions. Click the image below to see a larger version.

However, it’s very easy to quickly go too far with Adjust, especially if you rely on its predefined presets. For example, Figure 4 shows what can happen using Adjust’s Exposure Correction preset:
Figure 4. Adjust can easily go too far with its edits and oversharpen your photos. Click the image below to see a larger version.
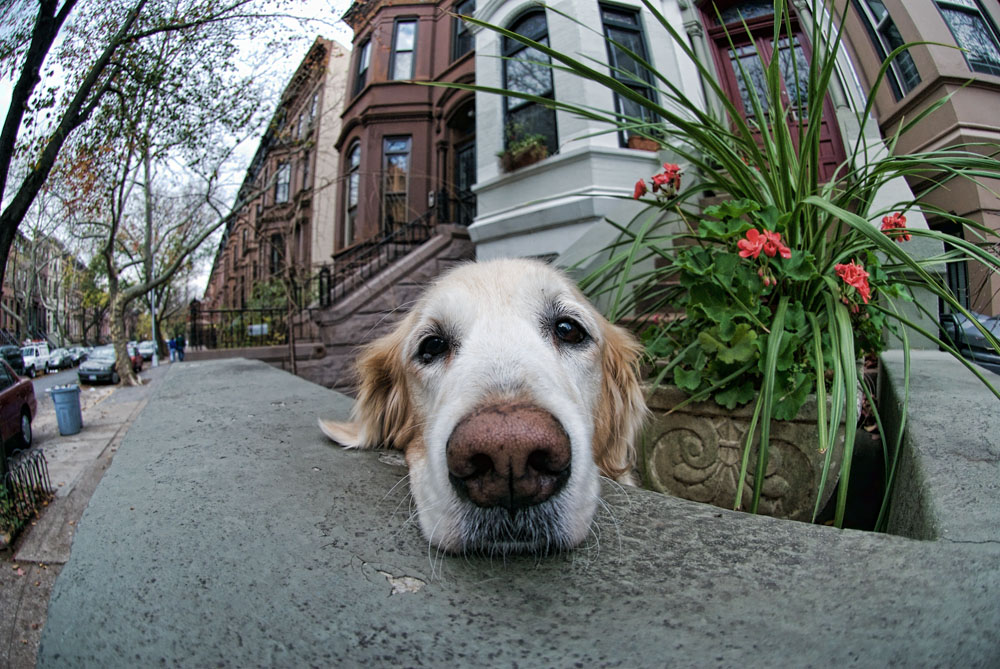
While the color and contrast edits are acceptable, the detail adjustments have played havoc with the textures in the image, resulting in an oversharpened look across the image. Note the splotchy textures that have appeared on the wall, and the exagerration of the black edges on the dog’s face. These are characteristic artifacts with Adjust, but you can remove a lot of them by dialing back the Details settings or by activating the “Process details independent of exposure” checkbox under Details.
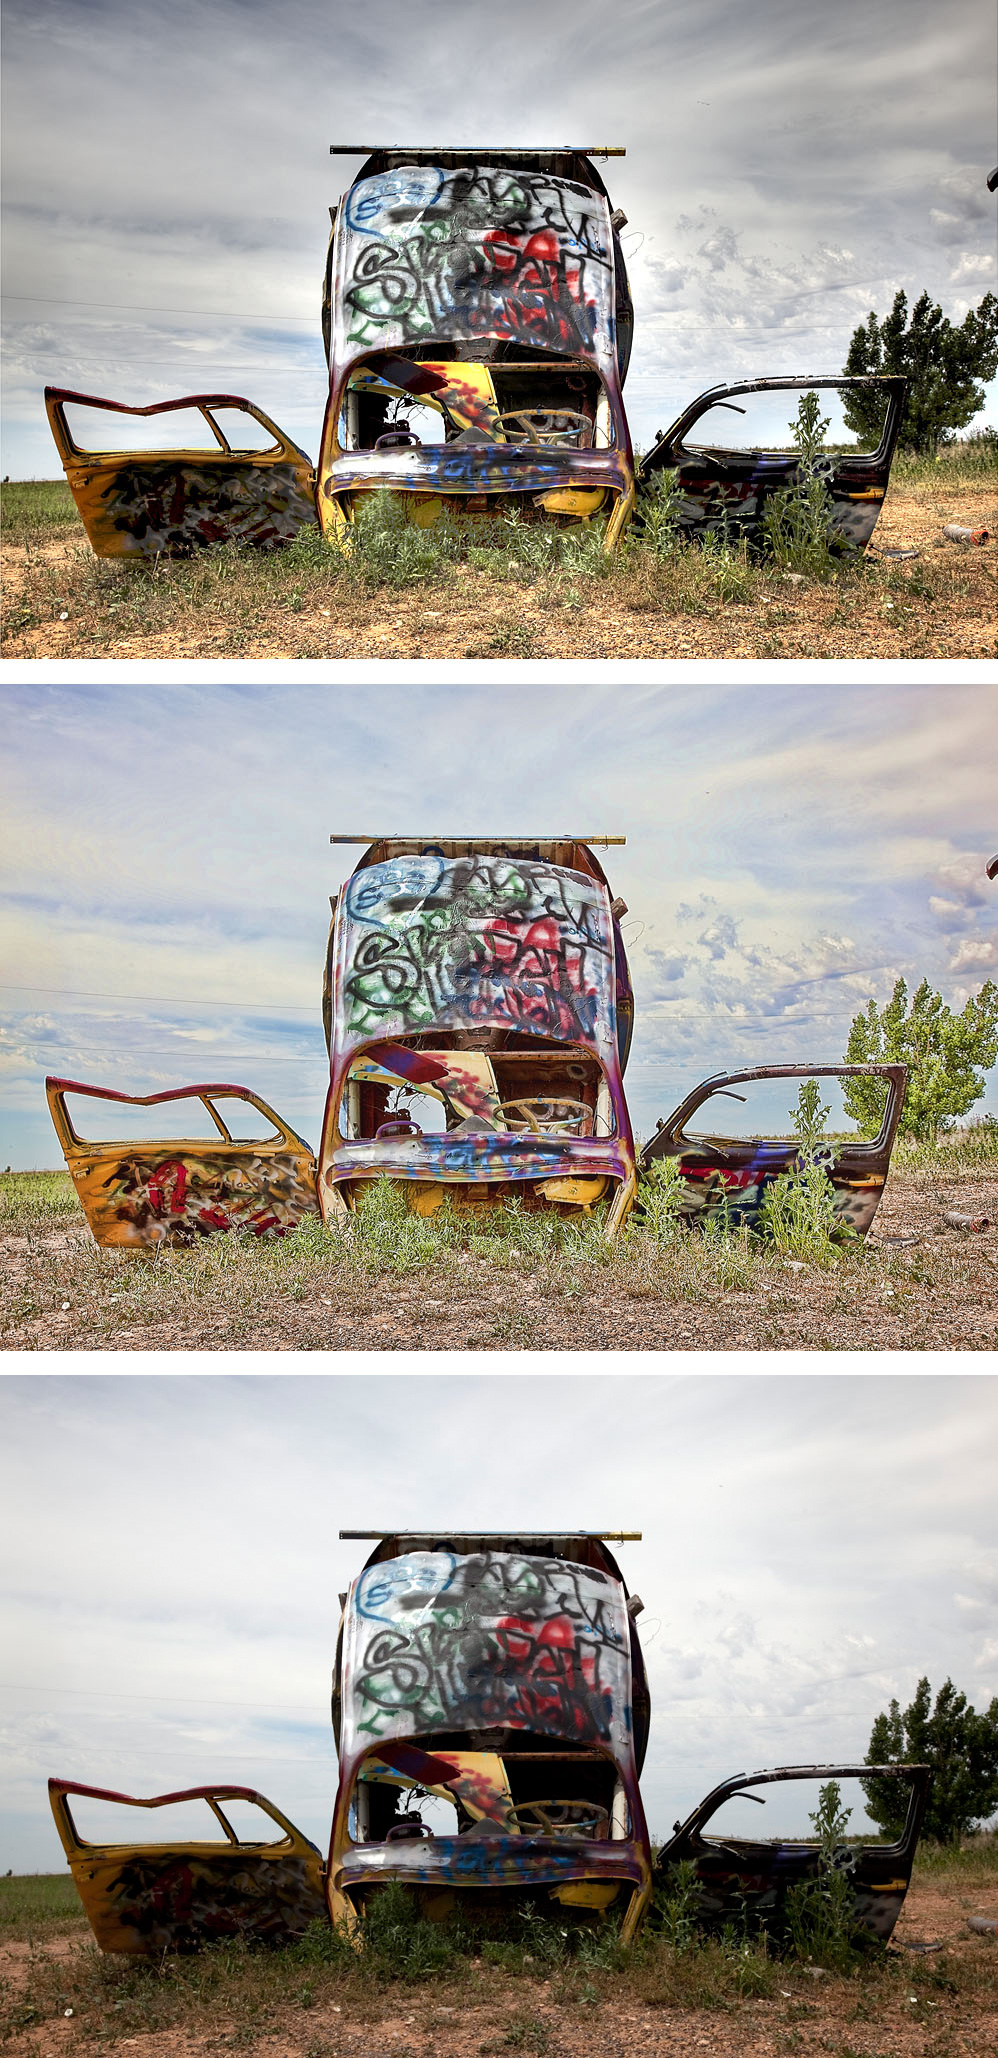
The Adjust filter includes two presets designed to simulate the look of a high dynamic range (HDR) image. But rather than requiring multiple frames of varying exposure, the HDR presets work off of a single image (Figure 5). While the results aren’t bad (if you like an overblown HDR look), you’ll again want to dial back the sharpening effects.
Figure 5. On top is a true HDR image, processed from three separate frames. On the middle is a Topaz Adjust-created image, generated from a single source frame. That source frame is on the bottom. Click the image below to see a larger version.
If the lighting in your scene is already good, you might not need Adjust. But if you’re facing a flat or otherwise blah image, Adjust just might turn it into something far more interesting. Just remember that less is definitely more when it comes to applying Adjust’s effects. More than any other effects plug-in I’ve seen, Adjust makes it easy to create garish, overdone effects. But with a restrained hand, Adjust can be a very useful tool.
ReMask 2
If you’re a Photoshop CS4 user who misses the Extract tool, then you’ll like Topaz’s ReMask for times when you need to cut a mask around a complex shape. As with Photoshop’s old Extract tool, you create a mask in ReMask by using a colored marker to outline the transition area between what you want to keep and what you want to get rid of (Figure 6). Other markers and paint buckets are used to indicate which areas are kept, and which are masked away.
Figure 6. ReMask offers controls nearly identical to Photoshop’s old Extract command. The plug-in has trouble with hair and other fine details. Click the image below to see a larger version.

Offering good preview tools, and okay refinement tools, ReMask does a fair job of cutting complex masks, though wispy hair and semi-transparent objects often stymie the program. Still, if you do a lot of mask cutting, you can’t have too many tools.
Simplify 2
While Photoshop includes several filters that make a photo look more like it was drawn or painted with traditional media, none of them give you a tremendous amount of control. By comparison, Topaz’s Simplify 2 filter has an excellent range of options that give you a fine degree of customization, letting you easily create effects that look like pen and ink, pencil sketches, and more (Figure 7). And because you can save any configuration as a preset, it’s easy to achieve a similar look across multiple images.
Figure 7. Simplify simulates natural media renderings of images very well. Click the image below to see a larger version.

Simplify mixes things up with randomization and color effects, which get you closer to a conversion that looks more hand-rendered than what you’ll produce with Photoshop’s built-in filters.
Detail 2
Like religion and politics, sharpening is a topic you want to broach cautiously. If you’ve ever met a die-hard sharpening maniac, you know that emotions can run hot about this critical step in your photographic workflow.
True digital sharpening isn’t actually possible. Instead, sharpening software works to increase acutance: the perception of how acute an edge is in an image. Acutance is increased by varying the contrast along edges in your image, and the result is a picture that appears to be sharper. The problem is that if you do too much of this contrast adjustment, you’ll end up with visible halos around edges and splotchy patterns on flat textures.
I appreciate that Topaz has named this plug-in Detail, because it’s important to think of this process as being about bringing out detail, not sharpening.
There are many different theories and approaches to applying sharpening, and if you don’t know any of them and don’t care to learn, then Detail 2 is an excellent solution. Its huge selection of presets can bring out varying levels of detail, or you can take full manual control of refining and make your own presets.
As with Adjust, it’s easy to take Detail’s effects too far, but the program’s interface lets you back off from overblown effects fairly easily.
Go to page 2 for Ben’s take on three more filters in the Plug-In Bundle.
This article was last modified on December 14, 2022
This article was first published on March 22, 2010
Commenting is easier and faster when you're logged in!

Recommended for you

The Final Frontier of High Resolution Printing
When it comes to printing, what does the term "high resolution" mean t...
10 Essential Tips for Adobe Camera Raw
Adobe Camera Raw is an incredibly powerful and flexible tool for applying adjust...

Integrating 3D Text into Images with Photoshop
This is a technique you’ll have seen in countless films and TV shows, from...