
Adobe XD for InDesign Users
Get to know the app that embodies Adobe’s vision for the future of design and layout.

This article appears in Issue 142 of InDesign Magazine.
Unless you’ve missed all of Adobe’s marketing campaigns in the last four years, chances are you have at least heard of Adobe XD, Adobe’s latest flagship application for UX design and prototyping. Despite all Adobe evangelist efforts and presentations, however, most InDesign users probably categorize XD under “not uninteresting, but fairly irrelevant to my day-to-day job.” After all, you live and breathe layout, typography, and CMYK colors.
But, what if I told you that XD could open the doors to new money-making opportunities for your business or help you upskill for future design opportunities? Interested now? Let me explain.
Dispelling Doubts
If you’re already an InDesign user then you probably also use other apps—Photoshop, Illustrator, and Acrobat. But we all know that Creative Cloud comes with more than just print applications. Maybe you’ve used Premiere Pro or After Effects for a little video work or tried popular programs like Lightroom and Dreamweaver. Did you also know that over the last five years, Adobe has released five brand new desktop apps, plus several mobile apps and cloud services? It would be pretty naïve to assume that none of these apps would prove valuable to your business without giving them a try. In my experience as a trainer and consultant there are always three preconceptions that prevent people from adopting new software:
- It’s probably too expensive to buy.
- It seems too difficult to learn, and I don’t have time.
- I don’t see how it can help my business.
XD easily overcomes all three of these obstacles. The first one isn’t an obstacle at all because XD is already included in your Creative Cloud membership at no extra cost. Even if you don’t have a CC membership, you can still target=”_blank” rel=”noopener noreferrer”>download XD for free from Adobe.com. Number two isn’t really a problem if you already have a working knowledge of building layouts with InDesign. And as for number three, well, that’s the point of this article. So, keep an open mind and start exploring.
Why Does XD Even Exist?
Before you learn how you can use XD to your advantage it’s important to take a step back and understand why XD exists in the first place. Let’s go back in time to the year 2010. This was the year Adobe Creative Suite 5 came out, blessing us with such features as Photoshop’s Content Aware Fill and the ability to see page objects in InDesign’s Layers panel.
But this flashback isn’t about Adobe, it’s about a Dutch vector drawing program called Sketch. In the years following the 2010 debut of Sketch, if you were designing interfaces (UI) and user experiences (UX), there was no way around using a combination of Sketch and Photoshop (and/or Illustrator) for your projects. Using Photoshop on its own for building the interface of a website or mobile app has always been possible (remember Adobe ImageReady?), but let’s admit that Photoshop didn’t always offer the most intuitive or straightforward methods—with its endless text and shape layers and slicing options.
Sketch, on the other hand, was built from the ground up for the sole purpose of building interfaces. And because it integrated with other third-party solutions, like Invision and Zeppelin, it rapidly became the tool of choice for UI and UX designers. In the industry-standard workflow, Photoshop supplied the graphics; Sketch tied everything together; Invision offered interactive prototyping and feedback from stakeholders; and solutions like Zeppelin were used to hand over projects to developers. What a team! … Or was it?
Fast forward to 2015. The first version of XD (codenamed Project Comet, and later Adobe Experience Design CC) was publicly released (Figure 1). A team comprised of a handful of Adobe product managers, all veterans in the world of UX/UI design, drove its development. Their approach was simple: Get rid of fragmented workflows and combine the three basic phases of an interactive project—design, prototype, and share—into one single product. If executed properly, the concept would be of tremendous value to users (Spoiler alert: It was). No more exporting and importing from one app to another made round-tripping easy and offered huge boosts in flexibility and efficiency.

Figure 1. The very first public presentation of Project Comet during Adobe MAX 2015
To imagine what things were like before XD, picture building slides in PowerPoint, and then having to export those slides to another app to add transitions or animations to that same presentation. If you noticed a mistake, you’d have to go back to PowerPoint and re-export the whole project. Lather, rinse, repeat. Doesn’t sound like much fun, does it? But in the world of UX/UI design, it was the truth as we knew it.
On top of the efficiency of a single-app workflow, using XD means you need only one product to cover the entire workflow, not three or four. Not to mention you need to keep only one product up to date, reducing the number of bugs and compatibility issues you encounter when working with a bunch of apps on different upgrade schedules that constantly need to play nice with another. Photoshop and Illustrator are still the worldwide standards for pixel and vector design solutions, and Adobe’s growing list of cloud solutions offer XD the perfect means for sharing projects with others. Add to that the existing user base, cloud infrastructure, a massive R&D budget, and the long-term vision for the company… Plus, they already had experience taking on a dominant software competitor (QuarkXPress) and beating them. So even back in 2015, Adobe had a lot of reasons to believe in XD’s potential.
Why It Matters to You
It’s important to realize that we live in a world that becomes more digital by the day. We’re used to seeing digital apps on our smart devices and computers. But what about other user experiences? How do you design a user experience for wearable tech like smart watches? How about the in-flight entertainment system of an airline, the heads-up display of a refrigerator or oven, the dashboard of your new car or home automation system? That is the beauty of a UX/UI solution: being able to easily design an interface, making it fully interactive with only a few clicks, and sharing it with your stakeholder from within the app. Just take a look at how Penske is using Adobe XD to help visualize all of their tracking data. Or how Land Rover used Adobe XD to prototype the touch screen infotainment system of the Land Rover Defender.
Now please forget the idea that XD is only for designing mobile apps. It’s not. It’s built to design much more, making it one of the most versatile apps that Adobe has ever conceived.
XD’s Place in Creative Workflows
Let’s admit it, we all wear different hats in order to accommodate the needs of our customers or bosses. One day you’re a true desktop publisher designing a print brochure, the next day you’re automating a catalog. Maybe someone asked you to create a few web banners in Photoshop, a logo or icons in Illustrator, or a PowerPoint presentation template. Maybe you’re retouching a few images or managing the asset database of your company. And while you’re at it, here’s a pile of documents to make accessible or interactive using InDesign. The bottom line is that once you know how InDesign, Photoshop, and Illustrator work you are no longer bound to one specific output channel or industry. Times change, technology evolves and so do the needs of customers. In the past, we’ve seen that the designers and businesses that learn to upskill and push the boundaries of their abilities are the ones that stay afloat—especially when times are tough and budgets shrink. Once you realize that interactive screens are taking over the world, it becomes clear that learning a design application built for that purpose is an investment in your future.
Here are some more things to get you excited:
- XD was designed to be extremely easy to learn, making your time investment minimal. Before you ever launch the program, as an InDesign user you already know how to use many of the essential tools. Making selections, adding shapes, drawing with the Pen tool, masking an image, and working with layers will all be instantly familiar (Figure 2).
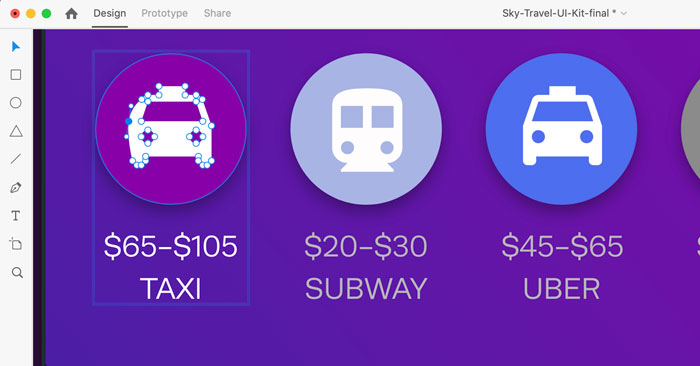
Figure 2. Adobe XD offers a variety of common tools like the Pen tool, Artboard tool, and basic shape tools.
- You can open or place native file formats like Photoshop PSD and Illustrator AI files in XD, which will convert all layers and objects into native XD objects. Vectors are maintained, live type is preserved, and images maintain full resolution (Figure 3). Documents that were big and bulky before suddenly become as light as a feather. I once converted a 45 MB Photoshop document to an XD document, stripping away 40 MB of the document while retaining all objects! And if you’re an ex-Sketch user you can even open native Sketch documents in XD. As of now you can’t directly bring InDesign content into XD, but a solution is officially under review by the XD product team.
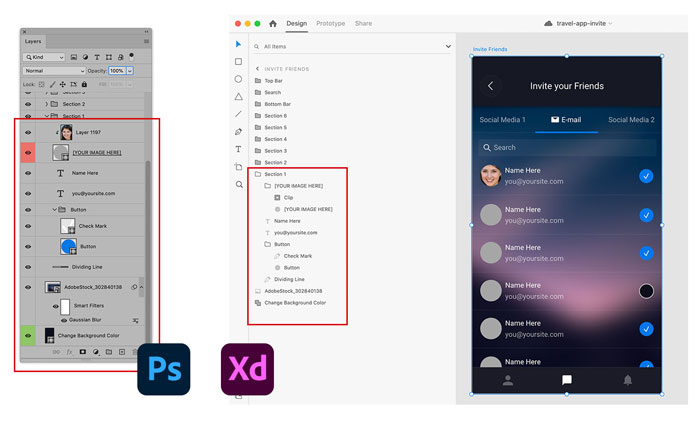
Figure 3. This Photoshop document was opened in Adobe XD. Notice how objects and the layer structure are preserved and converted to native XD content.
- XD also uses Adobe’s cloud infrastructure, which allows you to save your file as a cloud document and make use of CC Libraries, Adobe Fonts, and Adobe Stock. On top of that, you can even co-edit a document with other users in your team at the same time and synchronize style guides across multiple users and projects. Sharing interactive prototypes is also accomplished by publishing the document online using Adobe’s cloud services.
What Does a Typical UX Project Look Like?
Once you’ve learned how to design an interface or user experience you can use XD for virtually any interactive project proposal. But keep in mind one very important thing: XD is a design and prototyping tool; it is not used to develop a live app or website. It will not produce Xcode or JavaScript. (There are some third-party plug-ins that do allow for HTML export.)
Knowing the steps needed to design an interactive experience will help you understand XD’s role and how you can use it to your advantage. In a nutshell, developing an interactive experience requires the following:
- Think about the concept of what you’re trying to build, learn who the target audience is and which problem you’re solving.
- Start the design process, often using paper, a whiteboard, Sharpies, and Post-it notes.
- Create a lo-fi (low-fidelity) design using XD, using placeholder text and gray boxes to represent menus, buttons, and other design elements.
- Add interaction to the buttons for basic navigation, menus, and pop-ups.
- Test the interactive experience. Share it with an audience, and gather feedback.
- Implement changes and convert your design to a hi-fi (high-fidelity) prototype by adding colors, real text, pictures, animations, and anything else required to make it look real.
- Repeat this process until you receive design approval.
- Export and hand off the interactive prototype along with all design assets to the development team.
Notice that XD is built for fast design and ideation, before you start the time consuming and expensive development of your solution. In other words, XD does not produce the final product but is responsible for the entire design and validation process of the product development. It’s similar to how most of us use InDesign. We design our layouts and export them to a high-resolution PDF, which we then hand off to a print service provider for printing and finishing. The difference is that with XD, someone still needs to actually code the final project—based on your XD design.
So again: XD is used for ideation and design, not the actual development process.
Four Ways to Get Started Using XD
Let’s take a look at some examples of how you can use XD to your advantage, even if you’re not an app designer.
Build presentations
One of the simplest ways of using XD for the first time is to build interactive presentations. Nobody enjoys text-heavy, bullet-riddled, read-off-the-screen presentations. It doesn’t matter what program was used. What we want is a good end product, an engaging story that’s visually appealing with the right amount of content and maybe a little animation to spice things up. Here’s why XD can help you create that.
- The integration with existing Adobe apps allows you to use native design files, speeding up your import process.
- Features like the Repeat Grid and Stack options allow you to rapidly add text and images.
- You can use a design component to act as a master slide element, allowing you to make global updates across your document (just like InDesign’s master pages and styles).
- XD’s Auto-Animate feature allows you to create complex-looking animations without the need for a timeline or keyframes.
- All transitions and animations can be triggered by a tap, a click, or keyboard shortcuts, allowing you to tie different interactions to different keys on the same slide, even 3D transformations.
- XD allows you to build a non-linear presentation. This means that you can choose a different path of navigation while you’re presenting, based on the amount of time you have left or input from the audience.
- XD’s free-form artboard allows you to easily organize all of your presentation content (Figure 4).

Figure 4. Adobe XD’s prototyping features allows you to set up non-linear navigation throughout your presentation.
- You can share the interactive presentation with others either for gathering feedback or as a leave-behind for customers by sharing a live link which they can open on any modern browser.
- You can use XD’s plug-ins to help build your presentation. For example, the Google Sheets plug-in helps you manage the information in your presentation. The Whiteboard plug-in comes with presentation templates, and there’s even a plug-in that generates random profile pictures of people. In fact, you can find hundreds of plug-ins available today that allow you to customize XD into the tool that you need (Figure 5).
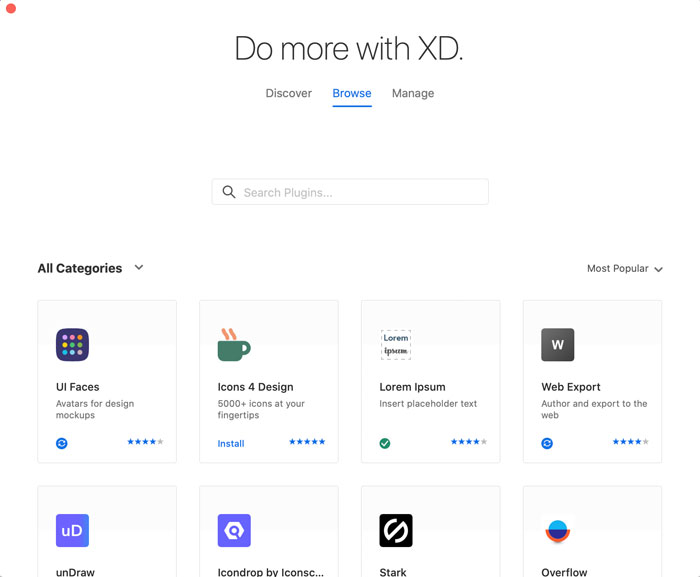
Figure 5. Adobe XD’s plug-in app store offers an easy way to browse and add plug-ins.
Prototype your website
Of course, we can’t ignore the most obvious use case: If you are involved in the design process of a mobile website or app, then XD is the tool to use. Imagine prototyping your portfolio page or updating your company’s website (Figure 6).

Figure 6. A website prototype example created using templates and UI kits
XD offers free UI design kits to get you started on your lo-fi design allowing you to build, prototype, and share a handful of pages in a matter of minutes. I once observed an InDesign user with zero XD experience build three variations of the landing page to her new portfolio site within an hour—all thanks to the gentle learning curve and intuitive interface. Also, remember that you can invite others to co-edit your document. That’s right: Multiple users can work on the same document at the same time.
Prototype interactive InDesign projects
We all know the power of InDesign’s interactive features. They’re great, but not always quick and easy to use. (Does anyone really enjoy working with multi-state objects?) So the next time you’re building a Publish Online or interactive PDF project, consider prototyping it first using XD. Why? Because it’s faster at prototyping than InDesign, especially if you’re still in the ideation phase without the right copy or images. By using XD you won’t spend a lot of time creating animations or multi-state objects, only having to totally re-do them once you’ve received the final assets and approval. Here are a few tips:
- Use XD’s plug-ins for adding placeholder text, placeholder images, and profile pictures.
- Place content from Photoshop and Illustrator in XD by opening or importing the documents. Alternatively, use Creative Cloud libraries. This also applies to InDesign. You can’t directly import InDesign content, but you can place it in a library and then grab if from that same library within XD as a work-around.
- Temporarily replace slideshow objects using multi-state objects with a Horizontal Scroll object in XD. It only takes a few seconds to set up, and it gives off the rough idea. Remember, this is a quick prototype and the goal is to help secure earlier buy-in from key stakeholders. Once you have that, you can build the real thing in InDesign.
- Add basic page navigation in a matter of clicks by using prototype options.
- Share your design with your customer using XD’s sharing capabilities and have them comment on your work or personally present a live working prototype (Figure 7).

Figure 7. An example of an online published prototype
Build a mood board
Drawing inspiration before you dive into a big project is super important. And collaborating with your co-workers to build a mood board together is often a good step in the right direction. We often do this using Photoshop or InDesign. But consider using XD instead. Why? Because it allows you to paste or place virtually anything you want, and it outclasses InDesign when it comes to online collaboration and feedback gathering. Additionally, what first started out as a mood board often becomes the basis for a customer presentation afterwards. And we’ve already established that XD can be a really good presentation tool. Also, XD isn’t limited to a page size since pages don’t exist in XD. Instead it uses a free-floating artboard, very much like Illustrator does. So you’ll have a massive canvas at your disposal of which you can choose which part to share online.
Your First XD Project
Are you excited about XD yet? In that case, it’s time to start learning. Pick a small project, personal or professional, and try to build that using XD. Here are a few of the features that are worth exploring during each phase of your interactive project.
Step 1: Design
Of course, you first have to design your project. Start off by creating your new document and exploring the basic interface. A blank page can look pretty intimidating, especially without bleed, margins and columns. So be sure to click the name of your first artboard and activate XD’s grid options on the right side of the screen (Figure 8). Once you added a few columns and grids, you’ll feel a lot better. Also, you can drag out guides from the top and left edge of your artboard. Just drag inward to create them.
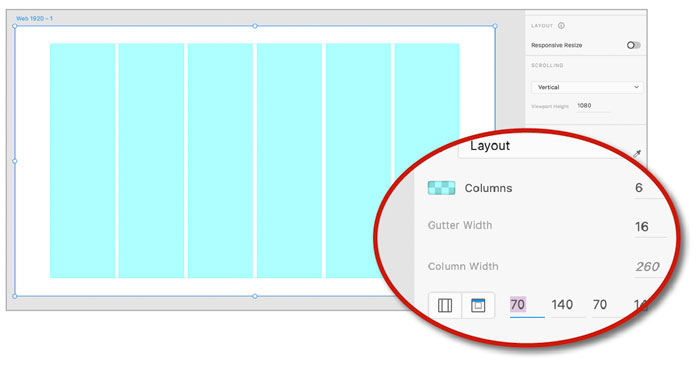
Figure 8. Adding margins and columns to your design will make your design work easier.
Now it’s time to add more content. Use the Plug-ins menu to add the Lorem Ipsum plug-in to help fill your page (Figure 9).

Figure 9. With the Lorem Ipsum plug-in (or similar ones) it’s easy to populate your design with basic text.
Text in XD behaves just like in Illustrator: You can click to create Point type or click and drag to create Area type. The type options in XD aren’t extensive, but this is slowly improving. In the meantime, you’ll need to accept the fact that you can’t yet create things like tables, small caps, or paragraph rules.
For images, the best practice is to first drag a basic shape and then place your image into that shape (Figure 10). This way the shape will act as a mask, very similar to the graphics frames we use in InDesign. You’ll also have a lot more control over the image cropping and dimensions. So avoid dragging in images when you have no placeholder shape ready.

Figure 10. Drag and drop images from the Finder (or Windows Explorer) or use the Creative Cloud Libraries.
Once you have some content ready, you can open the Assets panel on the bottom left of the screen and create text styles. I also recommend you learn how to create a Repeat Grid object and a Scroll Group for managing multiple objects. And when you’ve mastered all of that, learn how to use and save Components in a later stage. A good place to learn these basic skills is via Let’s XD.
Step 2: Prototype
Prototyping is the act of linking objects and artboards together, creating a logical flow that enables basic navigation and interaction. Move into prototyping mode by clicking the word Prototype at the top left of the screen. From there, it’s simply a matter of selecting either an artboard or object and dragging out its handle to connect it to another object or artboard (Figure 11).

Figure 11. Creating an interactive prototype is as easy as dragging links from objects to artboards.
Most of the options that appear on the right are pretty self-explanatory. If you do want to put in a little extra effort, learn how to use Auto-Animate, with which you easily can create cool-looking animations that start on a given trigger or artboard. Remember because XD is an all-in-one app, you can always switch back to Design mode if needed. And at any time you can click the Play icon at the top right of your screen to preview your interactions. Alternatively, you can download the free XD viewer app on iOS and Android to try your experience on-screen.
Step 3: Share
Of course you need to share your work in order to present it to others, gather feedback from stakeholders, or hand off your project to a team of developers. Start by clicking the Share option at the top left of the screen, and then choose a method of sharing on the right.
The View Settings menu will explain the main differences between the sharing methods. You can use Design Review for gathering feedback (Figure 12), Presentation for sharing online presentations, and Development for handing off your project for development. This means that anyone with the shared link will be able to select objects in your shared project, download assets, and copy basic CSS properties.

Figure 12. Choose the appropriate settings when publishing and sharing your design.
Also know that you can save your document as a cloud document. Doing so gives you the advantage of file version control and the ability to invite others to co-edit your document.
How to Get InDesign Content into Adobe XD
At this writing there is no direct way of opening InDesign documents and converting them into an XD document. But there are a couple alternative methods that enable you to share content between InDesign and Adobe XD—each with its own benefits and best practices.
Copy and paste
The first and most obvious method is to just copy the content you need from InDesign, and then paste that into your XD document. Doing so will keep native vector content editable in Adobe XD, and even text elements will remain intact. It’s not a flawless experience, however. Adobe XD will split up the pasted paragraph text into dozens of separate text frames, making it very difficult to work with afterwards. So if you opt for this method, plan on using the assets as they are after you copy and paste.
Using Creative Cloud Libraries
If you want to get the most out of sharing InDesign content with Adobe XD, use a Creative Cloud library and follow these tips. (See Issue 83 for the basics of working with CC Libraries.)
Colors: Once you’ve added a color swatch to a CC Library, you can directly apply it to your elements in Adobe XD. Note that you first have to apply a swatch to an object before you can save it to the Colors section of the Local Document Panel in XD (Figure 13).

Figure 13. A color swatch added from InDesign to a CC Library can be applied to content in XD from that same library.
Character Styles: XD supports character styles, but not paragraph styles (similar to Photoshop). So be sure to properly create and apply character styles to text in InDesign before adding that text to a CC Library (Figure 14).

Figure 14. Adding an InDesign character style to a CC Library allows you to use that same style in your XD documents.
Graphics: You can save any collection of native InDesign content into a CC Library (e.g., text frames, vector content, tables, groups, and so on). To do so, simply select the artwork in InDesign and drag it into a CC Library. Then, in XD you can drag and drop linked assets directly onto the artboard, or right-click a graphic in the Libraries panel to place it as an unlinked copy instead (Figure 15).

Figure 15. Drag and drop graphics from InDesign into a CC Library if you want to re-use them in your XD documents.
Edit and update: To make changes to InDesign content in a CC Library, right-click the item and choose Edit. All changes will be automatically applied to all instances in Adobe XD (Figure 16).

Figure 16. When you edit a graphic in a CC Library it will automatically update your XD documents.
Designing the Future
XD has truly revolutionized how experiences are designed, not just for customers but for Adobe as well. The Adobe team uses XD to prototype the next versions of InDesign, Photoshop, and other apps, even XD itself (how’s that for inception?). And with its monthly update cadence, open roadmap, and quick innovation, XD is a tool worth investing in. If you want to learn more, I highly suggest you take a look at LetsXD.com.
Commenting is easier and faster when you're logged in!

Recommended for you

Scripts from the Crypts
Mike Rankin digs deep into the InDesignSecrets archives to find 20 scripts that...

Variable Fonts in InDesign
A concise Q&A guide to navigating InDesign 2020’s newest tool for type.

InDesign Magazine Issue 149: The Accessibility Issue
Issue 149 has articles on Tools and Services for Accessibility, Accessible Color...