

As a person who makes PDF files all day every day, controlling the many settings in Acrobat Distiller can be a real problem. Distiller is the software part of the Adobe Acrobat package that actually creates PDF files. This all-important software is in fact a software RIP, similar to the controller on a PostScript printer, but its end product is a self-contained PDF document instead of a printed page.
At last count there were 1,239,864 variables in Distiller (perhaps a conservative count – experts cannot agree on the actual number), and if you set one incorrectly, the resulting files are not useful: They don’t print correctly, or they don’t have the correct font implementation, or the color space is wrong, or…
Custom Settings
In Acrobat Distiller 6.0, which comes with Acrobat 6.0 Professional, the five available default settings (High Quality, PDFX1a, PDFX3, Press Quality, and Standard) are usually not acceptable to me. Adobe has created these to answer the needs of the general public (“Standard”) and the publishing professional (PDFX1a), but for the work I do there are often things that I need to change. For example, I find myself changing the percentage for subsetting embedded fonts, or changing the compression values or compression method for images in PDF files.
For instance, I always set all fonts to embed and to subset at a fairly high percentage value. I do this to force Distiller to create a custom font name for the embedded font (this solves an esoteric problem with RIPs that have resident fonts with the same names as the fonts I have on my computer — but I will address that issue in another article). On the issue of compression, I usually choose not to use JPEG (the default) as the compression method for color images in PDF files destined to high-quality printing. Since JPEG creates often-visible artifacts in images, I choose either no compression or ZIP compression, which is lossless. I also do a fair amount of work that is printed on newsprint, so I have made special PDF Settings for newsprint (resolution appropriate for 100 lpi halftones).
Whenever I make these changes to Distiller settings, I know I can save them and use them again. In earlier versions of the application these custom settings used to be called “Job Options.” But in Distiller 6.0, the menu item entitled PDF Settings takes you to a multi-tab menu where these items are controlled, although the resulting files are (still) called “.joboptions” by Distiller. By default, Distiller will put your settings with the defaults that Adobe provides. When you save your .joboptions files with Adobe’s, your settings will show up in the menu of Adobe PDF Settings that control how your PDF files will be made. Each time you use Distiller you must ensure that the correct selection is made before invoking the application. If you don’t do this, you can easily get a PDF with the wrong attributes (not enough compression, wrong color space, no embedded or subset fonts, etc.).
Watching Folders
After wrestling with Distiller for years, I have developed (discovered?) another technique for managing Distiller settings that works well, and which simplifies the making of PDFs to various specifications. It provides me with greater efficiency, and prevents me from making errors in the creation of PDF files.
Here’s how it works: Distiller has a function to watch one or more folders for incoming PostScript or EPS files. To do this, just create a new folder somewhere on your computer and then tell Distiller to monitor that folder (you can share these folders with other computers on your local network, too). Among the settings in the Watched Folder menu is how frequently to look for file to distill (“Check watched folders every [x] seconds” — I set mine to 60 seconds), where to put the original PostScript files after distilling (I recommend you save them by moving them to the Out folder, rather than delete them), and how long to keep them after processing (I delete mine after 7 days).
I have created a folder that holds all of my distilling activities, and inside that folder I have created four additional folders for the common types of PDFs I create – screen quality, press quality, print quality, and newsprint quality (you can have as many folders as you need).
The set-up is diagrammed here (see Figure 1). I create and save custom PDF Settings inside the Watched Folders I have asked Adobe Distiller to monitor. Whenever I save a PostScript file to one of those folders, Acrobat Distiller will distill the file to PDF according to the .joboptions file located in the specific folder. This means that Distiller will always use the correct settings for the job, according to the folder in which I save my PostScript file.
 Figure 1: When you place custom settings inside individual folders like shown, Distiller will automatically apply those settings to incoming files.
Distributed Distilling
This arrangement looks complicated, but the effectiveness of this method is solid. If you save or move a PostScript file to the correct folder, the resulting PDF will be created correctly (you can’t make a mistake very easily, and if you do, just drag the .ps file into the correct folder and do it again).
Being the evangelist that I am, I have created this folder arrangement on a variety of colleagues’ computers, and since I never hear to the contrary, I must assume that it is working successfully.
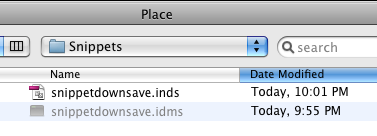
I have tested this technique thoroughly with Distiller 5 and 6. With version 6, I can even update the .joboptions files from the Watched Folders palette. For each watched folder there is an associated “Settings” file (see Figure 2). On the right side of the Watched Folders menu are buttons for editing, loading, and clearing the settings files. I can also add security settings for those PDFs that need password protection or other restrictions. Then, by simply saving my PostScript files into the correct folder, these security settings and all my PDF Settings will be applied according to these Watched Folder controls.
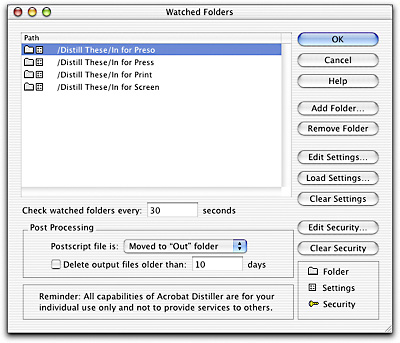 Figure 2: Notice the icon next the to folder in the Watched Folders list. This is the .joboptions file associated with that folder. You can edit these .joboptions files by clicking on the “Edit Settings” button at right.
If you distill a lot of PDF files, try this technique. You’ll be pleased with its efficiency.
This article was last modified on December 13, 2022
This article was first published on June 24, 2003
Commenting is easier and faster when you're logged in!

Recommended for you

Quark and The Art Institutes Annual Design Competition Honors Students' Tribute to Typography
Quark Inc. today announced the winners of its annual graphic design competition...
dot-font: Type now
dot-font was a collection of short articles written by editor and typographer Jo...

New Contest! The Mystery of the Unused Style
Solve this InDesign mystery for a chance at winning a great prize.