


How Data Merge and Scripting Can Save the Day
Learn how InDesign’s capabilities turned a fragile, deadline-driven layout into one that reflows itself.


This article appears in Issue 61 of CreativePro Magazine.
Most people think of InDesign’s data merge as useful for inserting content into one field in an otherwise static project—certificates and name badges, to name two classic examples.
But Data Merge can handle a lot more than that if you’re willing to push it and, flexing a newfound understanding of scripts, I ended up using it to solve a problem that wouldn’t stand still.
A Data Merge Challenge
I work for Walsworth, which prints school yearbooks (among many other publications), and every other year we produce Possibilities, a book full of examples and tips to celebrate standout work from our yearbook customers.
The book (Figure 1) features hundreds of examples from high schools and middle schools that either carried a strong design from cover to cover or produced something innovative in print. The book covers themes and how schools carried them through their books, cover design, spread design, and photography. It also shares projects that used print in ways other schools might not know are possible.
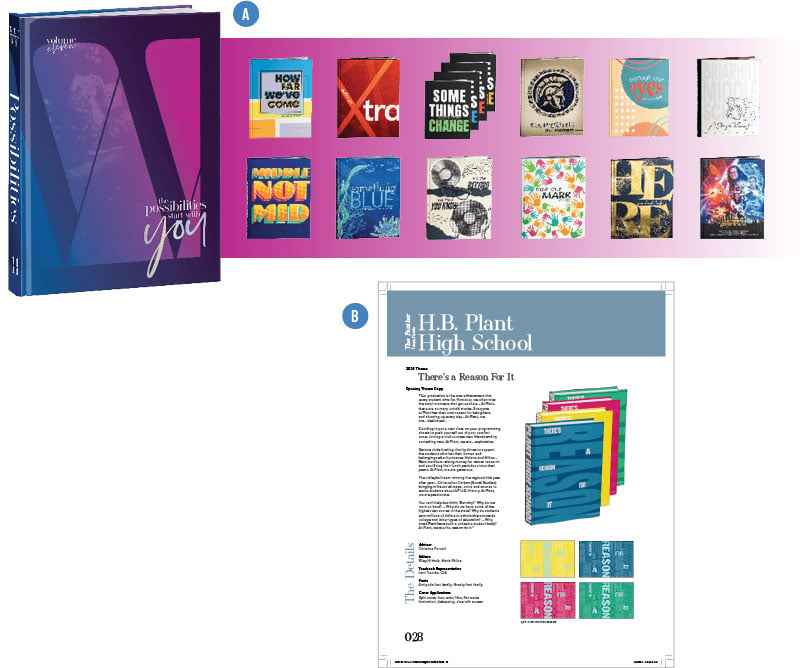
Its layout is surprisingly consistent. When I sat down with the project manager and designer to map out the whole process, we found that most spreads follow the same format: a school name, some details, and a set of images in the same positions, page after page.
The data lived in a CSV file that was clean enough to work with, making most of the book a strong fit for data merge. We could pull information and images into the layout quickly and let the designer handle adjustments from there.
One problem immediately emerged: By itself, Data Merge could automate the initial layout of the pages, but if we would need to add or remove an entry from the sequence, the designer would have to insert a new profile into the flow and shuffle the position of every remaining group by hand on dozens of pages.
We could re-run the whole merge each time to rebuild the pages with the profiles in the updated sequence, but that would not be ideal. I wanted a way to run an initial merge once and keep editing from there.
InDesign would need a little assistance. I created a script to take each of those groups and paste it as an anchored object into a document’s primary text frame, creating one story with all the yearbook projects.
The script uses script labels to treat grouped data merge content as it would a single character in a flow of text.
Now, to change the order or add or delete one of these yearbook examples, a designer can cut or paste a group. The layout reflows!
How to Build It
Here are the steps I used to create the project. This isn’t a full Data Merge tutorial; CreativePro already has plenty of coverage on the basics, including the Data Merge Super Guide (a free download for members).
Create your target document
Set up and apply separate object styles for your variable image frame and for your variable text frame (Figure 2).
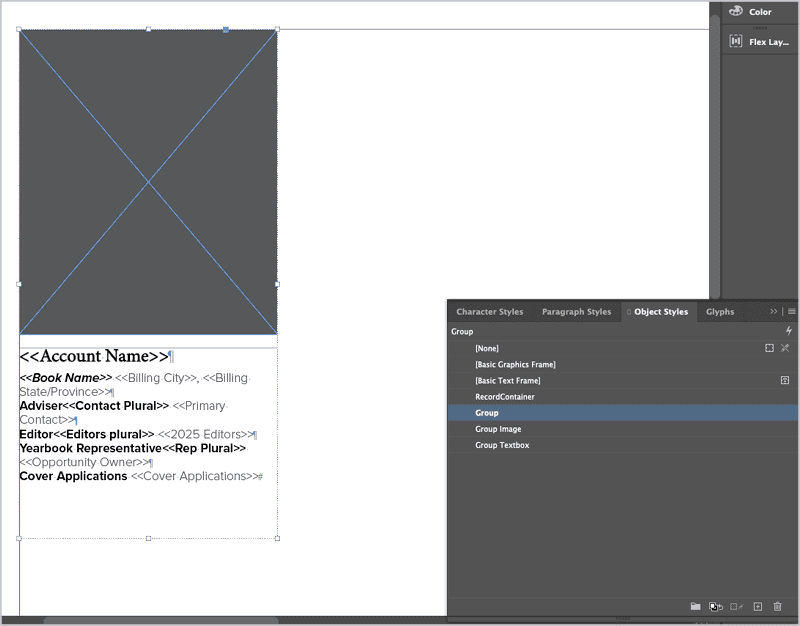
Create a third object style for the variable group. Caution: The group object style overrides the individual styles underneath it. Turn off any settings that would conflict with your image or text frame styles. Fill is the most common culprit.
Set up character and paragraph styles for your text. Even a stripped-down set with default fonts works. Tip: The script preserves whatever formatting you assign, so styling here pays off later when you need to make document-wide adjustments.
Create a fresh parent page for the creation of the grouped text/image and apply it to the first page of your document.
On this first document page (not the parent), group your text frame and image, apply your group object style, and assign a script label (Window > Utilities > Script Label) to the group. (The script, by default, expects the label to be named “record.”)
Create your merged document with running text
Run your data merge to create your merged INDD file.
On your merged document with all your groups in sequence, run my FlowGroupedObjects script. In the dialog box, choose the parent page that holds your destination text frames, and confirm or edit your record label and container label. The two labels work together to tell the script what to gather and where to send it. (Figure 3).
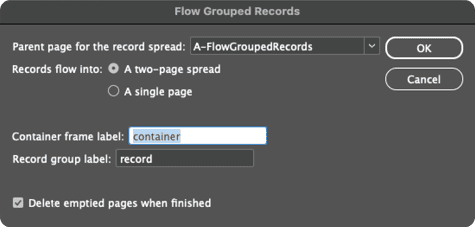
The script creates a two-page spread for the project (to avoid the scrambled-flow issue). It then adds every labeled record from the merged-page document into the primary text frame of the book document, in order. You can choose to delete the leftover blank merge pages.
If you’re flowing into a single page instead of a spread, you can skip page creation entirely. Just make sure your container label is set, and tell the script not to create pages.
Caution: If records come out of order across a spread, you almost certainly created the destination pages separately instead of together as a full spread. The FlowGroupedObjects script handles this automatically, but if you’re customizing the process by hand, build both pages of the spread at once, and confirm that the primary text frames are linked across the spread before running your merge.
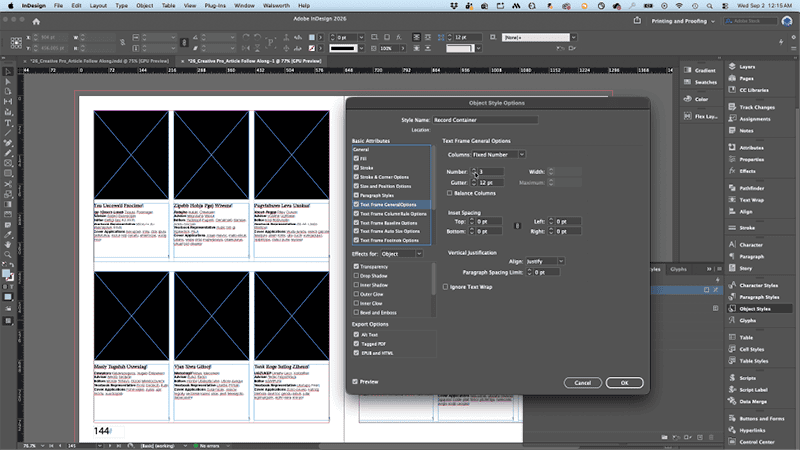
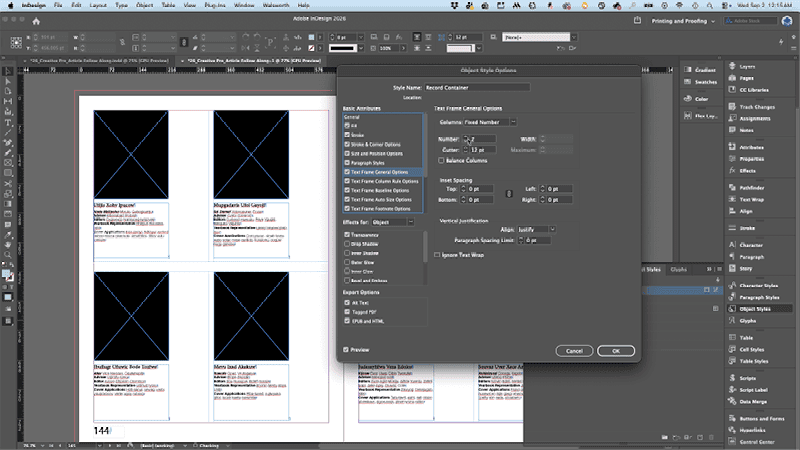
Tip: Create an object style for your destination document’s primary text frame and apply it before running the script. If you need to make changes like switching a three-column layout to two columns, you can edit the style once (Figures 4 and 5).
Lessons Learned
Though my concept seemed like a tidy solution, the process of creating the script wasn’t so clean. I discovered that when a primary text frame spans a spread, you need to create the two pages together as a full spread from the start. Add them one at a time—even onto a parent page built for it—and the connection between the frames breaks.
Once I understood what was happening and why, I could design around that behavior instead of fighting it. And that turned out to be one of the more useful lessons in this whole project.
Commenting is easier and faster when you're logged in!

Recommended for you

Update Index
When you edit an index, for example to combine entries, you can end up with un-w...
A Script to Round off Size and Position Values in InDesign
Instantly clean up "messy" values by rounding them off to the nearest whole poin...