
16 Free Must-Have Scripts for InDesign Users
These powerful scripts can transform you from a regular InDesign user to a super-powered force of nature!


This article appears in Issue 49 of InDesign Magazine.
Congratulations: By starting to read this article, you have taken the first step towards making your life far easier! I’m going to uncover a secret that can transform you from a regular InDesign user to a super-powered force of nature! The trick is based on what I (immodestly) call Blatner’s First Rule of Publishing: Take a little time now to save far more time in the future. One of the best ways to apply this rule is to find a script or a plug-in that does your work for you. A script is a series of instructions to make InDesign and your computer do work you would ordinarily have to do by hand. Most scripts are extremely easy to use and can save you hours of time. The hardest part is knowing what’s available and where to get them. Fortunately, I’m going to make it easier for you by providing a list of 20 awesome scripts. Of course, I’m not saying you need all of them, but you do need to know about all of them! You never know when one will come in handy. By the way, if you don’t know how to install and run scripts, you’re not alone. Fortunately, it’s really simple.
- Open the Scripts panel (Window > Utilities > Scripts). You’ll find pre-installed scripts inside the Application/Samples/Javascript folder in the panel. To run one, double-click on it.
- If you want to install a script you have downloaded from the internet (it should have a .js or .jsx extension), right-click the User folder in the Scripts panel and choose Reveal in Finder (or Open in Explorer in Windows) from the context menu.
- Put your scripts inside the Scripts Panel folder (not the Scripts folder). Make sure it ends with .js or .jsx (sometimes
scripts get a .txt added to their name when you download them from the internet). Next time you look at your Scripts Panel, you’ll see the script inside the User folder—no need to restart the program. Double-click the script name in the panel, and you’re in business.
Your new scripts
Note that these scripts are in alphabetical order, not order of awesomeness or functionality. Click on the script name to jump to a web page from which you can download the script. In most cases you’ll find other scripts worth checking out, too.
1. Calendar Wizard
One of the most stunning scripting examples is Calendar Wizard, a tour de force by Scott Selberg, who offers it free for personal and noncommercial use. Calendar Wizard can create calendars in a wide variety of forms, and with a wide range of options, including holidays, phases of the moon, and calendars in over 20 different languages (Figure 1)! Best of all, the calendars are all based on paragraph, table, and cell styles, so it’s extremely easy to customize them. Scott has created a number of simple and excellent tutorials to help you through the process. You can read more about Calendar Wizard here.

Calendar Wizard’s dialog box is huge but doesn’t take long to figure out.
2. FindChangeByList
Do you run the same find/change queries repeatedly? Do you have 10 find/ change queries that you routinely have to run one after the other? You need FindChangeByList, and the good news is that you already have it—it’s one of the free scripts that are installed by default into the Samples folder inside the Scripts folder. The hardest part of using this script is the text file you have to create to control it. The text file tells the script what it should find and what to replace it with. It’s not rocket science; but it does take some time and effort to figure out. (See my InDesign Secrets video “How to Clean up Text with a Built-in Script” for a full demonstration.) You can save a lot of time if you use some additional scripts, mentioned in this blog post: Find-Change Scripting Goodness. But honestly, you can save even more time if you use an inexpensive third-party product called Multi-Find/Change.
3. Scripts for long documents
Do you need endnotes in InDesign? For years, InDesign only offered footnotes! Fortunately, if you’re using a pre–2017 version (and some of you are), Peter Kahrel has made a script that can convert your footnotes into endnotes using a cool workaround involving cross-references. Even better, Peter has other scripts that can convert footnotes into side notes (which sit in the margins) and more! His repository contains essential scripts for working with long, complicated documents and books. All of Peter’s scripts are hosted right here at Creative Pro.
4. History scripts

The History scripts let you undo or redo as many steps as you want, using a convenient popup menu. You can set a keyboard shortcut to these scripts (or any other script) for easy access by choosing Edit > Keyboard Shortcuts and choosing Scripts from the Product Area popup menu.
5. IndyFont demo
IndyFont turns InDesign into a font creation application—yes, you can literally design and export a font! That may sound crazy, but in fact it has some excellent uses. For example, need a custom bullet character? Or custom numbering for a fancy auto-numbered list? What about a custom icon at the end of your magazine story? All these things require a custom font. In the past, that meant not only buying another application, but learning it! IndyFont lets you do it with tools you already know, and while the free “demo” version only exports a single character in the font, it lets you create as many fonts as you want. (A full license is €59.00, approximately $70 U.S.) IndyFont was created by Theunis de Jong (“Jongware”), who developed it with Marc Autret of the Indiscripts website. Both have been prolific members of the InDesign scripting community. DeJong died in 2020, leaving behind this amazing script as well as a body of ingenious work that pushes the limits of InDesign.
6. InGutter
Even though several years ago, InDesign added the ability to automatically run lines (rules) between each column, the feature doesn’t offer as much control and flexibility for designers of newspapers and magazines. It’s not that hard to do manually, but it is tedious and frustrating if you ever need to change the size of the frame. Enter InGutter, a wonderful tool from Indiscripts that uses a clever trick to add the lines for you (Figure 3). Even better, when you resize the frame, the rules change automatically, too!

InGutter can add guides between or around any multi-column text frame.
7. LayoutZone
Did you ever wish you could take a section of your page and hand it to someone else to work on? LayoutZone, by Martinho da Gloria, lets you convert any part of your spread into an editable InDesign document; then later, after it’s edited, you can update the “zone” in InDesign or convert it back into editable objects again. You can even use it to convert any placed InDesign document into editable objects or export portions of your page in different file formats or as their own InDesign file. LayoutZone needs to be installed differently, but easy-to-understand instructions on the developer’s site lay it out for you. This tool may sound complex, but it’s actually very easy and has the potential to supercharge your workflow!

Layout Zone lets you select any number of objects on a spread and—all at once!—export them as an InDesign document in their own right, which then becomes linked to your document, replacing the original selection. That new InDesign file can be sent to another designer. At any point, your original structure can be restored, complete with any updates.
8. MakeGrid
This script—again, one that you already have—is one of my favorites, and not just because I was partially responsible for it being written. A client of mine needed a way to split a single frame into a grid of smaller frames (they were using it to create real estate and car ads). I asked Olav Martin Kvern (who was working at Adobe at the time) for some help, and he wrote MakeGrid in a jiffy. It was so useful that Adobe decided to add it to the Samples folder, which is where you’ll find it today.
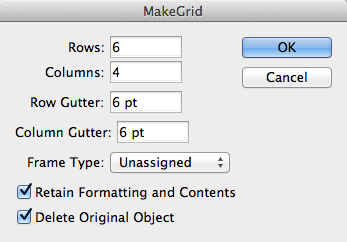
The MakeGrid script breaks any empty or graphic frame into a bunch of pieces.

The script makes duplicates in a grid for open paths…

9. ID-MultiPageImporter
It’s easy to place multiple pages of a PDF into an InDesign document with the Import Options dialog box, but you have to click at least once for each page you’re importing. Wouldn’t it be cool if you could just import two or more pages automatically? InDesign automatically installs a free script (in the Samples folder) called PlaceMultipagePDF which can help. It first asks you to choose a PDF, and then it asks if you want to place the pages in a new document or the current one. But that’s about the extent of its power. If you want to supercharge the import, use ID-MultiPageImporter, which lets you rotate, scale, and position your source file—a PDF, a PDF-compatible Illustrator .AI, or an InDesign document—just where you want it. ID-MultiPageImporter, originally written by Scott Zanelli, has been maintained by Mike Edel and is available on GitHub.
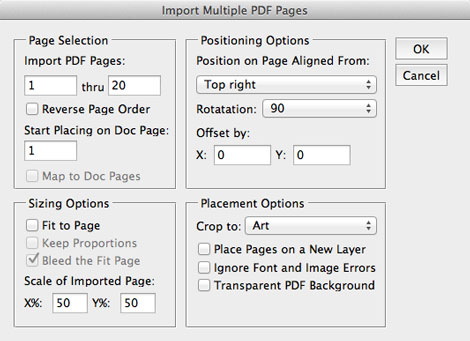
ID-MultiPageImporter lets you import a bunch of pages from any PDF or INDD file very quickly and accurately.
10. Page Exporter utility
Recent versions of InDesign have added the capability to export single-page PDFs, which many printers request, particularly for magazine and newspaper workflows. But if you need more control over how your documents are exported to PDF (or EPS or some other format), then check out the Page Exporter Utility (PEU), which has been a staple of many people’s production lines for years. What I use it for most commonly is layer versioning. For example, you might have a “base layer” and then three different language versions (say, English, French, German). PEU can export multiple PDF files as base+English, base+French, and base+German. Simple and super efficient!
11. PriceAdjuster
Let’s say you have a thousand different numbers in your InDesign story and you need to increase each of them by 1. Or you have a hundred prices in your catalog and you need to decrease them all by 30 percent. Computers are supposed to be good at doing math, right? So let the PriceAdjuster script do the heavy lifting for you! You can add, subtract, multiply, or divide all the numbers in your story or document. It even lets you adjust just the numbers that have a dollar sign in front of them, or just ones that match a particular GREP pattern. It’s very powerful, and very fast. PriceAdjuster, written by Peter Kahrel, synthesizes code and functionality from Olav Kvern’s PriceUpdateByString and Steve Wareham’s NumberAdjuster.

If you, say, wanted to multiply every instance of U.S. dollar amounts in a document by 3 and display the result as fire-engine red, you can use PriceAdjuster to do so in seconds.
12. SetVisualCharSize
Need to make your text exactly 72 points tall? That’s surprisingly difficult in InDesign because the point size of text typically includes space above the ascenders and space below the baseline (to make room for descenders). Fortunately, you can use this script to figure out the size for you. Just select some text, run the script, and tell it how large you want the text to be (based on the size of a specific letter). For example, you could say “make the uppercase A be exactly 30 mm tall.”
13. Size Labels
Need to know exactly how large every frame is in your document because you’re working with very strict guidelines? Don’t click on each frame one by one; just run the SizeLabels script, and every object is suddenly adorned with a little label showing its dimensions. You can edit the script (sounds scary, but it’s really easy!) to change the measurement system it uses from inches to something else, and you can add paragraph and object styles to customize the labels. Best of all, the script places the labels on a special layer, so it’s easy to hide or even delete them. Size Labels is produced by Rorohiko Workflow Resources.
14. StyLighter
It’s almost impossible to tell where styles are applied in InDesign unless you click on every bit of text manually, or the style is easily identifiable by eye. But this problem is handled by Marc Autret’s amazing StyLighter script. In the StyLighter dialog box you can assign a different color for each paragraph or character style. Enable the Activate the Preview Mode checkbox, to see your chosen colors appear wherever styles are applied in your document. All local character formatting (style overrides) are shown with a red line through them; local paragraph formatting gets a line along its left side. These lines don’t print; they’re on-screen-only. You can make it all go away by running the script again and turning off that checkbox.
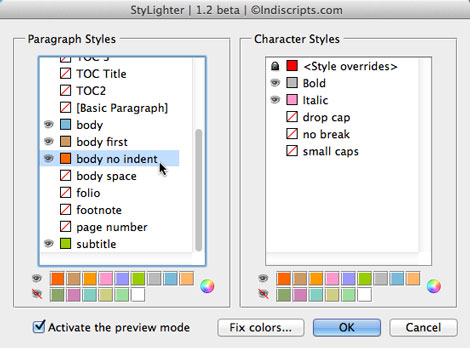
When you turn on the preview mode in StyLighter…
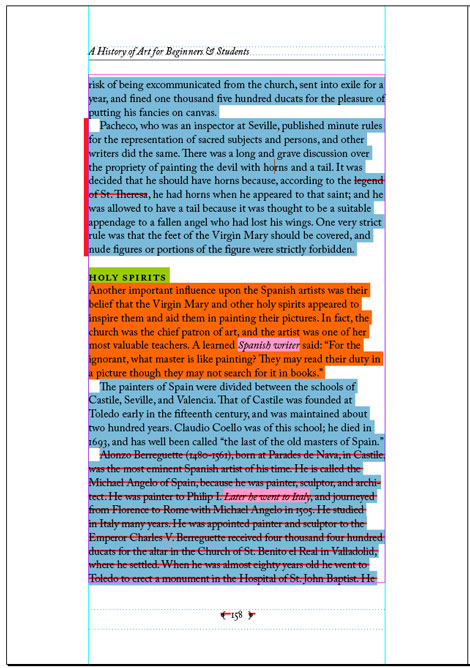
… you can see what styles are applied and if any local formatting has been applied on top of those styles.
15. SortParagraphs and Table Sort
I’m actually going to mention two scripts here. First, you have to know about the SortParagraphs script that comes in InDesign’s Samples folder (in the Scripts panel). It’s terrific for sorting any kind of list, whether numerically or alphabetically. But it only sorts paragraphs and can’t sort data in a table! That’s where Peter Kahrel’s TableSort script comes in handy. It can sort tables in all the ways you’d typically want.

TableSort is great for sorting a table alphabetically.
16. Wordalizer
The last script on here is addictive; once you start using it, you’ll want to run it at least 10 times in a row. Marc Autret’s Wordalizer is a script that makes a word cloud of the most common words in a story or document and lays them out in a clever and colorful way. While most people don’t need a word cloud in their documents, it is an awesome way to make your publication look super cool. The free tryout version of Wordalizer (€29.00, approximately $34 U.S.) inserts the word “Wordalizer” into your word cloud. 
Tips for using these scripts
I’ve tried all the scripts in this article, and they generally work fine. We’ve also retested them to ensure that they continue to work in the 2021 version of InDesign. Some scripts in this article say they’re designed for certain long-gone and officially unsupported versions, but they do appear to work in the current version. With that said, software can be finicky. Here are some things to look out for and a couple of ways to experiment with scripts and have a good (and fun) experience doing so!
Save first!
Some coders write their scripts in a way that you can use Undo to easily revert to the state of your document before you ran the script. However, many scripts don’t do this (especially older scripts). The result is that if you try to undo after running one of those scripts, you may have to choose Undo about 50 times (once for every action the script performs). Instead, save your document before running the script! That way, if something goes terribly wrong (or you just don’t like the result), you can choose File > Revert and you’re back in action quickly.
It didn’t work! Now what?
Every so often scripts spit back errors at you when you try to run them. These errors are often really scary and unless you’re a scripter you may not know what to do. My suggestions:
- Try the script on a different document and see if it works there.
- Try setting up the document differently (for example, some scripts want you to select something first; others don’t want anything selected).
- Sometimes older scripts just don’t work right in a new version of the product. Other times it’s some weird bug that might affect just you or your situation. You can sometimes go back to the developer, report the bug, and see if they’ll fix it for you. But because these are free, the developer may not get around to fixing it for a while. If using the script is important for you, consider offering them a small fee to help motivate them.
Speaking of which…
Return the favor!
Just because these scripts are free doesn’t mean they’re not worth a lot! If you find yourself saving money or time using a script, consider donating to the developer, or buying some other product from them! Most of these scripters have a Donate button on their site. You’d be amazed at how sending even $20 or $50 makes a huge difference to these folks. (And believe me, you’re likely to save hundreds of dollars in time, so it’s more than worth it.) * * * This is an update of material that originally appeared in InDesign Magazine, August/September 2012 (issue 49). Thanks to Mike Rankin, Anne-Marie Concepción, and Erica Gamet for introducing me to some of these scripts.
Commenting is easier and faster when you're logged in!

Recommended for you

InDesign Tips: Printing Transparency
Transparency is one of those features that designers love and printers hate. Tha...
How to Keep AI-Generated Presentations Fully Editable
An AI-assisted workflow that actually works, so your files are beautiful and fun...

Send Those Crash Reports!
Recently, Zak Williamson of Adobe put out the call to InDesign users to please s...