


Creating arrows in Photoshop is one of those things that’s always been more difficult and confusing than you’d expect. There are two main approaches you can use in the application: Use the Custom Shape tool or the Line tool. Or, you can “cheat” and borrow some arrows from Illustrator by pasting or placing from a Creative Cloud library. Let’s see what we can do with each of these methods.
Creating Arrows with Custom Shapes
Custom shapes give you interesting choices like swooping, wavy arrows.  To use one of the custom arrow shapes that come with Photoshop, take the Custom Shape tool and from the Shape menu on the Options bar, choose Legacy Shapes and More > All Legacy Default Shapes > Arrows. Click the arrow shape you want, and then either click or drag on the canvas to add the arrow to your image.
Creating Arrows with the Line Tool
 If you just want a straight arrow with simple triangular or barbed arrowheads at either end, you can use the Line tool. The trick here is that you must choose your arrowhead settings before drawing the line. Arrowheads cannot be added, removed, or modified after the line is drawn. With the Line tool, click the gear icon on the Options bar to choose your arrowhead settings, then drag on the canvas to make your arrow. Note that the stroke you apply to the line will also be applied to the arrowhead.
  The most important thing to remember is that you must use the controls on the Options bar to
set up your arrowhead’s look before you draw the line it’s attached to.
Borrowing Arrows from Illustrator
If neither of the above methods produces satisfactory results, an alternative is to create your arrows in Adobe Illustrator (where you can draw a line and apply more flexible and varied arrowhead options in the Stroke panel) and then decide how you want to bring them into Photoshop.  Illustrator offers many more choices for arrowheads than Photoshop. You have several options, each with its pros and cons. You can copy from Illustrator and paste in Photoshop as Layers, Smart Objects, Pixels, Paths, or Shape Layers.
 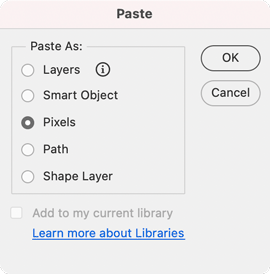 Let’s consider each one.
Paste as Layers
In order to take advantage of this feature (preserving vectors, formatting attributes, and layer structure) you first need to expand the arrow’s appearance in Illustrator (Object > Expand Appearance). If you don’t expand the appearance before copying and pasting, the arrow gets rasterized as a pixel layer.
Paste as Smart Objects
The arrow will be rasterized in any output but the main advantage here is that you can transform it nondestructively in Photoshop. So, if you scale it much smaller you can scale it back up later on without any loss of image quality.
Paste as Pixels
The arrow will be permanently rasterized in a new pixel layer at the resolution of your Photoshop document. It won’t be editable with any path tools.
Paste as Paths
This adds the vector path from Illustrator to the Photoshop Paths panel. You can edit this path with any of the usual tools (Pen, Direct Selection, etc.). It won’t have any formatting, so it’s up to you to apply a new stroke and/or fill to the path.
Paste as Shape Layers
The nice thing here is that you can edit the shape of the arrow with any of the path tools and easily change the fill/stroke in the Properties panel or Options bar.
Use Creative Cloud Libraries
This is probably the best option of all. You can create arrows in your desired styles in Illustrator and save them in a Creative Cloud library. Then place them from the library into a Photoshop document. If you need to edit one after placing it, double-click its thumbnail in the Layers panel. It will open in Illustrator where you can make your edits and save. When you return to Photoshop all instances of the arrow will be updated. This article is for members only. To continue reading, please log in above, or sign up for a membership today! Thanks for supporting CreativePro!
Commenting is easier and faster when you're logged in!

Recommended for you

How to Make Amazing Halftone Effects with Photoshop
Use a Photoshop method to explore and control creative halftone effects for prin...
How to Turn a Photo into Graffiti with Photoshop
You can turn any photograph into a piece of graffiti artwork in Photoshop, witho...
Photoshop New Features Guide
For some time, InDesign users have enjoyed a great free resource that details wh...