*** From the Archives ***

This article is from April 23, 2009, and is no longer current.

WordPress for Creative Pros, Part 1

Return to page 1.
Step 10
When you write a blog post, it’s important to give it a category and some tags. Categories describe the post’s content. Tags also describe the post, but they can be more specific, since you usually assign more tags than categories to a post. For example, if you were posting a review of a nature photography book, the category could be “nature photography” or “book reviews,” but the tags could include the book’s author, the locations of the shoot, the equipment used to capture the photos, and so on.

Type some tags into the space, separate them with commas, and click Add. Add a new category or two; from now on, the category will be listed so you can check it when you post similar content.
Step 11
Once you’ve typed the text, inserted images, and set categories and tags, click on Publish.

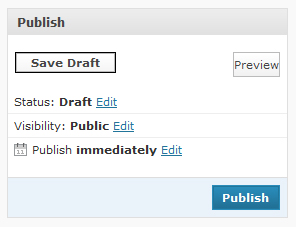
Just like pages, you can edit the Status and the Visibility. But you can also set it to be published at a specific day and time, instead of immediately.
In Part 2 of this tutorial, I’ll lead you through adjusting the settings of a WordPress blog, as well as the plug-ins, themes, widgets, and template/stylesheet editor.


Previous 1 2

  • Radost says:

    Thanks for the great post on using WordPress. We use it at my company for our blog but I’m a contributor not the site’s manager. I appreciated your clear advice and step by steps. I can’t wait for part II.

  • Anonymous says:

    Agreed. As a long time wordpress user, this is a great article on getting your feet wet!

  • Coachb666 says:

    Thanks for the concise and informative article. I started setting up my blog and became somewhat overwhelmed. Your article brought clarity to many questions.

    I am really looking forward to Part II. Sooner rather than later I hope!

  • Anonymous says:

    Chad, thanks a million. You have unscrambled the maze for me. I wanted to set up a WordPress Blog, but information overload confused me; now your article has shown me how to proceed, including the options of a stand alone blog or have it done through a website.

    Thanks again, and I look forward to reading Part 2.

    Ronald

  • Anonymous says:

    You’ve made a couple things a lot more clear – Like the difference betweeen pages and posts.

    Looking forward to the stuff on working with templates especially.

    Thanks again.

    Victor S
    Fort worth, TX

  • Anonymous says:

    Thank you, thank you, thank you, thank you for posting this article on CreativePro. The subject matter is EXACTLY was I was looking for. Looking forward to reading part 2.

    Cheers,
    DamBuster

  • Anonymous says:

    For almost two years I have struggled with Word Press. I have spoken to other designers who concur: this is not an easy program. The installation alone is breathtakingly complex, thus, when people refer to this as a “user-friendly” program, one can only giggle. That said, Word Press does seem to represent some of the best designed websites. Hopefully, following this tutorial, I will FINALLY get it.
    PS Just discovered FREEWAY PRO and my dreams of a “publishing based web design program” have been answered. Sweet.

  • Anonymous says:

    I use WP for my new site.
    I had some issues getting some of the features to work incorporating WP into a previously existing site, though. But, as a standalone, it works very well.
    As with any powerful software, there is a learning curve, and many options.
    I look forward to seeing your next part of this article.
    Ken Storch PhotographyUncapped.com

  • Anonymous says:

    Thanks for the article, we use WordPress for our site and blog. As a contributor not a designer is good for me to read about the backend —- have a better understanding what my designers are going through. Part 2 looks like something I will be sharing with my designers.

    bingdesign.com – we used a Woo theme
    BINGenuity.com – is our blog

    Laura

  • Anonymous says:

    In step 11 you state “click on Publish” and show a visual of a blue button with the word Publish on it. However, in the actual online blog interface I see a blue button with the words “Update Post”.

  • ChadNeuman says:

    thanks for the comments everyone! Re: “tough to follow”; It depends on if you are just editing an already published post, or publishing a new one. If you are creating a new post, then it should say “publish,” and if you are updating a post, it may say “Update post.” But be sure you have the most recent version of WordPress too.

  • CJB says:

    I’ve created my blog directory on my site and uploaded the WordPress files via FTP. But I don’t understand how WordPress knows where to send the email you mention in Step Two, Chad.

    “Never underestimate the power of a minority who cherish the vision of a just and gentle world” – Robert Bellah

  • ChadNeuman says:

    CJB;

    If you have an automatic install with your hosting company then it would tell you to go to /wp-admin/install.php after the directory. But if you just uploaded it via FTP, please see https://codex.wordpress.org/Installing_WordPress#Famous_5-Minute_Install.

    Thanks, Chad

  • Anonymous says:

    I recently undertook the formidable task of building a new web site/blog. This is always significantly more challenging than one expects. Especially if you want to create a web property that increases in value with time.

    I’ve shared my insights on the journey in a recent post. https://tinyurl.com/yjpdhfu

    The end result is that I am now able to put a lot more time and effort into one web property that meets all of my needs and keeps my online visibility higher than it has ever been.

  • Anonymous says:

    Thanks for a concise, informative article! Looking forward to part 2. I worked on wordpress.com but never ventured into adding to my or my client’s hosted site. Great job!

  • Guest says:

    Thanks for the great lesson, it has been really helpful…as a beginner i already feel like a pro.

    thanks again…great work

  • >