
What’s New with Lightroom Classic CC 8.0
The venerable Lightroom application got a bit roughed up last year. For several years, Lightroom users had been screaming for better performance, and version 7.0 delivered speed improvements. But that was overshadowed by a sprightly newcomer, Lightroom CC 1.0. Adobe even swiped Lightroom’s previous name in the transition, saddling the original with the “Classic” moniker. Would Lightroom Classic CC be the last hurrah for a photo editing and organizing application that had outmaneuvered Apple’s Aperture and held off several up-and-comers?
With this week’s release of version 8.0, it’s clear there’s still plenty of life in Lightroom Classic CC. It’s the choice for photographers who aren’t interested in syncing their entire libraries with other devices via Creative Cloud, or who need features such as HDR or panorama merging, printing, creating books or slideshows, and more advanced organizing and metadata wrangling. Here’s an overview of the spotlight features in this release.
HDR Panorama Merge
Lightroom Classic includes straightforward PhotoMerge tools for combining multiple images into an HDR image (high dynamic range, where several photos of the same scene are captured at different exposures to broaden the tonal range) or a panorama. It’s possible to combine both techniques: set your camera to shoot brackets at different exposures, take a shot, pan the lens and take another bracketed shot, and so on until you’ve covered the width of a scene. It can result in great photos, but that process is labor intensive. You need to make HDR images from the bracketed photos, and then merge the HDRs into a panorama.
In Lightroom Classic 8.0, there’s now a quick, automated way to accomplish that. Select a range of bracketed exposures that make up the panorama and choose Photo > PhotoMerge > HDR Panorama. It removes some control from making the HDR images, aligning and de-ghosting the shots, but you can always make the HDRs separately as you could before this release.

Depth Range Masking
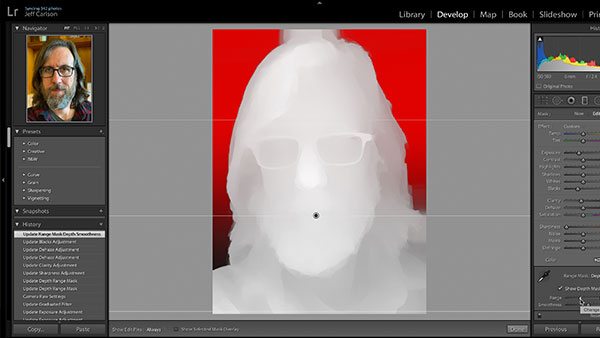
One of the more interesting developments in the smartphone camera arms race is generating depth masks to identify foreground and background objects. Using dual cameras (or a single camera in some models), the phone uses that depth information to simulate the blurred background effect found when shooting with traditional cameras at wide-open apertures.
Lightroom Classic 8.0 can read that depth data in formats that support it (such as the HEIF files captured by the iPhone XS and a few other models). This feature doesn’t give you control over how blurring the background appears (aside from softening the area with negative Clarity and Sharpness settings), but you can adjust tone and some color information using Lightroom’s masking tools.
To use it, create a linear gradient, radial gradient, or use the brush adjustment tool. Under the Range Mask pop-up menu, choose Depth, and then adjust the Range slider to control the mask that’s detected. Click Show Depth Mask to see it more clearly.


Canon Camera Tethered Capture
If you photograph studio portraits or products, it’s helpful to shoot tethered, where the camera is directly connected to a computer so the images are transferred directly into Lightroom for review. Lightroom Classic 8.0 features improved tethering to compatible Canon cameras.
I don’t have a Canon body to test this feature, but Adobe claims up to 1.5 to 2 times faster transfer performance and greater stability. The company also says it’s working on improving tethered performance for Nikon cameras.
Process Version 5
The last major feature is one you shouldn’t have to think about. Adobe has updated its process version for raw files, which controls how colors are handled overall. Process Version 5 removes a purple color cast that appeared in high-ISO, low-light images, and reduces noise when you set the Dehaze slider to a negative value. The process version is automatically selected for new photos you edit; in the Develop module, open the Calibration panel to find the Process drop-down menu. You can switch to earlier process versions if you think their results are better. Photos edited with an earlier process version are not automatically updated, however.
Process Version 5 is also included with Adobe Camera Raw (ACR) in Photoshop CC. Lightroom Classic CC 8.0, Lightroom CC 2.0, and ACR 11.0 all gain the compatibility, and add new cameras and lenses to the lists of supported cameras and supported lens profiles.
This article was last modified on June 7, 2021
This article was first published on October 18, 2018
Commenting is easier and faster when you're logged in!

Recommended for you

Scanning Around With Gene: One Ringy-Dingy, Two Ringy-Dingies
In the annals of great American institutions, American Telephone and Telegraph,...

How to Extract Images Using Photoshop’s Refine Mask
Splitting Hairs with Refine Mask We can only accomplish so much using manual mas...

Creative Cloud Storage: Where Does It Go?
When you create using Adobe Creative Cloud applications, where is your work save...