


This article appears in Issue 127 of InDesign Magazine.
It’s that time of year again. The weather starts changing, the holidays approach, and the Adobe MAX conference once again offers us creative inspiration, new techniques to learn, and the announcement of the next major release of the tools that we use every day, including the one we’re most excited about: InDesign. Here’s a rundown of everything that’s new and/or improved in the 2020 version of InDesign.

The InDesign 2020 splash screen
The Intangibles
We all want to see whiz-bang features added to InDesign, but sometimes the really important changes are ones that you just can’t see. Before we get to the cool new stuff, here are some under-the-hood changes that are sure to improve your day-to-day experience with InDesign.
Squash those bugs!
InDesign is a big product with a big audience. No matter what you use it for, you’ve likely encountered a bug or two along the way that stopped you in your tracks and forced you to come up with a workaround of some kind. Thankfully, the InDesign team has been tracking these and working diligently to fix them! InDesign 2020 contains a long list of bug fixes to address crashes related to things like IDML import, GREP searches, cross-references, anchored tables, and CC Libraries.
Performance
Just as important as bug-fixing is improving app performance, and I’m happy to report that InDesign 2020 offers some significant improvements in that area that are sure to make your work easier. One such enhancement is in text. In previous releases and in certain situations, it was common to be typing away in InDesign only to be forced to sit and wait for the display to catch up. This version promises faster
text composition when working with vertical justification in frames, balance columns, and span columns.
In addition to overall performance improvements, Adobe has also worked hard to stamp out sources of document corruption that have resulted in lost work for some users. Many of those sources have been removed in this release.
Interface Changes
You’ll notice a few minor interface changes when working in InDesign 2020. I hope you’ll find, as I have, that some of these changes result in better usability and easier access to features.
The Home screen
In CC 2015, InDesign introduced the Start workspace as the initial view shown when you launched InDesign and had no document open. The Start screen showed recent files that you had worked on and also offered access to both Adobe Stock and Adobe Help. However, one major limitation of the Start workspace was that it became unavailable once you opened a document, and the only way to bring it back was to close all documents. Not exactly what I’d call efficient.
Now, in InDesign 2020, the Start workspace has been replaced with the Home screen, which is displayed when you initially launch InDesign or any time you have no documents open. But you can also access the Home screen at any time by clicking its “house” icon (Figure 1) in the top left corner of the InDesign workspace. This is in the area that used to be called the Application Bar, but it’s now nameless and can’t be turned off.

Figure 1. The small house icon is used to activate the Home screen in InDesign 2020.
As part of this change, the other icons that were present in the Application Bar have been removed or repositioned to the bottom of the Tools panel. I’m not a fan of this move, since I liked having quick access to my document arrangement and Adobe Bridge in that location, but I suppose it’s something I’ll get used to.
The Home screen provides a quick view of your recent files along with InDesign tutorials to help beginners and even experienced users learn new techniques and features of the program. You can also perform searches within the Home screen, which scans through your recent files (called Your Work), Adobe Help, Adobe Forums, and Adobe Stock. I found the Home screen to be quite useful when running InDesign 2020 through its paces because it provides quick access to recently open documents and, when searching Adobe Stock, I like the larger thumbnails that appear in the Home screen (Figure 2).

Figure 2. Searches in the Home screen provide results from Adobe Help, Adobe Forums, Adobe Stock, and Your Work.
However, the Home screen does have one big “gotcha,” at least on the Mac: let’s say you have a document open and then switch to the Home screen. You’ll see a red “close” button in the upper left corner of the window, and you might be tempted to click it to leave the Home screen. Don’t do it—that closes the (now hidden) document, and you’ll be left wondering what happened to your file.
Gone in a Flash
Adobe has announced their decision to end development and distribution of the Adobe Flash Player in the near future. And in conjunction with this, the 2020 release of InDesign completely removes support for placing, importing, exporting, and linking to Flash files, including the FLV, F4V, and SWF formats. And within the application, all underlying traces of Flash have been removed from panels like Links, Media, Timing, Page Transitions, Object States, Buttons and Forms, and Animation. Of course, the SWF Preview panel (whose sole purpose was to preview Flash animations) is gone, as is the Page Turn transition (Figure 3).

Figure 3. Page flipping effects, along with the rest of Flash, have gone the way of the dodo.
Text Improvements
InDesign 2020 offers some notable text improvements that, while not groundbreaking, are still quite welcome. We’ve been asking for some of these features for quite some time, so it’s nice to see them finally arrive.
Support for Southeast Asian languages
Adobe has added a new text engine called Harfbuzz to the World-Ready Paragraph Composer that improves rendering of script fonts for languages such as Thai, Burmese, Khmer, and Sinhala. For people working with text in these Southeast Asian languages, this a very big deal.
Reverse spell check
Every InDesign user knows that moment when you’re running a spell check and get into the rhythm of quickly skipping words that don’t need to be changed and you accidentally click the Skip button for a word that does need be fixed. D’oh! Until now, there was no way to go back and recheck that word. The only option was to start all over again, which could be a huge inconvenience in a long document. The option to search backward appeared in the Find/Change dialog box in CC 2014, and now with InDesign 2020 we have a Backward button to reverse the spell check direction as well (Figure 4). So now if you click Skip too quickly, you can simply go back to the word and fix it. This feature alone will save many InDesign users a lot of time.

Assigning keyboard shortcuts to styles
When InDesign was released two decades ago, virtually everyone who used it worked on a desktop computer with a full-size keyboard containing a numeric keypad. So the fact that you could only assign keyboard shortcuts to styles using the keypad wasn’t a big hindrance to most folks (unless you happened to be left-handed). But nowadays laptop users (and many desktop users) don’t have those keypads, and thus can’t use shortcuts to apply styles. InDesign 2020 finally allows the creation of keyboard shortcuts for styles using standard keyboard combinations, without the need to use the numeric keypad (Figure 5).
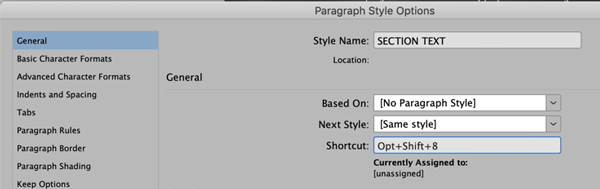
Figure 5. The ability to create a shortcut for styles in InDesign without using the numeric keypad is a very welcome addition to InDesign 2020.
Note, however, that style shortcuts always play second fiddle to the regular app shortcuts. For example, if you apply Command+N or Ctrl+N to a shortcut, it won’t work (because it opens the New Document dialog box instead).
Variable fonts
If you’ve seen the variable fonts feature in Illustrator or Photoshop, you’ve probably wondered why InDesign—the best typesetting app on the planet—didn’t support it. Well, wait no longer! InDesign 2020 now supports this format, which allows you to make fine adjustments of font properties such as weight, width, slant, and optical size. This is almost like magic.
To use variable fonts in InDesign 2020 (at least one, Acumin Variable Concept, should be installed automatically), begin by clicking the Variable Fonts icon, which you can find in the Control panel, Character panel, or Properties panel. This opens a small menu with sliders that let you control settings such as weight, width, slant, and optical size (Figure 6). The available choices will vary depending on the particular font you’re using. These variable text attributes can be saved as part of a paragraph or character style for reuse.

Figure 6. Adjusting the properties of a variable font in InDesign 2020.
Unfortunately, there isn’t an option to filter the fonts menu to show just variable fonts. But most variable fonts also contain the word “variable” in their names, which makes them easy to search for.
SVG Support
InDesign has always been able to place images in a wide variety of graphic formats, from native PSD files to JPG, TIF, and many more. For the most part, there wasn’t anything it couldn’t handle. As InDesign spread its wings into more interactive capabilities, from HTML output to EPUB and Publish Online, users started requesting support for SVG (Scalable Vector Graphics). SVG has gained popularity in recent years; web developers like the format’s ability to deliver clean, crisp graphics on high-res displays without the file size and slowness of raster graphics.
InDesign 2020 adds support for the SVG, SVGZ, and SMIL (native SVG animation) formats, and will render the output as vector content when exported to PDF, HTML, EPUB, or Publish Online. Plus, animated SVG graphics can be previewed in the EPUB Interactivity Preview panel within InDesign. When an SVG is selected, new controls in the Object Export Options dialog box (Figure 7) let you control the output options for the selected SVG graphic. You’ll also see new output options when exporting to any of the above-mentioned formats in their respective export dialog boxes.

Figure 7. Controlling SVG output in the Object Export Options dialog box.
CC Enhancements
The Creative Cloud feature set continues to grow, as does the integration of those features into the products that we use every day in our InDesign workflows. With Creative Cloud Libraries and Adobe Stock search, we’ve seen the Creative Cloud integration first-hand in InDesign. In an effort to expose more InDesign users to Adobe Stock images, the CC 2017 release of InDesign introduced the ability to find images similar to an existing selected image. InDesign 2020 enhances that feature by allowing you to access the option directly on the page.
To use this feature, select an image in your layout, right-click it, and choose Find Similar Images from the contextual menu. Alternatively, you can choose Edit > Find Similar Images, or simply use the Find Similar Images button at the bottom of the Properties panel. The result will appear in the CC Libraries panel, which shows an Adobe Stock search result with a list of images that are visually similar to the selected image (Figure 8). If desired, you can crop the image to change the area that is used during the search. Note that resolution, scale, and zoom are not considered when determining search results. And, of course, Adobe Stock images do require an additional fee to license.
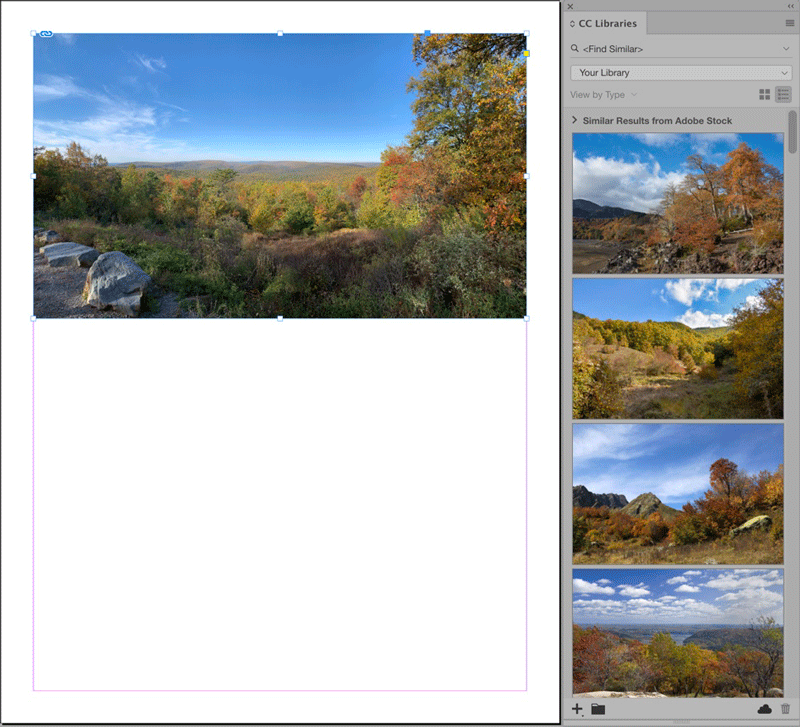
Figure 8. An image selected on the page (left) and the search results in the CC Libraries panel (right) after choosing Find Similar Images.
Column Rules
If you do any type of magazine or catalog layout, you’ve certainly encountered the need to place vertical rules between columns of text in a layout. There have been a number of workarounds to achieve this, including placing rules on a master page, running scripts, or grouping frames and hand-drawn lines. But in every case, manual work was required to achieve the desired result.
InDesign 2020 now allows you to add column rules easily to a multi-column text frame via the Text Frame Options dialog box. A new section called Column Rules has been added to the dialog box (Figure 9). To accommodate this new feature, the category names have been moved from tabs along the top to a list along the left side of the dialog box.

Figure 9. The new Column Rules category in the Text Frame Options dialog box.
Within the Column Rules section, you’ll see the ability to adjust where the rule starts and ends as well as the horizontal position of the rule within the gutter. Stroke options provide control of the weight, color, tint, and style of the stroke as well.
I was impressed by this feature, so naturally I wanted to push it to its limits to see if it would break. I applied a column span within the frame to see what would happen, and I was delighted to see how elegantly the span was applied and how the rules were nicely interrupted within the layout (Figure 10). You can use the Space Before and Space After features to increase the space in the span, and the rules accommodate this added space as expected. And as you would hope, you can save Column Rules settings in an object style.

Figure 10. Applying a span within a frame that has Column Rules applied results in an automatic adjustment of how the rules are applied within the frame.
Honorable Mentions
The InDesign team at Adobe added a few other minor tweaks that are worth pointing out.
Data Merge improvements
InDesign’s Data Merge feature received a few minor upgrades in this release. First, in addition to the comma-delimited and tab-delimited formats that have been supported in previous releases, Data Merge can now use semicolon-delimited files. This is a welcome change for anyone who is importing data that contains commas (especially in numbers such as “1,000”).
Also for you Data Mergers, InDesign 2020 boasts a new Content Placement option in the Data Merge panel called Use Existing. In previous releases, the Content Placement option that determined how all images in the merge would fit within image frames was a global choice, and thus didn’t work well in many situations. Now with the Use Existing option, whatever frame fitting option is defined for the frame(s) in the InDesign document, that fitting option will be used during the Data Merge. So you could have one frame that requires Fit Content Proportionately, and another frame that requires Fill Frame Proportionately.
Improved sorting in the Links panel
Now when you sort items in the Links panel by scale factor, it sorts by number instead of alphabetically (Figure 11).

Figure 11. Up until now, the Links panel bizarrely sorted by scale percentage alphabetically (left). This has been corrected in 2020 (right).
My 2020 Vision
Whenever Adobe releases a new version of InDesign, I look forward to any and all improvements that are added to the product. After all, it’s the primary tool that I use on a daily basis, and the better it gets, the more efficiently I can get my work completed—and the more fun I have using it.
When I think about 2020, I’m excited about the performance improvements and text enhancements. The ability to change direction in Spell Check and to add shortcuts to styles is something I’ll probably use every single day. I like the Home screen too, and can see myself leveraging that feature regularly. While I may not use Variable Fonts routinely, I can see how this will be a game-changer for magazines and newspapers who need a crazy amount of flexibility in setting headlines. And the ability to set column rules is most welcome.
All that said, like most InDesign users, I still have a laundry list of features and fixes that I’m waiting for. But 2020 is a step forward, and I’ll be making the most of the new features that have been added and will keep pushing for more improvements in future releases.
Commenting is easier and faster when you're logged in!

Recommended for you

InDesign Magazine Issue 60: The Color Issue
We’re happy to announce that InDesign Magazine Issue 60 (April, 2014)...

CreativePro Magazine Issue 1 Now Available
Issue 1 has articles on designing book covers, typographic rhythm, Illustrator t...

InDesign Magazine Turns 15
Addison Lalier takes a look back at 15 years of InDesign Magazine, with the peop...