
View Source: Add a Content Slider To Your Website
Web designers always battle against information overload. As marketing, customer service, and the CEO request more and more content on the home page, designers fight to keep their designs legible. One of the most popular solutions is the “content slider” — a simple slideshow-like interface for displaying one picture or chunk of content at a time. Many information-heavy sites use sliders to show images, text, and links in bite-sized chunks that slide across the screen.
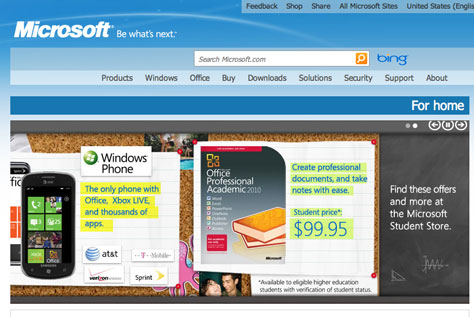
By letting users scroll through content, you can keep your home pages simple and attractive, as well as add visually interesting and interactive presentations to your site. You can even set up a slider to act as an automated slideshow with images or other content sliding at a predetermined speed across the page (Figure 1).
Figure 1: To minimize onscreen clutter, sites like Microsoft.com use content sliders to display a single image or chunk of content at a time. In this example, the image outlined in red can slide out of site to the left, revealing another image with more information.
 Content sliders rely on JavaScript or Flash. For a variety of reasons, I recommend JavaScript. There’s a wide selection of free JavaScript options, and one of the most versatile is AnythingSlider. AnythingSlider works with jQuery, the popular JavaScript Library (I’ve written about jQuery previously in “View Source: JavaScript for Designers“.
In this article, I’ll take you through the steps of setting up a JavaScript content slider. I’ll also provide all the files you need to follow along.
Overview of the Process
jQuery is a JavaScript “library”: a file that contains JavaScript programming to simplify common tasks and overcome cross-browser inconsistencies. AnythingSlider is a jQuery plug-in, meaning it’s another chunk of JavaScript programming that uses jQuery to add useful or interesting interactive effects to your site. While there are thousands of plug-ins, the process for using them is usually the same:
- Download jQuery and the plug-in files. You can find jQuery at https://docs.jquery.com/Downloading_jQuery. To download all the files you need to use AnythingSlider, click here.
- Attach the plug-in’s CSS file to the web page you wish to add the plug-in to. Most jQuery plug-ins include an external CSS file that provides basic formatting for the user interface elements generated by the plug-in. In the case of the AnythingSlider, a CSS file has formatting instructions for the slider’s navigation buttons, as well as behind-the-scenes styles for placing the individual slides.
- Attach jQuery and the plug-in files to the web page. This involves adding <script> tags to the <head> of the page. One script tag points to the jQuery file and another to the plug-in’s JavaScript file.
- Add the appropriate HTML. Most plug-ins require that you add HTML to your web page in a specific way. In the case of AnythingSlider, you’ll add a <div> tag to contain all of the slides, and separate <div> tags for each slide.
- “Call” the plug-in’s programming. Usually, you activate the plug-in’s programming when the page loads, and the plug-in handles all the necessary setup to do its stuff. For the AnythingSlider, this means hiding all but the first slide you’ve created, adding navigation buttons, and adding all the necessary programming required to respond when a visitor clicks through the slides.
The Basic Slider
Creating a basic slider is really quite easy. In this tutorial, I’ll take you through the process.
- Launch your HTML editor of choice and open the file slider.html. The first step is to add AnythingSlider’s CSS file.
- Click in the empty line following <link href=”css/site.css” rel=”stylesheet”> and type <link rel=”stylesheet” href=”anythingSlider/anythingslider.css”>. (If you’re using Dreamweaver, you need to be in Code View [View > Code] or Split mode [View > Code and Design]). This line simply loads the anythingslider.css file, which contains specific styles for formatting the slider. I’ll revisit this file later when I explain how you update the look of the slider.
- Below the line of code you just added, type the following to link to the necessary JavaScript files: <script src=”anythingSlider/jquery-1.6.2.min.js”></script> <script src=”anythingSlider/jquery.anythingslider.min.js”></script> The first line loads the jQuery file, while the second loads the plug-in file. The order in which these lines appear is important. You must always load the jQuery file first, since the plug-in relies on that code. If you instead load the plug-in first, you’ll end up with JavaScript errors and the slider won’t work.
- Now it’s time to add the HTML. Locate <div id=”main”> in the code, and on the blank line below it type the following: <div id=”slider”> </div> This is a <div> tag (an HTML tag meant to mark a region or “division” in a web page.) This particular div represents the slider itself. Inside it you’ll add more <div> tags, one for each slide you wish to display.
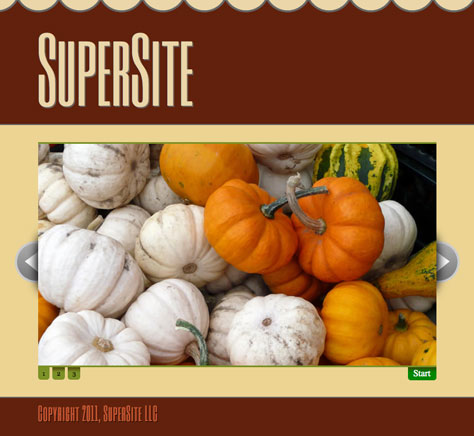
- Inside the slider div (that is, between the opening <div> and closing </div> tags), type: <div> <a href=”page1.html”><img src=”images/pumpkin.jpg” width=”700″ height=”390″ alt=”Pumpkin”></a> </div> This is a second div, containing a link and image. Clicking the image takes you to another page, a common approach with content sliders, which often act as a kind of animated banner ad for your site. Each slide acts as a kind of teaser for other content, so visitors click a slide to jump to an article or other section of the site. With AnythingSlider you can add any HTML you’d like. You’re not limited to one large image. You could have text, images, other div tags — anything you’d like to place inside the slide.
- Add two more <div> tags inside the slider div: <div> <a href=”page2.html”><img src=”images/grapes.jpg” width=”700″ height=”390″ alt=”Grapes”></a> </div> <div> <a href=”page3.html”><img src=”images/various.jpg” width=”700″ height=”390″ alt=”Various”></a> </div> These two divs represent two more slides. You can add as many slides as you’d like. Now time to add some programming.
- Near the top of the file, add an empty line after the second <script> tag but before the closing </head> tag and type: <script> $(document).ready(function() { }); </script> The <script> tag is used not only to load an external JavaScript file, but also to add your own programming to a page. In this case, you’re adding some pretty-weird looking code. It’s a jQuery-specific thing that has the simple task of waiting until the page loads before running any code. Since plug-ins usually look at and manipulate the HTML of a page (in this example, the AnythingSlider has to locate the slider div, and identify the individual slides), the HTML must load before the plug-in runs. You’ll encounter this $(document).ready stuff frequently when using jQuery.
- Now it’s time to call the plug-in. Click in the empty line between $(document).ready(function() { and }); a
nd type $(‘#slider’).anythingSlider();. The code in the file should now look like this: <script> $(document).ready(function() { $(‘#slider’).anythingSlider(); }); </script> Believe it or not, that’s all you need. - Save the file, then open it in a Web browser. The page should look like Figure 2. (If it doesn’t, double-check your code. You can also compare your work to the file basic_slider.html, which is a completed version of this tutorial that I included in the tutorial materials folder you downloaded earlier.) Try out the different controls: the right arrow key to move to the next slide to the right, the left arrow to move back one slide, the numbered buttons to jump to a specific slide, and the start button to begin an automated slideshow.
Figure 2: Adding a basic slide show to your site involves just a few steps.
Customizing the Slider Appearance
As you can see, it’s pretty easy to use AnythingSlider. Of course, the slider’s default appearance may not match your site’s design, and you may not want or need all of its features (like the automated slideshow or the forward and backward buttons). You can change AnythingSlider’s appearance in a few ways: by editing a graphics file, editing the stylesheet, and setting options for the plug-in (discussed in the next section).
One graphic file — default.png — provides the look for the right and left arrows and for the subtle drop shadow that appears at the top of the numbered buttons and the Start button. This one file is used for both the regular and hover states of the arrows. Using a technique called CSS Sprites, you can edit this graphics file and add your own arrow images. (Here’s an introduction to CSS Sprites.)
You can also edit the stylesheet to customize the appearance of the slideshow. Here are some of the most common formatting changes and which styles you need to edit to make the changes:
- Height and width of the slider. The first style in the anythingslider.css file — #slider — controls the overall width and height of the slideshow. You can adjust the width value to allow for either a wider or thinner slideshow, and the height value if your slides are shorter or taller than the default 390 pixels.
- Color of the navigation buttons. The numbered buttons at the bottom of the slider are normally green. If you don’t like that color, edit this long-winded style: div.anythingSlider.activeSlider .anythingControls ul a.cur, div.anythingSlider.activeSlider .anythingControls ul a. Change the background-color from #7C9127 to a color that matches your site. If you want to change the font color you can also add the color property with the color you want; for example, color: #F44439;
- Rollover color for navigation buttons. You can give the navigation buttons a new background-color, change the font or whatever you’d like by editing the div.anythingSlider .anythingControls ul a:hover style. Currently, it simply removes the background-image (the drop shadow) from the button.
- Currently selected navigation button. You can highlight the button associated with the currently displayed slide by adding a style named div.anythingSlider.activeSlider .anythingControls ul a.cur to the style sheet and setting a different background color, font, and so on. Make sure you either place this style after the style listed above for the “Color of the navigation buttons” or remove div.anythingSlider.activeSlider .anythingControls ul a.cur from that style name, since it already has a background color associated with it and will override your new style, unless you place the new style later in the style sheet.
- Colors of the start and stop buttons. The button used to for starting and stopping an automated slideshow is controlled by two styles. To change the green background color of the “start” button as well as the font color, edit the div.anythingSlider .start-stop. To change the red color of the “stop” button edit the div.anythingSlider .start-stop.playing style.
- Drop shadows and other elements of the navigation buttons. If you don’t like the drop shadows that appear on the navigation buttons and the start/stop button, then edit the div.anythingSlider .anythingControls ul a and div.anythingSlider .start-stop styles: remove the background-image property. You can also edit the border-radius, -moz-border-radius, and –webkit-border-radius properties on these styles to remove or increase the rounded corners on this button. These styles control the basic look of the buttons, so they’re worth playing around with to see what new looks you can create.
- Green borders above and below slideshow. The slider has a green, three-pixel border above and below it. Edit the div.anythingSlider .anythingWindow style to change this. Simply remove the border-top and border-bottom properties to remove the borders completely, or alter their settings to change the color and width of the borders.
- Placement of the arrows. You can control the locations of the back and forward arrows by editing the div.anythingSlider .back (for the left arrow) and div.anythingSlider .forward (for the right arrow) styles. In addition, the div.anythingSlider .arrow style sets some basic properties for both arrows, including their position in the middle of the slide. If, for example, you want the arrows closer to the top of the slider, simply edit the div.anythingSlider .arrow and change top: 50% to something like top: 20%, or even use a pixel value like top: 45px;.
Customizing the Slider Behavior
You can make a lot of changes to the slider simply by editing the CSS file. But for fundamental changes to how the slider works, you need to set a few options for the plug-in. To do so, you pass what’s called an “object literal” to the plug-in. This is more scary-sounding than it actually is. An object literal is made up of pairs of options and option values (separated by a colon), placed inside curly braces like this:
{
buildArrows : false, startText : “Start slideshow”, stopText : “Stop slideshow”
}
In other words, “buildArrows” is an AnythingSlider option, and “false” is the setting. This setting prevents AnythingSlider from adding the left and right arrows. You add a comma at the end of each option/value pair except for the last one — notice that there’s no comma after ‘stopText : “Stop Slideshow””.
You then place this object literal inside the call to the plug-in; for example: $(‘#slider’).anythingslider({ buildArrows : false, startText : “Start slideshow”, stopText : “Stop slideshow” }); Here are some of the most useful options:
- To hide the left and right arrows, set the “buildArrows” option to false like this: buildArrows : false
- To change the text that appears on the “start” and “stop” buttons, set the startText and stopText options like this: startText : “Start slideshow”, stopText : “Stop slideshow”
- Turn off the autoplay option. You might not want the “Play” and “Stop” buttons to appear, preferring that visitors manually select the slide they wish to view. In this case, set the buildStartStop setting to false: buildStartStop : false
- To have slides move vertically up and down instead of left to right, set the vertical option to true: vertical : true
<br
/> - To have the slideshow feature begin when the page loads, set the autoPlay option to true: autoPlay : true This is a particularly common feature on websites that include sliders, since it exposes visitors to more content without requiring them to hit a “play slideshow” button.
To see some of these options in action, open the modified_slide.html file in the tutorial files.
Adding AnythingSlider to Your Site
If you like this effect and want to use it on your own site, you can simply copy the anythingSlider folder located in the tutorial files for this article. The folder contains the AnythingSlider plug-in file, CSS file, and graphic file, as well as a copy of jQuery. (If you’re already using jQuery on your site, you won’t need the copy in the anythingSlider folder.) You can then follow the steps above for attaching the files and setting up the HTML for your site.
As you can see, AnythingSlider is easy to add to a site, and just as easy to customize. I’ve just scratched the surface of what this plug-in can do. You can embed video and add special effects and custom programming to make it work exactly the way you want. Check out the AnythingSlider Wiki for more information.
This article was last modified on January 8, 2023
This article was first published on October 25, 2011
Commenting is easier and faster when you're logged in!

Recommended for you

Printing and Exporting Alternate Layouts
The Alternate Layouts feature in InDesign CS6 is cool, but it does make some thi...

Bake Up a Batch of PDF Files
Courtesy of: We often perform the same tasks over and over, without realizing th...
A Script to Collect All Objects With A Particular Object Style
In the course of my editorial duties here at CreativePro, from time to time I...