
Using Smart Objects in Photoshop
Learn how using Smart Objects is the key to working nondestructively in Photoshop.

This article appears in Issue 3 of CreativePro Magazine.
Smart Objects are of one of Photoshop’s best-kept secrets, even though they’re one of the most powerful and essential tools in the entire program. What makes them so great? Simply put: They allow you to work with maximum flexibility, editing, transforming, and manipulating layers as much as you like, nondestructively. You can place content from Bridge, Camera Raw, Lightroom, Illustrator, or InDesign in Photoshop, as embedded or linked Smart Objects. You can make copies of Smart Objects and transform them so when you change one, they all change—or you can keep them independent. In this feature, you’ll learn what Smart Objects are, how they work, and how to use them in your day-to-day Photoshop workflow. Finally, I’ll show you some of the more interesting and, often, surprising uses of Smart Objects.
What Makes Smart Objects Smart?
The easiest way to explain the fundamental benefit of Smart Objects is to compare them to the behavior of regular Photoshop layers. To create Figure 1, I duplicated the layer on the left and moved it to the right. Then, I turned the second layer into a Smart Object. How? As with just about everything in Photoshop, there are a few ways to do this. With the layer selected, you can choose Layer > Smart Objects > Convert to Smart Object. Alternatively, choose Convert to Smart Object from the Layers panel menu, or right-click a layer name (not the thumbnail) and choose that command.
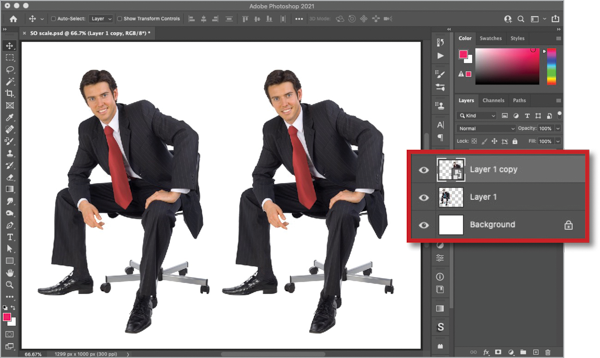
Figure 1. The original layer is on the left, the Smart Object version on
the right.

Figure 2. The Properties panel will tell you when you have a Smart Object selected and give you options for working with it.

Figure 3. The original and Smart Object layer reduced and rotated

Figure 4. The original layer has lost most of its definition, which the Smart Object version retains.
Editing Smart Objects
Any time you want to make a change to the pixels in a Smart Object (e.g., painting, erasing, cloning, healing) you need to take an intermediate step first in order to reap the benefits of working nondestructively. For example, I reverted to the undistorted version of the original layer and recolored the man’s tie using the Color Replacement Tool. But when I tried to use the same brush on the Smart Object layer, a warning dialog box appeared, telling me that the Smart Object must be rasterized in order to proceed (Figure 5).

Figure 5. Photoshop gives you a heads up that you can’t paint directly on Smart Objects.

Figure 6. You can add adjustment layers inside Smart Objects.

Figure 7. The color of the tie is changed, but notice there’s no sign of the adjustment layer in the main Photoshop document. This is a feature, not a bug: Multiple layers can be contained within a single Smart Object.
Creating Complex Distortions
The next example demonstrates one of the most powerful uses for Smart Objects: creating complex (yet nondestructive) distortions. To demonstrate, I’ll use a stock photo of a man reading a magazine on a plane. The only preparation work I did ahead of time was to copy the magazine to a new layer, so I could use it as a mask later on (Figure 8).

Figure 8. The magazine in this image has been selected and copied to a new layer (Layer 1).
Making a Smart Object from multiple layers
There were four additional layers in my document: a reproduction of a famous painting called The Laughing Cavalier, two text layers, and a green banner behind the magazine title (Figure 9).

Figure 9. The four additional layers that make up the magazine cover
The Smart Object in place
Figure 10 shows the resulting Smart Object. It contained all the original layers within it. I could then work with this object as if it were a single regular layer.

Figure 10. All the layers are now encapsulated within a single Smart Object.
Distorting the Smart Object
The next step was to make a clipping mask so the Smart Object shows up inside the magazine cover only. You can do this by pressing Command+Option+G (macOS) or Ctrl+Alt+G (Windows), or choosing Layer > Create Clipping Mask. The Smart Object now shows up only where it overlaps the layer beneath. I used Free Transform to rotate the Smart Object so that the spine lined up with the spine of the original magazine, and I scaled it down to roughly the right size (Figure 11).

Figure 11. The Smart Object using the cutout magazine layer as a clipping mask
Warping the Smart Object
Rotating the Smart Object wasn’t enough to create a truly convincing effect, so I clicked the Warp button on the Options Bar and used the Bézier curve handles to distort it so that it fit the shape of the magazine (Figure 12). Another great thing about Smart Objects is that if you don’t get the distortion exactly right the first time, you’ll find that when you use Free Transform again, the distortion handles will be exactly where you left them before.

Figure 12. The Smart Object distorted to fit the magazine cover
Adding a shadow
To make the cover look more realistic, I made a new layer above the Smart Object and used a soft-edged brush at a low opacity to paint a soft shadow beneath the hand (Figure 13). I had to make sure this layer also used the underlying layer as a clipping mask, so the shadow didn’t spill over onto the hand.

Figure 13. A shadow beneath the hand adds realism.
Editing the Smart Object
Now the real magic: I double-clicked the Smart Object in the Layers panel, so it opened in a new window (Figure 14). All the original layers were present, and I could modify them as I wished.

Figure 14. The Smart Object contains all the original layers that were used to create it.
Changing the contents
As well as modifying layers within a Smart Object, you can also bring in new layers. This comes in handy for trying multiple variations of an image: I decided to create a different edition of the magazine by changing the background image to the Mona Lisa. I also changed the headline and the color behind the nameplate text, and I masked the nameplate so that her head sticks up above it (Figure 15).

Figure 16. The magazine cover displaying the revised content
The revised artwork
When I closed the Smart Object, all the changes I made were revealed in the original document—along with the distortion I made to the Smart Object (Figure 16). It may have taken a little while to create the original distortion and its shadow, but swapping out the contents was a piece of cake. Imagine how much work this kind of technique could save in a job where you had to create many different versions of the image with different magazine covers.
Figure 16. The magazine cover displaying the revised content
Working with Multiple Smart Objects
Typically, when you make copies of Smart Objects, they’re all linked together. Change one, and you change them all. (Note: It is possible to create unlinked copies of Smart Objects by choosing Layer > Smart Objects > New Smart Object via Copy.) For Figure 17, I started with an image of an art gallery. I then removed all the pictures from the frames, so I could place my Smart Objects inside them.

Figure 17. An art gallery with all the pictures deleted
Adding the first image
An image of the Mona Lisa seemed like a fitting subject for the first painting. I moved it behind the gallery layer and turned it into a Smart Object (Figure 18). Using Free Transform, I easily was able to distort the image so that it matched the perspective of the scene. (Tip: If you hold Command/Ctrl as you grab each corner while in Free Transform, you can move that corner independently of the others.)

Figure 18. The Mona Lisa distorted with Free Transform to match the perspective of the gallery image
Duplicating the Smart Object
It’s easy to make multiple copies of a Smart Object, just as it is with any regular layer. You can use Command+J/Ctrl+J to duplicate a layer. Or, with the Move tool, just hold Option/Alt as you drag a layer to make a copy. Using this technique, I moved each copy of the image into place and used Free Transform to fit them into their frames (Figure 19). Free Transform behaves rather differently when working with Smart Objects: You don’t just get a rectangular selection as you do with regular layers. Instead, if you’ve already transformed a Smart Object, then when you use Free Transform again—even on a duplicate of the object—you’ll find the Transform handles still where you left them after the previous transformation. This makes it much easier to change the distortion.

Figure 19. Several duplicates of the Smart Object populate the gallery.
Adding Smart Filters
You can apply almost all of Photoshop’s filters to Smart Objects, just like regular layers. Unlike regular layers, though, when you apply a filter to a Smart Object, the filter itself becomes Smart. After you’ve applied the filter, you can change its settings, hide its effects, or remove it altogether. This is another huge advantage of working with Smart Objects. For Figure 20, I applied various Smart Filters to each of the Mona Lisa images in the gallery. All the Smart Filters were applied to different copies of the same Smart Object.

Figure 20. Different filters have been applied to each of the duplicate images.
Changing the image
Once again, you can double-click the Smart Object thumbnail in the Layers panel to open it in a new window. For Figure 21, I pasted a painting of The Laughing Cavalier on top of the Mona Lisa. As usual, close or save the Smart Object to return to your main Photoshop image.

Figure 21. The Smart Object opened in its own window, with a new image pasted in.
Keeping the effect
Once the base image has been changed in a single Smart Object, all the duplicate Smart Objects are changed to use the same image. But note what also happens: All the filters applied to the original copies are now applied immediately to the new content (Figure 22). Now that’s a smart way to work!

Figure 22. All the instances of the Smart Object are changed at once.
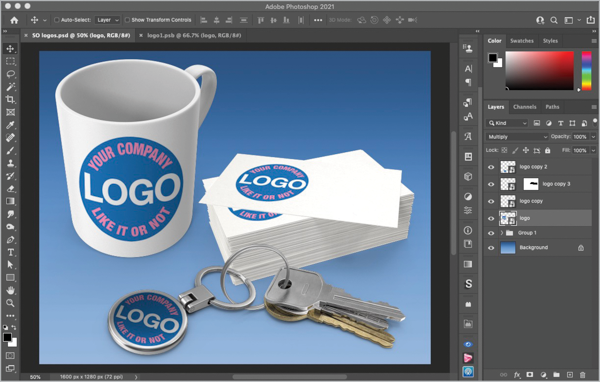
Placing Art from Other Applications into Photoshop
As well as turning Photoshop layers into Smart Objects, you can also import artwork from Illustrator, Lightroom, Camera Raw, or other Photoshop files. Combine that ability with the fact that all duplicated Smart Objects are linked together, and you have the recipe for amazing efficiency. For example, you could produce a mockup for a client showing what their logo would look like printed on a coffee mug, on a keychain, and on a business card. If the client then wants to make changes to the logo, you only have to paste the new version into a single Smart Object and the changes will instantly take place on all the versions in the image.
Working with linked Smart Objects
There are several ways to create linked Smart Objects (See the sidebar “The Many Methods of Creating Smart Objects”). The most obvious is to choose File > Place Linked and select your artwork. It will appear as a new layer. An icon on the file’s thumbnail will show that this is a linked file (Figure 23). If you’re familiar with the workings of links in InDesign, linked Smart Objects will seem very familiar. They can be Up to Date, Out of Date, or Missing. They can be local files in a folder on your computer or a server, or CC Library items.

Figure 23. The Smart Object containing the Illustrator artwork
 To edit a linked Smart Object in a new window (such as the logo in the example), double-click any of the copies. Then, double-click this file, and it will open the original in Illustrator, where you can make any changes you want. When you’re done editing, Save the Illustrator file and return to Photoshop, where you’ll see that the artwork inside the Smart Object has been updated to the new version.
The changed logo
Save or close the Smart Object, and you’ll see the edited version in place in your Photoshop document (Figure 25). Note that if you’ve changed the proportions of the logo in Illustrator, it may no longer fit within the bounds of the Smart Object file inside Photoshop. In this case, you’ll need to use the Crop tool to resize the canvas of the Smart Object so that it contains the whole logo. You’ll also need to use Free Transform to adjust the size and position of each of the placed versions of the logo in your file.

Figure 25. The modified logo in place in Photoshop
Working with Text in Smart Objects
You can use Free Transform to rotate and scale live text in Photoshop, but the program won’t allow you to apply perspective or other distortions on it without rasterizing it first—which means it will no longer be editable text (Figure 26). Clearly, it’s a major advantage to keep the text editable as long as possible, and once again Smart Objects are the solution.

Figure 26. Live text in Photoshop: How can you make it match the perspective of the wall?
Turn the text into a Smart Object
Make the text into a Smart Object using the usual procedure, and then you’ll be able to hold Command/Ctrl as you grab each of the corner handles and move them to their new location. In the example, it’s easy to follow the lines of the bricks in this wall to make the text perfectly match the perspective of the scene (Figure 27).

Figure 27. Turning live text into a Smart Object allows you to put it in perspective.
Eliminating Distracting Elements with Smart Objects and Image Stacks
Even if everything I’ve told you so far about Smart Objects hasn’t convinced you to try them, I think this final example might. It’s sheer magic, and it involves combining Smart Objects with a rather obscure feature called image stacks to remove unwanted elements from photos (such as a gaggle of tourists wandering aimlessly in front of your perfectly composed shot of the Eiffel Tower). Here’s how it works.

Figure 28. Wouldn’t it be nice if these folks weren’t in the way of the shot?

Figure 29. Be sure to turn on the option to create a Smart Object from your image stack.

Figure 30. Going… going…

Figure 31. Gone.
An Objectively Smarter Way to Work
Smart Objects should be a key component in any Photoshop artist’s workflow. They allow you to manipulate layers with an unprecedented ease, giving you the ability to rotate, transform, and distort layers multiple times without loss of quality. They also give you the ability to change your mind at any point and prevent you from having to repeat complex tasks. Just watch out for the unfortunate limitation of how everything in a Smart Object is represented by raster data outside of Photoshop (see sidebar). Even so, Smart Objects are an essential tool in Photoshop. If you aren’t using them on a regular basis, you’re seriously missing out.

- You can convert an embedded Smart Object to a linked one or vice versa by right-clicking and choosing Convert To Linked or Embed Linked.
- Right-click a linked Smart Object to reveal it in the Finder or File Explorer, update modified content, or relink to a local file or CC Library item.
- You can rasterize a Smart Object so it’s just a regular old pixel layer by right-clicking and choosing Rasterize Layer. Just be 100% sure that’s really what you want to do because any filters, adjustments, or transformations will no longer be editable once the Smart Object is rasterized.
- Similarly, if you converted several Photoshop layers into one Smart Object, you can unpack them by choosing Convert to Layers (they’ll be gathered together in a new layer group).
- In Photoshop: Choose File > Open as Smart Object.
- In Camera Raw: Hold the Shift key to make the Open Image button change to Open Object and click.
- In Bridge: Select an image and choose Place > In Photoshop (or drag and drop from Bridge into Photoshop). Hold Option/Alt as you drag and drop to create a linked Smart Object.
- In Lightroom Classic: Select an image and drag and drop it into Photoshop.
- In Illustrator or InDesign: Copy any objects, including text frames, and paste into Photoshop. Pasted content is added as a vector Smart Object.
You can also simply select a file (in one of the supported formats) in the Mac Finder or Windows File Explorer and drag and drop it into an open Photoshop document.
 You can filter the display of the Layers panel to show embedded Smart Objects or linked Smart Objects according to their status (Library Linked, Locally Linked, Up To Date, Out Of Date, Missing). Start by choosing Smart Object from the filtering menu in the Layers panel. Then choose the kind(s) of Smart Objects you want to see (you can turn on as many kinds as you wish), and click the button to turn on layer filtering.
Commenting is easier and faster when you're logged in!

Recommended for you

How to Create a Pencil Drawing Effect Quickly in Photoshop
In this Three Minutes Max video, Tony Harmer demos an easy way in Photoshop to c...

Creating Editable Extruded Text in Photoshop
Extruded text is a popular effect, and it’s not difficult to create...

The Digital Art Studio II: Duplicating Photoshop’s Smart Objects
This post is part of a series called The Digital Art Studio, in which Sharon Ste...