
Timeless Treasures in InDesign
Like friends and wine, some of the best InDesign features are the ones that have been around for quite a while.
This article appears in Issue 75 of InDesign Magazine.
In the game-design world, one of the mantras is: “Simple to learn, difficult to master.” A well-designed game can usually be picked up quickly, but years down the road, you’re still trying new strategies and adapting to the other players around the table. And that’s InDesign for you: a tool (game) that is evolving on a yearly basis for our jobs (players) that are also continually evolving. How can we claim mastery of it? If you skipped over one or more updates in the last 10 years, you may have never learned about one or more of the features introduced in it. Does your copy of InDesign contain hidden treasure and secrets to unlock? I guarantee it. And even better: some of these treasures are even more valuable when combined! Let’s go back in time. Bring a few documents along, but nothing too valuable—treasure hunting is risky business.
Object Styles
I hope that by now you’ve discovered object styles! They are the number one tool for quickly formatting objects, both text and images. The Object Styles panel is found under Window > Object Styles, and works much like the Paragraph Styles panel. To start experimenting with it, open one of your existing documents, select an object with some formatting, and choose New Object Style from the panel’s flyout menu. Give the new style a name, and click OK. You can then create a brand-new object and apply the newly-created object style to it, and you’ll see that much of the formatting has come alone for the ride. With your new object style applied, double-click its name in the Object Styles panel to open the Object Style Options dialog box. Select the Preview checkbox in the bottom-left corner, and explore the options! Many of these options have obvious visual
effects on components of your document, such as fill, stroke, effects, columns, insets, and text wrap. You certainly know what these do—you’ve just never applied them so quickly before! When it comes to naming your object styles, think about what the object actually is or does, not what it looks like. It’s tempting to use names like “Blue Sidebar” or “Anchored Yellow Example”—but if the design changes, you’ll be left with names that are unhelpful or misleading. So give your styles functional names: “Sidebar” and “Anchored Example” are better! CS2 also introduced the Next Style functionality, which allows you to logically chain paragraph styles together. An object style containing a paragraph style and the Apply Next Style option will allow you to quickly format sidebars that contain multiple styles (Figure 1).

Figure 1: All the text formatting in this sidebar can be applied with a single click, thanks to an object style that applies paragraph styles with the Next Style option.
What don’t object styles do?
Sadly, the treasure you have found isn’t perfect: you can’t apply dimensions or locations yet. So you can’t use a style to set all objects to default to a particular size or location on the page. Object styles also can’t be used to place an image inside the object. Want even more tips and tricks for using object styles? Check out David Blatner’s article “Get in the Fast Lane With Object Styles,” in issue 40. 
Live Preflight
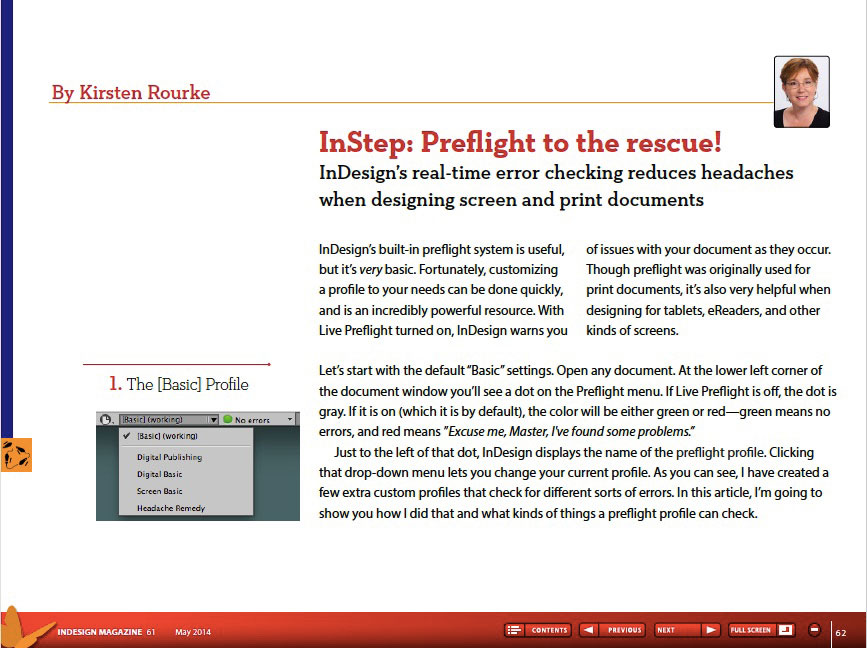
I love big documents and eschew InDesign’s “book” feature as generally creating more trouble than it’s worth. But as documents get larger and more complex, proofing them manually gets less and less reliable. If only we had a powerful machine that could automate much of it! Oh—did you think I meant that we didn’t have such a tool? We do; it’s called Live Preflight. Live Preflight lives under Window > Output > Preflight, and you can also get to it via the menu items tucked in the status bar at the bottom of each document’s window. Open up a complicated InDesign document, one that’s in progress, and peek at the preflight section near the bottom of the document window. Is there a profile being applied? By default, the [Basic] profile is applied to new documents. You may see another profile applied, and that’s due to a handy feature: preflight profiles can be embedded into documents! This allows you to configure a document-specific profile and know that whoever ends up working on the document will have access to the same important preflight settings. To the right of the preflight profile’s name, you’ll see a green dot (good job!) or a red dot (uh-oh!), and to the right of that, the number of issues detected by preflight (Figure 2). To bring up those issues, click the little triangle to show the Preflight flyout menu, and choose Preflight Panel from that menu to open the Preflight panel. Within the panel, errors are divided into the relevant categories and display a brief description. To the right is the page number where the violation occurs—click on it to take you directly to the source of the problem. 

Figure 2: With InDesign’s Live Preflight features, you can tell at a glance if your document is clean (top) or if you have some fix-up work to do (bottom). Note that these two images show two different presets analyzing the same document.
Document Fonts
This feature is simple: If your InDesign file is in a folder that contains a subfolder named “Document fonts,” any fonts inside that folder will be automatically available inside that InDesign document, even if you add those fonts to the folder when InDesign and the document are open. This works regardless of the font type, and it functions on top of any font management software you may have installed. There are three good ways to get fonts into a Document fonts folder: 1. Manually copy them there in the Finder or Windows Explorer. 2. Package an InDesign file with the Copy Fonts option selected. A Document fonts folder will be created and populated automatically (Figure 3). Note that fonts synced from Typekit cannot be packaged.

Figure 3: A packaged InDesign document and its Document fonts folder.
Spans and Splits
Before Creative Suite 5, if we wanted to have a header span multiple columns of text, it would require two text frames—one for the header, and one for the body. If the desired effect was a sidebar or other graphical entity, it was usually best to then add a third frame for the background, border stroke, and so on. Creative Suite 5 brought us Spans and Splits, one of the finest unsung hero features in recent memory. Spans and Splits can be applied from the Paragraph panel, but you’ll probably use this feature most often within paragraph styles. In both instances, the option is described only as Span Columns, but Split Columns is an option under the Paragraph Layout dropdown menu inside Span Columns. Spans have the most obvious options: you can specify how many columns are spanned (2 or higher, or simply choose All), and you can also set a Space Before and Space After the span, which functions like a normal paragraph space before/after, but applies to all lines of text above/below the span, if it is larger than the paragraph space for that paragraph style. Splits are most often used to create faux-tables or lists in the middle of text flow when a detailed/formatted table is not required. In addition to the number of splits (columns), you have the usual space before/after settings, and the ability to set the width of both the outside and inside gutters. Remember that if you build tables of contents, you may need to include multiple paragraph styles in the Table of Contents style to catch all the span/split variations. For more on using spans and splits, see Claudia McCue’s article “You’re Going to Love CS5” in issue 35. 
Bringing it all together
Combine object styles, paragraph Next Styles, and spans and splits to easily format sidebars. A few paired styles can let you bounce between single, double, triple, and more columns in your sidebars, so you can optimize for the text you’re flowing! 
“X” Marks the Spot (And You Are There)
For every piece of treasure we’ve found on this hunt, there are a half-dozen still uncovered! Some of them, like Sticky Previews passively help you get work done more efficiently, while others, such as Quick Apply or Anchored Objects, require some study and practice before they revolutionize your work. As mentioned in Keith Gilbert’s article earlier in this issue, one great place to learn more is James Wamser’s InDesign New Features Guide, which catalogs every new feature from version 1.0 (1999!) all the way to the current edition. And of course, consult the InDesign Magazine index to find information on just about every InDesign feature in existence. No matter which version of InDesign you’re using, there are always new things to discover. More hidden gems await! To find them, all you need is some curiosity, creativity, and persistence. And maybe a snack. You wouldn’t want to hunt for treasure on an empty stomach.
Commenting is easier and faster when you're logged in!

Recommended for you

Sever the Link to the Table of Contents So it Won’t Get Replaced
There’s just no way around it: Sometimes you have to edit a table of contents th...


New Contest! The Mystery of the Text That Wouldn’t Align Right
Solve this InDesign mystery for a chance at winning a great prize.