

If you haven’t delved into making custom pattern brushes in Illustrator, you’re kind of lucky, because they can get a little addictive once you start. Sharon Steuer shared a fun, robot-inspired tutorial here if you need to get up to speed on the entire creation process.
I love creating custom designs, but I find the trickiest part is properly creating—then maintaining—the individual elements that make up the pattern. I start with the elements, combine them, then refine them. Here are three of my tips for working with custom pattern brushes.
Work Big
When I create the designs that will form the basis of my pattern, I work big. I make my elements large-ish (often working on a separate artboard to avoid confusion) so that I can spot any issues in the finished stroke. Once I’ve perfected my pattern, I often go back and adjust the scale. To do that, double-click on your finished brush in the Brushes panel then adjust the Scale slider.

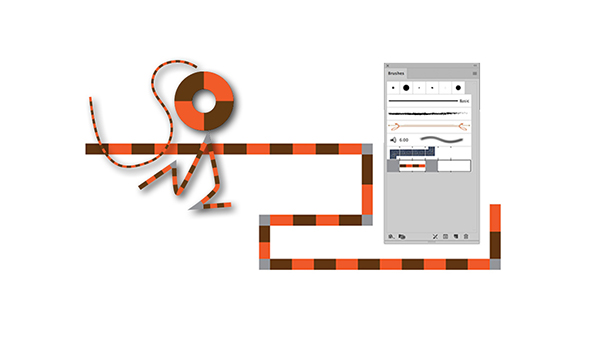
The elements used to make the side tiles and the corners

Reduce the scale of the elements in relation to the path
Add to Swatches
Any pattern element you create should first be added to the Swatches panel. To get these elements in there, either drag them directly into the Swatches panel, or choose Object > Pattern > Make. If you need to change the pattern later, double-click its icon in the Swatches panel to enter edit mode, make the changes, then click Done. You’ll then need to re-assign the swatch to the proper segment in the Pattern Brush Options dialog box.

Custom Corners
Instead of letting Illustrator auto-generate corners—which often ends in distorted patterns—craft separate corner elements. I build my corner elements right next to the elements I used to create the side tiles to help get the scale relationship right. Once the corner elements are in the Swatches panel, you can select them from the Inner/Outer Corner pull-down menu in the Pattern Brush Options dialog box. But my favorite way to add corner elements is to Option-Command/Alt-Ctrl drag the elements directly onto the proper brush segment section in the Brushes panel.


The finished pattern brush
This article was last modified on March 17, 2017
This article was first published on March 17, 2017
Commenting is easier and faster when you're logged in!

Recommended for you

SOS San Francisco: A Case Study for Collective Visual Brainstorming
This article details the creative process used to develop the graphics for SOS S...
Photoshop New Features Guide
For some time, InDesign users have enjoyed a great free resource that details wh...

Three Ways to Make a Heart in Illustrator
Learn how to create a heart shape in Illustrator three different ways, using str...