

During the Watergate investigation, Deep Throat told Woodward and Bernstein to “Follow the Money.” In computer graphics, my source (Deep Drive) tells me to follow the vectors — take vector paths from one application and bring them into others.
What makes vectors so important? Unlike blurry little pixels, vectors are resolution independent — so they can be scaled up or down with no loss of detail — and they print clean and crisp. Vector shapes can be easily modified; just a little tug on a handle turns a line into a curve. And vectors can be easily rasterized into pixels; it takes specialized programs to convert pixels into vectors. (And even then you could spend hours cleaning up the results.) With the release of Photoshop 6, Adobe has confirmed the importance of vectors. And there are new roads to travel in following vectors from one application to another. In this column we’ll look at transferring vectors between Illustrator and Photoshop.
From Photoshop to Photoshop
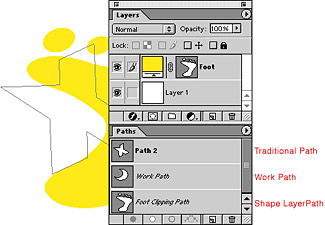
There are several different types of vector shapes in Photoshop 6. There are the traditional paths that appear in the Paths palette. There are also the paths that are part of the new Shape Layers. These paths appear in both the Layers palette as clipping elements and in the Paths palette. All of the Path tools — rectangle, round corner rectangle, ellipse, polygon, line, custom shape, and pen — can create either Shape Layers or Work Paths (as shown in Figure 1). You use the Options bar at the top of the screen to choose between the two (Figure 2).

Once you’ve created a path, you select and manipulate it with the Path Component Selection tool (the black selection arrow) or the Direct Selection tool (the white selection arrow).
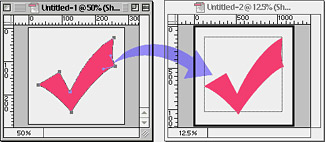
With a path selected, you can copy/paste or drag/drop the path from one Photoshop file to another. However, because they are resolution independent, the paths keep their print size from one file to another. So if you have a path in a 72-ppi (pixels per inch) file that is 2-by-2 inches, you can bring it into a 300-ppi file at the same dimensions. This has enormous advantages for designers working with both high-resolution print files and screen-resolution Web graphics. It means buttons and other vector elements can be dragged from print to Web and back without changing the size of the item (Figure 3).
From Photoshop to Illustrator
With the release of Illustrator 9 and Photoshop 6, you can now drag and drop paths directly from Photoshop into Illustrator. (Previously you could only export or copy and paste.) Just select the Photoshop path and drag it into the open Illustrator document (Figure 4). Once again, the vectors are resolution independent and come in at their printing size.
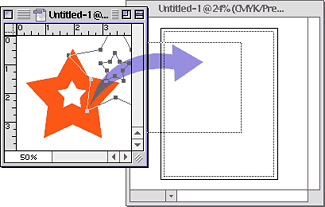
Figure 4
You can also export paths from Photoshop using the command File > Export > Paths to Illustrator (Figure 5). This feature has been around for so long, it’s amazing so few people know about it. You can choose a specific path from the Paths palette, a path from a shape layer, or crop marks that define the size of the Photoshop file. Just remember, the path you export to Illustrator will have no fill or stroke. You’d be amazed at how many people open the document, look at the blank page, and get upset because they can’t see any paths. Select all or switch to the outline mode to see your vectors.
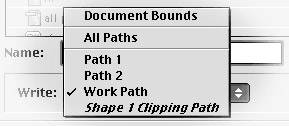
Figure 5
From Illustrator to Photoshop
You can also get vectors from Illustrator into Photoshop. If you select the Illustrator objects and then copy and paste, a dialog box (Figure 6) appears that lets you control whether you want the path converted into: pixels (on their own layer), paths (added to Photoshop’s Paths palette), or shapes (as a new shape layer). (If you’re wondering what happened to the anti-alias option that was in previous versions of this dialog box, it’s been moved to the Options panel at the top of the window.)
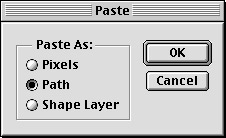
Figure 6
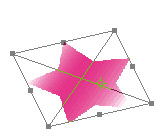
As sad as it is to convert precious vectors into bland pixels, Photoshop does give you a little control after you make the conversion. If you choose pixels, a transformation bounding box appears around the imported artwork (Figure 7). Use the bounding box handles to scale, rotate, or skew the artwork any which way you want. As long as you don’t double-click or press Return/Enter, you’ve still got resolution-independent vectors.
Finally, if you want to drag and drop from Illustrator into Photoshop, you can control the type of object that is created as follows: With no key pressed, drag to create a pixel layer. Hold the Command/Ctrl key to create a path. If a shape layer is currently active, the path will be added to that shape layer. Hold the Shift key to deposit the new object in the center of the Photoshop file.
Heard enough of moving vectors between Illustrator and Photoshop? Fine! In my next column we’ll look at what happens when you move vector graphics between those programs and QuarkXPress and InDesign.
Sandee Cohen, the one-and-only Vectorbabe, teaches and trains all sorts of graphics programs. Based in New York City, she is on the road at various conferences and seminars.
This article was last modified on January 18, 2023
This article was first published on November 8, 2000
Commenting is easier and faster when you're logged in!

Recommended for you

How to Straighten Photos Taken at an Angle
It’s hard to photograph many images head-on. For example, if you try to shoot a...
CreativePro Video: How to Turn Day into Night in Photoshop
In this week’s CreativePro video, Steve Caplin shows how to select a photo’s hig...

10 Free Vector Patterns, Volume 3
You may have seen my 20 free vector patterns and the follow-up 20 free line...