

This post continues to explore some of the ways to correct the proportions of an image. To reduce the number of steps, each of these posts builds on the techniques of the previous one. Before moving on to configuring exacting proportions of non-square rectangles, this Quick Fix sticks once more to square images.
To recap the first two in this series, Quick Fixes #1 used the square dimensions of a document to crop a square image to align it to the document edges. Quick Fixes #2 begins by creating a vector square to use as a reference for a square portion of a larger image, and then adds guides from this shape to create additional alignment references. If you’re not super comfortable with Smart Objects and Free Transform, please start with Quick Fixes #1 and #2.
Quick Fixes #3: Using An Unlinked Layer Mask
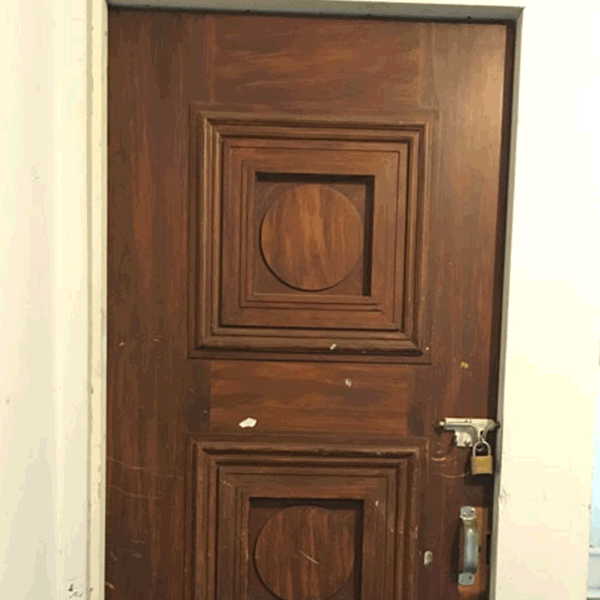
I must begin this Quick Fix with a confession. This was how I fixed my door image, but in hindsight it seems like the least efficient of the techniques for this particular project. Nonetheless I wanted to share this more complex method because 1) it’s how I actually fixed my image, 2) this technique might be the best solution for other projects, and 3) it offers a unique benefit since this is the only method that hides the portions of the image outside of your guide shape, providing you with a simple way to focus completely on the main element you’re transforming.
To create this reference square, I held Shift while dragging with the Rectangular selection tool to define a square that closely approximated the panels I wished to un-distort. If you need to scoot your selection around a bit, make sure the Rectangular selection tool is still chosen in the Tools panel, and use the arrow keys to nudge the selection.

With the selection in place, I clicked the Create Layer Mask icon in the Layers panel. You should now see only the area of your photo inside of the mask.

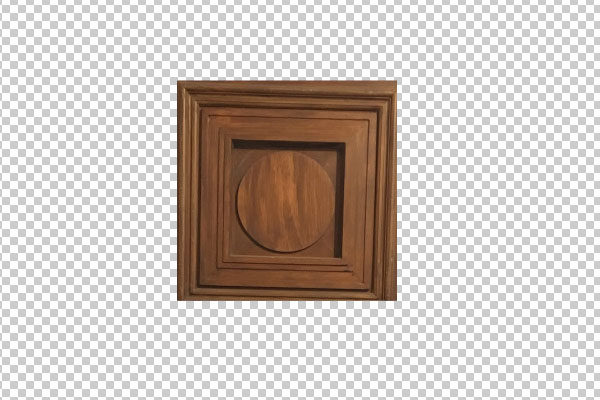
The classic reason to add a layer mask to an image layer is to control which portion of that layer will be hidden or visible (or any level of transparency in-between). With this traditional use of the layer mask, you generally would want the mask to remain linked to its image layer so they transform together. However, if you’re using the layer mask as a reference while you transform the image, you must unlink the layer from its mask by clicking on the Lock icon.

As with the previous steps, make sure you’re in Full Screen mode (cycle through view modes with the F key) so you’ll be able to reach beyond your current view as you transform your image. Next, with the Smart Image icon targeted in the Layers panel and the layer mask unlinked, I chose Free Transform using Command+T/Ctrl+T (see Quick Fixes #1 and #2 if you need more help with Smart Objects or Free Transform).
Adjusting each corner of the image separately by holding Command/Ctrl until the square panels of the door fit within the reference square. When not in an active Transform mode, you can toggle between hiding and showing the mask by Shift-clicking on the Layer Mask in the Layers panel.

As long as you’re working with Smart Objects which minimize final distortions, don’t hesitate to apply the transformation, hide the mask and zoom in and out, then enter transform again to tweak.
![]()
In the next post: Of course, many images that need fixing aren’t as simple as a square. So what steps are needed to properly adjust your non-square image to exact proportions? Here’s a hint: you’ll need to adjust both Image Size and Canvas Size, and know when to toggle Resample options on, and off.

This article was last modified on April 13, 2023
This article was first published on October 23, 2017
Commenting is easier and faster when you're logged in!

Recommended for you
How to Create a Pixel Stretching Effect in Photoshop
How to add a striking a sense of movement to any subject in Photoshop.

Photoshop CS6 Quick Reference Guide
If you use Photoshop every day, chances are you’ve committed to memory the...
Turning Grayscale to Color in Photoshop
When it comes to creating multitone images, it’s common to think of using the Du...