Remember George Jetson of the “Flintstones in the future” cartoon of the ’70s? Occasionally part of the story would show George at his job, which consisted of pushing buttons. One large, red button, actually. Sometimes poor George worked himself so hard that his button-pushing finger would be sore. Of course the irony emerging as we move forward is that we’re not that far off from a Jetsonian future. The main job of Web designers these days is to create sophisticated buttons for others to push, in the form of dynamic Web-site interfaces. Web designers are of course button-pushers themselves, clicking around apps like Adobe GoLive and ImageReady to do their work. As the Web matures, the people designing interfaces for it are honing their skills to build buttons that are not only better to use, but that are also more efficient to build and download.
Continuing our look at Adobe GoLive and the impressive array of style-sheet tools it provides, in this article we describe an alternative to creating the usual image- or form-based button. Using the knowledge from my previous two articles regarding style sheets and JavaScript — (Adding a Little Style in GoLive and Style Sheets Unbound in GoLive) — you can produce button-like interfaces that are made up entirely of source code without a single image pixel.
The first two articles demonstrated how to define your own style sheets in GoLive and gain a good understanding of what properties to use when creating them. Now that we have the building blocks in place, just about any Web editor will do, visual or not. I will be using GoLive’s Source Mode, but you’ll find less mention of its specific usage this time around. And one last thing to point out: Although I’ve made every effort to make sure the code provided works in Internet Explorer, some of the other browsers (Netscape 4.x, for example) do not fully support the CSS or JavaScript functions described here. Check out Webreview’s Leader Board to see why Internet Explorer is currently the obvious choice if you are trying to tap the power of CSS.
Managing Expenses
Question: Why would anybody go to all the trouble of making buttons made entirely of style sheets in lieu of regular old images? Answer: Because they’re cheap. Image-based buttons can get expensive when you think of all the extras that often go along for the ride. Firstly, the images themselves can be large files. Even the best color optimization can still leave your images a little heavy. Factor in image rollover states and the JavaScript code needed to swap out and pre-load the images, and you have yourself a button implementation that demands a fairly high bandwidth. The demand on system resources can also be higher than you might think, as the browser renders the table and loads and pre-loads the image sets.
In contrast, if you create a similar button out of style sheets, the user’s browser only needs to render the table with the associated style classes and handle the rollover function set up by running some simple JavaScript. Additionally, if your style sheets are externally linked, the browser only needs to cache each file once. As a result, the user’s browser and connection should feel a bit peppier, given that much less time is taken in downloading, saving, and processing files and instructions.
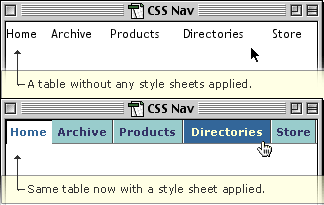
CSS buttons add a measure of appeal to a nav bar without resorting to bandwidth-hungry images
The one major downside of implementing CSS-flavored buttons is the limited selection of fonts at your disposal if you want to ensure that your creation will display as you intend on all computers. Many designers stick with image-based buttons mainly for this reason. The bottom line: If you don’t mind using one of the few fonts you can count on being on any system, you should be fine using CSS buttons.
Rollovers with Some Style
In essence, the basic setup of a CSS button is very much the same as setting up an image with all the rollovers, but without the need for pre-loaders. With an image button, you create various rollover states, keeping them the same dimensions and assigning them with the same names but with a rollover identifier (such as off, over, click). After creating the rollover set, you add the initial image state for the button into your page. Then you insert the JavaScript code that performs all the necessary swapping out of the images. In comparison, the CSS-based button setup goes something like this: Create your base style along with the classes that will be used for the various rollover states. Apply the base style to a table cell and then insert the JavaScript code that will perform the necessary substitution of style classes for the rollover states.
Let’s look at a simple line of code that changes the text to red when the cursor is rolled over the text and then back to black when rolled off.
The basic concept is akin to a simple image swap of an image-based button. Let’s go through it in a more detailed step-by-step.
- Establish the style classes that will be used for the rollover and click state for the <td> tag. If you’re having trouble with this, check out my previous two articles (links above) relating to this subject.
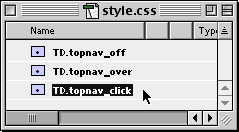
Three simple CSS classes manage all the rollover states for your svelte new buttons. - Create the table that will house your CSS buttons. It can be a column of vertical cells for a sidebar navigation or a long row of horizontal cells for a global menu system, as in this example.
- Add the necessary JavaScript functions to the header section of the page and then hook up the trigger event code to the table cells, turning them into mouse-aware elements.
- Use this code (copy, paste into the header section of your HTML page), which includes the JavaScript code, to make this magic happen. I’ve included comments and trimmed down the code as much as possible so that you can piece through it and build upon it. Some extra functions included take care of switching the click state back on and ignoring a rollover when a button is clicked.
The colorful text rollovers found on the most professional of Web sites are easily created using GoLive, CSS, and a little JavaScript
Only the Beginning
The method described here is a nice application of how well CSS and JavaScript work together, but it was meant to demonstrate much more. Believe it or not, you just learned a bit of Dynamic HTML. DHTML is essentially nothing more than CSS and JavaScript working together to manipulate HTML. This is only the tip of a huge iceberg, but it’s good to know that it’s not as scary as we may think, despite the intimidating buzzword quotient. As with anything, if you take baby steps toward learning the topic, you soon know more about it than you thought possible. In all the excitement you might feel when you realize the possibilities opened up by mixing JavaScript and CSS, just don’t work yourself into such fervor that you sprain your button-pushing finger, OK?
This article was last modified on January 8, 2023
This article was first published on June 19, 2001
Commenting is easier and faster when you're logged in!

Recommended for you
InDesign Magazine Issue 76: Publish Anywhere with InDesign to HTML5
We’re happy to announce that InDesign Magazine Issue 76 (August, 2015) is now av...

Distilling the Story: The First Step to a Great Presentation
Learn how choosing the correct story can put you on the path to creating a succe...