

A few years ago, one of the truly tedious tasks for a Web designer/producer was the creation and optimization of Web graphics. First we had to plan out how the Photoshop build was to be split up or sliced so that each slice fit nicely with the arrangement of the HTML table layout. Relying solely on tools such as Debabelizer to optimize the manually sliced Web graphics, we would then proceed to recreate the layout in an HTML page, piecing the slices back together as if we were putting together a jigsaw puzzle — and having almost as much fun.
To address the problem, Adobe developed an application specifically designed to slice and optimize Web graphics — Adobe ImageReady. ImageReady 2.0 can now be found as a component of Photoshop 5.5 and is no longer sold separately. Using ImageReady to its fullest potential means smoother sailing when it comes time to export graphics into an HTML environment such as Adobe GoLive 4.0.
It Slices, It Dices
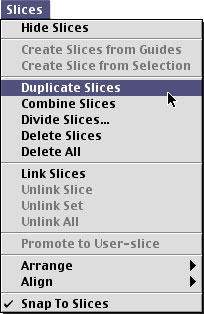
ImageReady 2.0 introduced Slices, editable boxes that allow you to designate filename and optimization settings for each individual area. Using the Slice tool and the Slice Select tool, you can cut up your Web page and rebuild it as you see fit. Slices can be duplicated by selecting the Duplicate command found in the Slices menu. They can also be automatically created from Guides or a Selection. Combining Slices is also a breeze: Just select two or more slices and choose Combine Slices under the Slices menu.
Whether you’re creating a quick working prototype or building towards the real thing, here are some other helpful ImageReady tips to keep in mind:
- Slices can be set to include no image data, allowing you to preset a table cell to a certain background color. This is accomplished by selecting a Slice, then going to the Slice palette and changing the Type pull-down to “No Image.” Now set your chosen table cell background color under the “BG:” pull-down.
- Not only can you set a Slice to be a particular background color, but you can also fill that slice with text that will be written out as HTML. Follow the above instructions and enter your text in the “Text” field. And here’s the clincher: HTML tags (such as <FONT>) can also be entered in this field, meaning you can program your Web page to save out a complete HTML file.
- An HTML Background color (or image) can be set within ImageReady. Look for this option under the File menu, “HTML Background…”
- Slices establish the area for Rollovers also. You must create a Slice before creating a Rollover. Incidentally, the JavaScript code for Rollovers is also written out in your HTML file.
Writing the Code Before You Write the Code
Now that you went to all the trouble of setting up your Slices, Rollovers, and Non-Image Slices that even include HTML tags, you may be wondering what it was all for. Where is the fame and glory? Well, you’ll have to wait for that, but all that extra up-front effort leaves us with very little tweaking to do in GoLive (if any).

Before saving out your images, be sure to set ImageReady’s preferences so that it creates GoLive-compatible code. This is not the default setting. To do this, go to ImageReady’s preferences and select the “HTML” pull-down. Then select “GoLive” in the Code pull-down. Now select the “Save HTML File” checkbox in the Save Optimized dialog box and everything should be ready to go into GoLive.

What’s Left For GoLive?
Once you have saved your slices and HTML from ImageReady, you can import the page to your site or open it as a new one within GoLive. Rollovers, table backgrounds, and HTML code you’ve entered in ImageReady should all remain intact. One thing to keep in mind is that the HTML code that was written within ImageReady assumes that the location of the Slice images will stay relative to the HTML file. With this in mind, I strongly suggest that you select the “Put in images subfolder:” option in ImageReady. Create an identically named images folder in your GoLive site and you shouldn’t have any problems with broken references.

Most designers I talk to sheepishly admit to me that they have overlooked this seamless process between ImageReady and GoLive. They would use ImageReady to create their slices, but instead of importing them en masse to GoLive, they would painstakingly import them one by one and place them manually on the pages. I suppose they simply expected it to be hard, and acted accordingly.

ImageReady 2.0
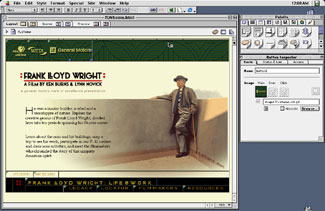
…to GoLive 4.0
This ImageReady-to-GoLive process helps minimize the tedium that once cursed this industry. Although the code that ImageReady generates may not be as lean and mean as code you yourself may generate, it may be just the thing when knocking out a prototype or hundreds of pages on a tight deadline.
This article was last modified on January 3, 2023
This article was first published on June 14, 2000
Commenting is easier and faster when you're logged in!

Recommended for you

ColoRotate, the mobile color companion to Photoshop
With Adobe’s Kuler on hiatus, it might be a good time to check out alterna...
Heavy Metal Madness: A Focus on Hocus Pocus
My favorite type of graphic discovery is one that comes out of nowhere, supplyin...
Image-Editing Review: Adobe Photoshop Lightroom 4
Pros: Improved develop engine extracts surprising dynamic range out of single im...