


In the movie “Back to the Future” Doc Brown builds a time machine out of a DeLorean. Of course, calamity ensues and Doc’s friend Marty McFly ends up back in time. Marty’s visit to the past inadvertently ends up having an impact on his future. He then must find a way to put everything back to how it was before he ever showed up.
Sound confusing? Time travel stories usually end up this way. And it’s probably one of the reasons Photoshop users steer clear of the History Brush as well. Although the tool does not truly cause temporal paradoxes to occur a la Back to the Future, it does allow you to go back in time (so to speak) and paint back a previous state of your Photoshop document. Sound powerful? Well, much like a time machine, it can be if used in the right way.

The History of the History Brush
Photoshop’s History Brush is really a much more powerful version of the old Magic Eraser. The Magic Eraser tool allowed you to erase back from your saved document. It was a one-trick pony that usually ended up being a very disk- and memory-intensive process. When Photoshop 5.0 was released, Adobe gave us more than just the multiple undos we were clamoring for. They gave us the ability to selectively paint back these undos onto current states using a little tool called the History Brush.

The History Palette
The History palette (View>History) goes hand in hand with the History Brush. This palette provides you with a running list of changes you have done to your document. These changes are often referred to as “states.” By default, the History palette lists the previous 20 states of your document. This setting can easily be changed within the History Options found within the History palette pop-up menu. If you’re short on RAM or processing power you may want to think about taking the maximum history states down to 5 or 10.

Clicking the name of the state or dragging the slider up or down reverts your document to that state. For those power users out there (and I know who you are), you can press Option+Command+Z (Mac) or Alt+Ctrl+Z (Windows) to move back to the previous state and Shift+Command+Z (Mac) or Shift+Ctrl+Z (Windows) to move forward. This is different then just Undo (Command/Ctrl+Z) which only toggles between one state (Undo/Redo). And just to make you crazy, Adobe made these key combinations practically opposite in ImageReady 2.0. Pressing Command/Ctrl+Z in ImageReady will keep taking you back in states instead of undoing/redoing one particulate state as it does in Photoshop.
Take a Snapshot, It Lasts Longer
The little thumbnail found at the top of the History palette is called a snapshot. Snapshots are basically frozen states that you can decide to take at any given time in the development of a document. Keep in mind that Snapshots are still similar to undo states in that they only exist for that work session. If you close and reopen a document, your Snapshots will be gone. Snapshots are great for when you decide to explore a different design direction and want to leave yourself an easy way to get back.
Photoshop by default creates an initial Snapshot of your document when opened or created. This can be really useful and a good compromise to having to revert an entire document. Say you messed up a small portion of your document that can be fixed by reverting. But you don’t want to revert because you have tons of time invested on the rest of the document. Clicking the hollow box next to the initial Snapshot allows you to selectively revert by painting back just that messed up area. When you do decide to revert an entire document, clicking this initial snapshot proves to be much faster than the old Revert (File>Revert) command since it’s reading from a cache file and not your hard drive.
Wasn’t This About the History Brush?
You designate what state the History Brush should read from by clicking the hollow box found next to each state or snapshot. The History Brush itself behaves much the same as the regular Paintbrush and includes similar options such as opacity and blending modes.
Now that you have a good understanding of how to use the History Brush, I thought it might be good time to mention what can’t be done. The History Brush cannot paint back states where the overall document has changed dramatically. Color mode, resolution, and cropping changes as well as deleting layers are some of the basic actions that can inhibit the use of the History Brush.
Not Just for Mistakes
Although the History Brush works great for locally painting away mistakes, it can also be used in more creative ways. For example, here’s a technique for producing down-and-dirty soft silhouettes to images:
- Open up a picture of your favorite person, pet, or object.
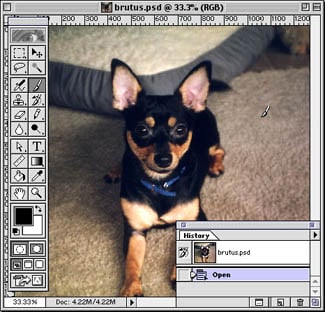
Here’s a shot of my dog, Brutus. He looks great but I could do without the background.
- Using a rather large, soft paintbrush, paint over the background with a solid color. Don’t worry about painting over the foreground object a bit. In fact, for this to work properly, you need to paint over the edges somewhat.

First I paint over the background with a big paintbrush making sure I paint over the “little monster” a bit.
- Double-check that your History brush is reading an earlier unpainted version of your image within the History palette.
- Now take your trusty History Brush and paint back the foreground object.

Now that the image is painted over, I select the History Brush and begin to “paint back” the edges of my dog.
- Repeat this process using smaller brushes and getting further in on detail until you have yourself a pretty decent silhouette.
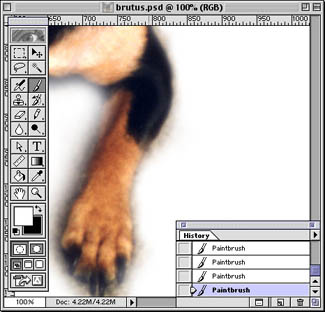
Repeat and rinse … Once I’m happy with the big brushes, I start going in on detail toggling between the Paintbrush and History Brush using smaller brush sizes. Repeating steps 2 and 3.
I believe that the History Brush is probably one of the most overlooked tool of the bunch and probably one of the most powerful. But this is not a tool to be feared just because of the questionable power it contains. It should be explored and pulled out of your bag of tricks when everyone around you has lost all hope. Sure, this isn’t time travel. But it’s the closest thing you’ll find in your day-to-day work unless you get your hands on a flux capacitor.
George Penston is a Information Designer and guru of all things Adobe. Being involved in the Web industry for over five years, he realized the inevitable and moved to San Francisco. His affinity towards Adobe products led him to develop and maintain a popular but ill-fated Adobe evangelist site. George spends his spare time playing video games and speculating on the futures of Adobe and the Web.
Read more of George’s work here.
This article was last modified on January 18, 2023
This article was first published on May 17, 2000
Commenting is easier and faster when you're logged in!

Recommended for you

The Most Powerful Panel in Illustrator
Imagine a panel that is so powerful it can control everything about the appearan...

CreativePro Tip of the Week: Previewing Graphic Styles in Illustrator
This CreativePro Tip of the Week onPreviewing Graphic Styles in Illustrator was...

Capture the Look of Classic Analog Photography With VSCO Film Emulations
If you were an avid photographer in the analog days, you probably had a few favo...