The Creative Toolbox: Adding a Little Style in GoLive
Are you still designing your Web pages to be viewable on your Aunt Mildred’s Mac Classic? Still worried about that copy of Netscape 2.0 you heard someone might be running somewhere in Pittsburg, California? If you’re still toiling with font tags, spacer GIFs, and tables to get your Web pages to halfway resemble what you had in mind, it’s time to move on. Time to cast off the shackles of HTML’s antiquities and put the past behind you. The future is now and that future is Cascading Style Sheets (CSS). Forgive my exuberant propaganda, but I understand that the words “style sheets” alone can induce instant slumber in some readers. The truth of the matter is that style sheets come closer than anything else to what Web designers have been begging for: precise control over formatting and positioning of most page elements. You just have to see past the technical underpinnings to discover the wonders style sheets offer up.
Behind the Style
Many technologies have attempted to compensate for the numerous limitations of HTML, which was not designed for the type of things we force it to do. While the weaknesses are apparent, it’s pretty remarkable what developers and designers have accomplished within the constraints of HTML using ingenious tricks and workarounds.
Cascading style sheets were borne out of a need to overcome HTML’s display shortcomings. Using external style sheets offers many benefits to help counter these weaknesses by defining and centralizing page element descriptions that override those automatically applied in HTML. Font size, document color, spacing, positioning and more can all be defined and saved within CSS. The browser only needs to read the style sheet once and then cache it for subsequent usage. Since the styles exist in one location, you can easily edit your design aspects and have them applied instantly across your site. Style sheets can be written locally into an individual page as an internal style sheet or saved as a separate file, known as an external style sheet, which can then be linked to multiple pages at once.
How do style sheets work? They are basically a set of discrete formatting instructions for the browser to use when attempting to render a page. The browser reads the style definitions and then applies the appropriate style when it is called for in the code. Even established HTML tags can be reassigned to styles. Think of it as a universal translator for the look and feel of a page.
Most modern browsers support style sheets in some capacity, but some do a better job than others, so if you wish to support a suite of popular browsers, choose style properties that are fully supported by each one. For a comprehensive listing of browser CSS support, check out WebReview’s incredibly helpful master compatibility chart.
GoLive’s Sense of Style
True to Adobe character, GoLive provides a straightforward, direct interface into creating style sheets, and lets you keep your hands (and thoughts) clean of code if you’re so inclined. If you are a code junkie or just curious to see what’s going on behind the scenes, bring up the Source Code palette found in the View menu. All flavors of code, including style sheets, can be viewed or directly edited within this palette, though you’ll likely spend most of your time defining style sheets in GoLive’s intuitive Style Sheet Inspector. Here you choose the properties you want for each style. But before we get in to all of this, let’s discuss how to create a new style sheet.

The GoLive Style Sheet inspector allows easy and full access to the multitude of style definitions.
Follow these steps to create a style sheet for your page:
- It’s a good idea to remove any conventional formatting you may have included in your pages beforehand. This sometimes makes it difficult to determine what attributes the style sheets are affecting.
- Click on the stair step icon located in the top-right corner of your page to open the CSS Interface window.

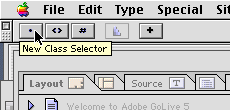
The “stair step” icon is your ticket to the GoLive CSS interface. - To initiate an internal style sheet, click on one of three selector buttons (class, element, ID) located in the toolbar. We’ll talk more about these below, but for the time being choose “element” for this example.

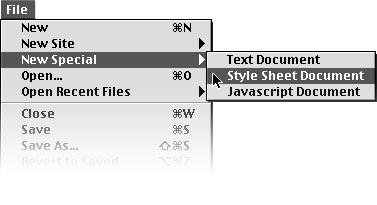
Selecting which type of CSS determines the level of browser compatibility your page will support. - If you’d rather start out with an external style sheet, choose File > New Special > Style Sheet Document from the main menu first, then click on one of the selector buttons.

Creating new styles is easy form the file menu.
Now that you have an idea of how to make a new style sheet, it may be helpful to discuss how styles work with one another. As promised, we’ll also discuss the different selector types.
Many Shapes and Sizes
Local styles supersede higher-level styles, as they become more specific to the elements being affected by them. The pecking order is as follows: Inline overrides internal and internal overrides external. You can use this to your advantage by using a main external style sheet for your site and then incorporating an internal style sheet to pages you wish to apply local changes to. This is the cascading facet of the style sheets. You can base styles upon styles, cascading them ad infinitum.
The styles themselves have different types selectors: element, class, and ID. It’s fundamental that you understand the subtle differences between them. Element selectors piggyback on established HTML tags, providing a means to map new styles to old tags. Older browsers will render the old HTML tags as usual, while CSS-capable browsers will use your defined element styles. It’s a beautiful thing. Just about any HTML tag can be stylized, so go crazy and see for yourself what can be affected. The greater-than-less-than (<>) button in the toolbar generates new element selectors.
Here’s an example of a simple element selector copied directly from GoLive:
td { color: #666; font-size: 1em; font-family: Verdana, Arial, Geneva, Helvetica, sans-serif; background-color: #ffc }
Classes allow you to create subsets of element selectors. You can arbitrarily attach these to any HTML tag. The period (.) button in the toolbar produces class selectors. Here an example of the produced code.
.red { color: #f33 }
And here’s how the class can be integrated into the above element:
<td class=”red”>
<p>Hello I want to be styled.</p>
</td>
The ID selector is similar to the class selector but is independent from element selectors. GoLive automatically assigns ID selectors to floating boxes. The hash mark (a.k.a. pound sign) button creates new ID selectors.
#author { color: #006; font-size: 0.7em }
<h2 id=”author”>By Jonathan Carroll<h2>
GoLive provides an interface to apply styles through your pages. Once you have your styles assigned, go back to your page and select an element to apply a style. Click the Style tab in the Inspector palette and check the style and method you want. If the Style tab fails to appear for the element you want to stylize, you will have to go into the Source window and assign the class or ID manually using the above examples as a guide.

Applying your new styles is as easy as point and click.
Conclusion
Once you’ve become acquainted with the ins and outs of style sheets, you’ll find it hard to deny their boundless possibilities. In fact, the only thing holding us back is the lack of full CSS support across all major browsers. Although the syntax scheme is fairly simple to grasp, using GoLive to help you learn the fundamentals of style sheets will definitely reduce the learning curve.
Next week we’ll explore the various formatting and positioning properties available through style sheets. In the meantime, the best way to learn style sheets and understand the remarkable benefits of using them is the begin experimenting with them yourself.

