
The 5 Rules of Efficiency for InDesign
You'll rake in the efficiency jackpot every time with these five basic rules.


This article appears in Issue 23 of InDesign Magazine.
Whether you’re gambling on The Strip or laying out a magazine, one rule prevails: “Watch your pennies, and the dollars will take care of themselves.” In InDesign, that means becoming more efficient in the little things, and the larger-scale production work will fall into place.
That’s why I like tips and tricks so much. They often focus on increasing efficiency in little ways, but over a day or a week those little changes add up to real time savings and reduced aggravation. With that in mind, this article presents important tips that I’ve put into five sections that are basic rules: Keep your hands on the keyboard, automate patterns, troubleshoot problems, lean on the Cloud, and use scripts and plug-ins.
Rule 1: Keep Your Hands on the Keyboard
When you use a keyboard shortcut, there’s only about a five-second difference between using a menu item or choosing from a floating panel, but keyboard shortcuts are important means to the end of being more efficient over time. Here are the ones every InDesign user should know. (Note that in different language versions of InDesign, or on different international keyboards, these shortcuts may be slightly—or radically—different.)
Navigation
Unless you work only on one-page documents that fill your screen, you need to navigate around:
- Hold down Option/Alt and the Spacebar to get the Hand tool temporarily.
- Shift+Page Up and Shift-Page Down jump from page to page; use the Option/Alt key instead to jump by spread.
- To jump to a specific page, press Command/Ctrl+J. If your document starts on any page other than 1, you can type a + sign before the number to jump to an absolute page number. (For example, +3 goes to the third page, no matter what number it is). You can also jump to a master page by typing its prefix (for example, “a” goes to A-Master).
- Command/Ctrl+Page Up jumps to the last page you were on in a document. For example, if you were on page 3 and then skipped to page 15, pressing Command/Ctrl+Page Up jumps back to 3. Then pressing Command/Ctrl+Page Down jumps back to page 15. These are like using the Back/Forward buttons in a Web browser. This also works for jumping between a parent page and the last document page you were looking at.
Magnification
Everyone needs to zoom in and out on the page, so the more efficient you are at this, the more productive you’ll be throughout the day. If you’re still using the scroll bars or the View menu, consider your wrist slapped. Now move on and get with the shortcuts. Here are some of the most-frequently needed magnification shortcuts:
| Zoom in! Out! Zoom, zoom, zoom! | |
| Zoom in a little | Command/Ctrl+= (equal) |
| Zoom out a little | Command/Ctrl+- (hyphen) |
| Actual Size | Command/Ctrl+1 |
| 200% | Command/Ctrl+2 |
| 400% | Command/Ctrl+4 |
| 50% | Command/Ctrl+5 |
| Fit page in window | Command/Ctrl+0 (zero) |
| Fit spread in window | Command+Option+0/Ctrl+Alt+0 (zero) |
| Type in arbitrary zoom percentage | Command+Option+5/Ctrl+Alt+5 |
| Toggle between last two zoom amounts | Command+Option+2/Ctrl+Alt+2 |
Most used dialog boxes and panels
Find the five or ten dialog boxes and panels you use most often and commit their shortcuts to memory. In many cases, these shortcuts are obscure (especially the F keys for opening panels), so consider changing them to shortcuts you’ll remember more easily (see the sidebar “Edit Your Shortcuts”). Following are some that I use multiple times every day, so it’s worth my taking some time to remember their shortcuts. Your go-to dialog boxes and panels may be different.
| David’s Go-to Dialog Boxes and Panels | |
| First field of Control panel | Command/Ctrl+6 |
| Swap Paragraph and Character mode (in Control Panel) | Command+Option+7/Ctrl+Alt+7 |
| Pages panel | F12 |
| Swatches panel | F5 |
| Paragraph Styles | Command/Ctrl+F11 |
| Character Styles | Command+Shift+F11/Ctrl+Shift+F11 |
| Links | Command+Shift+D/Ctrl+Shift+D |
| Text Frame Options | Command/Ctrl+B |
| Export | Command/Ctrl+E |
| Find/Change | Command/Ctrl+F |
Shortcuts can bypass or manage dialog boxes or panels. For example, you can bypass the New Document dialog box, creating a new document quickly based on the last-used document preset, by pressing Command/Ctrl+Option/Alt+N. You can add a new page after the currently selected spread by pressing Command/Ctrl+Shift+P.
And here’s one of my favorite shortcuts in the whole program: Command/Ctrl+Option/Alt+` (the unicode character Grave Accent, aka “backtick”) jumps to the field you last used in a panel. For instance, if you used the rotate field in the Control panel and you then want to use it again for a different object, press this shortcut and it jumps right back up there. So helpful!
Rule 2: Find Patterns That You Can Automate
If you’re going to get efficient in InDesign, it’s crucial to look for patterns in your documents. You can automate the repeating elements that make up those patterns and save a lot of time.
One obvious pattern is the page number that appears in the same place on every page. The solution: Put an automatic page number (Type > Insert Special Characters > Markers > Current Page Number) on your document’s parent page.
Other examples of patterns you can automate are styles: paragraph styles, character styles, table styles, cell styles, and object styles. Styles are all about recognizing repeating formatting and capturing it in a name you can quickly apply to text, tables, or objects.
Tip: Don’t overlook that last one—many people who use text styles avoid object styles, but that’s a mistake.
In the same vein, create presets, such as Print Presets, Adobe PDF Presets, and Document Presets. You can find all of these in the File menu. Presets are different from styles in that when you update a preset it doesn’t change anything in your document, it saves settings for exporting or outputting that document consistently.
There are many other ways to capture patterns and automate them. Here are a few more of my favorites.
Variables
The Text Variables feature is ideal for including repeating elements, such as variable running heads in a book or catalog, or the current date. You can find a list of premade text variables in the Type > Text Variables > Insert Variable submenu. You can load text variables from another InDesign document by choosing Type > Text Variables > Define, then clicking Load. In the Load Text Variables dialog box, you can select the variables you want to bring into your current document:

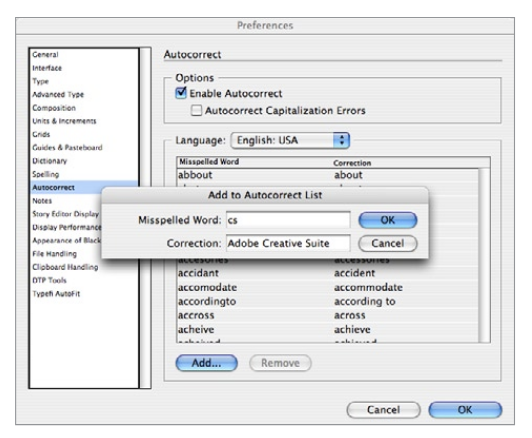
Autocorrect for text macros
If you’re tired of typing a long word or phrase repeatedly, let InDesign do it for you. Open the Preferences dialog box (Command/Ctrl+K), click on the Autocorrect section, and turn on the Enable Autocorrect checkbox. Then click the Add button and type the long word or phrase in the Correction field and some easy mnemonic in the Misspelled Word field, as shown in the figure below. Now, as soon as you type that mnemonic—in reality, a
short, intentionally misspelled word—followed by punctuation or a space, InDesign replaces it with the longer, “correct” version.
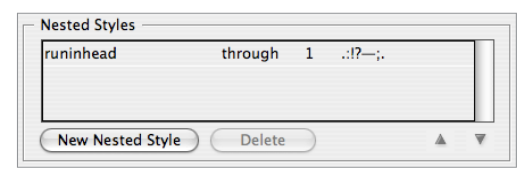
Nested styles
Use nested styles to create a run-in head. For example, you can define a paragraph style to apply a character style—run in to the rest of the paragraph—until the first period or some other condition you can define. Nested styles let you specify different character styles within a paragraph based on patterns. This figure shows how I can tell InDesign to apply the run-in character style “up to the first instance of punctuation”:
Nested styles are useful for so many different things. Let’s say you want a particular kind of styling for every bullet in a paragraph, but you don’t know how many bullets there will be. Create a character style for that glyph in the font, size, and color you want. Make sure the bullet character you want to use in that font won’t otherwise appear in the paragraph (such as a ? or ƒ).
Now set up your paragraph style with a nested style as shown here:
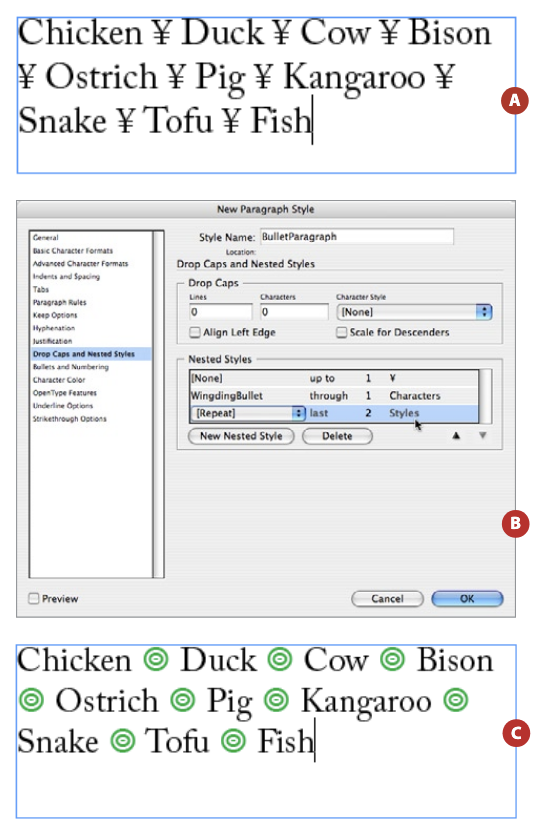
The “Repeat” feature means that the style will be applied to that character whether it shows up once or a hundred times in the paragraph.
Apply [style name] then Next Style
Need to apply paragraph styles to a lot of paragraphs? Look closely for patterns.
Let’s say that in your document, each subhead is followed by a no-indent paragraph, which is followed by one or more indented paragraphs. You can set up each paragraph’s “Next Style” setting (in the Edit Paragraph Styles dialog box) to reflect this order. Then, select a range of text (in this example, from one subhead to the paragraph before the next subhead), right-click on subhead in the Paragraph Styles panel, and choose Apply “subhead” and Then Next Style. This applies the proper paragraph styles throughout the selection in a single click!
Unfortunately, you can’t apply a keyboard shortcut to the Apply [style name] Then Next Style feature.
Find/Change
The Find/Change dialog box is all about recognizing patterns. Many people use Find/Change for simple text replacements only, but it can do far more. For example, let’s say you want to apply your “bullet” paragraph style to every paragraph in your document that has a bullet character followed by a tab. You can type the bullet character into the Find What field, but you’ll need a special code for InDesign to look for a tab character. You don’t have to remember those codes—just click on the little “@” flyout menu to the right of the Find What field. There are all kinds of goodies hiding in that flyout menu that will help when identifying patterns.
Once you’ve typed the pattern (bullet, tab) in the Find What field, click in the middle of the Change Format field at the bottom of the dialog box. Choose your Paragraph Style from the appropriate pop-up menu, and click OK. Leave the Change To field and the Find Format areas blank! That tells InDesign not to change the text and not to care what the formatting of the bullet character is. When you click Change All, the style is applied.
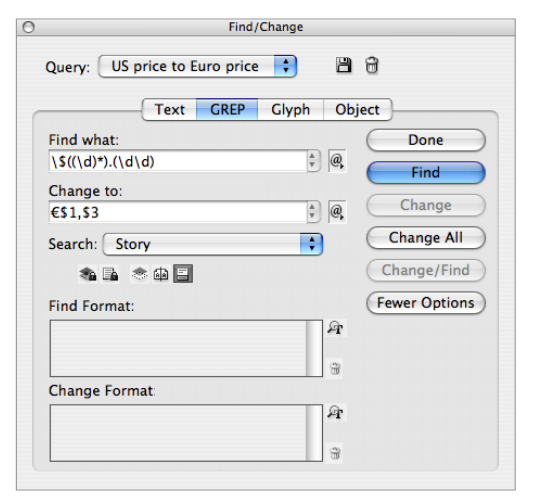
The GREP tab of the Find/Change dialog box is for doing even more specialized pattern recognition (Figure 5). See “How to Grok Grep” in the April/May 2007 issue (#17) for more on the cool things you can do with that.
I also love the Object tab of the Find/Change dialog box, which lets you search and replace object formatting. Force yourself to use this feature about three times and you’ll realize that it’s incredible and then use it all the time. It lets you apply object styles to objects, change some aspects of objects while leaving others, and even fix problems that other people have introduced into the document.
For example, you can choose Overprint Black Stroke from the Query pop-up menu at the top of the dialog box (Adobe ships a few find/change presets like this to show you how the feature works). This looks for any object with stroke set to [Black] and ensures that these rules will overprint other colors in your print job.
Transform Again
Here’s another simple pattern you can try to capture: Whenever you move, rotate, scale, or skew two or more objects, apply the transformation to one of them, then choose from options you’ll find in the Object > Transform Again submenu. For example, if you need to resize a bunch of frames to the same height and width, change one frame’s width, then its height, and then select each one (or more than one at a time) and choose Transform Sequence Again Individually. The height and width are applied to each of the frames. (InDesign sees changing the height and then the width as two different actions, and therefore a sequence.)
Rule 3: Learn to Troubleshoot Problems
Everyone runs into problems sooner or later. It’s a fact of computer life, no matter what software you’re using. Unfortunately, these troubles can quickly eat up all the time you saved being efficient in other ways. Every InDesign user needs to know five basic troubleshooting techniques.
Quit and relaunch InDesign
Or quit, restart the computer, and relaunch InDesign. It’s basic, but it often helps. In fact, I think InDesign should be restarted at least once a day.
Rebuild preferences
Sometimes preference files get corrupted. (Or, more politely, “confused.”) When it happens, InDesign acts in weird ways. Sometimes panels don’t look right, or features don’t act normally, or documents don’t behave correctly. The easiest way to rebuild your preferences is to quit InDesign, then relaunch while holding down all the modifier keys.
On the Mac, hold down Command/Option/Control/ Shift. On Windows, hold down Ctrl+Alt+Shift. You should see a dialog box that asks if you really want to rebuild your preferences:

If you don’t see that, you didn’t hold down the right keys or you didn’t hold them down fast enough.
Rebuilding your preferences means you lose all the preferences you’ve set, including everything in the Preferences dialog box and which alert dialog boxes you’ve told to never display again. They’re all back to factory defaults. If this bothers you, consider saving a back up of your preferences while you know they’re not corrupt. On the Mac, you can find your preferences files here:
User/Library/Preferences/Adobe InDesign/Version <your version number>/
In Windows, you can find them here:
C:\Documents and Settings(user name)\LocalSettings\Application Data\Adobe\InDesign\Version <your version number>\
Note that Application Data and other folders on the PC may be invisible; to see them, you have to choose Start > Tools > Folder Options > View, and then turn on “Show Hidden Files and Folders” in the Folder Options > View > Show Hidden Files and Folders.
You can back up this entire folder or individual preference files inside, such as the InDesign Defaults file. If you later suspect a problem, you can replace the current one with your backed-up version.
Check component information
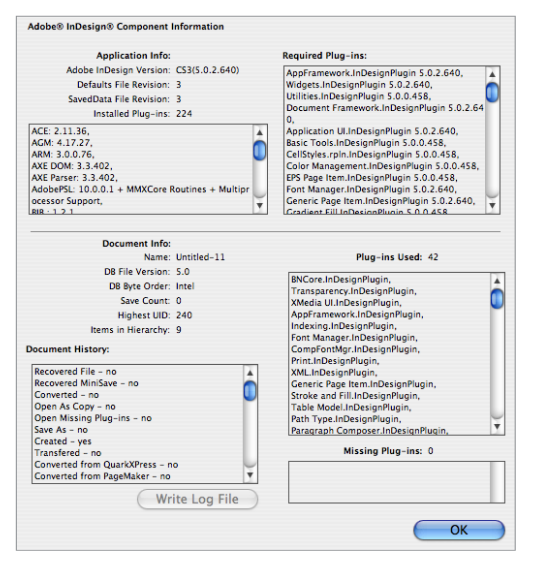
InDesign stores a lot of information about your documents where you normally can’t see it. But when you’re troubleshooting, you want access to all the knowledge you can get. That’s why it’s a good idea to open the Component Information dialog box, which you can find by holding down the Command/Ctrl key while you select About InDesign from the InDesign menu (Mac) or the Help menu (Windows).
The right side of the dialog box (Figure 7) displays plug-in information. I don’t find that very useful, so I ignore it. The left side tells you about your application (version number and so on), and then—below—about your document. For example, you can see whether this file was originally a PageMaker or QuarkXPress file. It tells you the history of when the file was first created and how often it’s been saved. It also tells you if the file was a recovered file after a crash.
be really useful when troubleshooting.
The Component Information dialog box doesn’t tell you everything you may want to know (such as, “Who messed up this thing?!”), but it may help you out in a pinch.
Export to INDD
Sometimes an InDesign document is so problematic that you want to rebuild it from scratch. Most of the time, rebuilding would take too long to be practical, but there’s still a way to get where you want to go: INDD. If you export your document to the InDesign Markup Language file format (using File > Export), you get an IDML file.
You can open an IDML file in versions of InDesign that are older than the one used to create your file. However, when you open the file in the same version you exported it from, InDesign literally rebuilds the whole file into a fresh INDD document from the ground up, using the data in this text-based file format.
Exporting and opening an IDML file is a great way to get rid of inexplicable document corruption problems. For example, some people have reported spot colors they simply cannot delete (and which they’re sure aren’t from placed graphics) or pasteboards that become inexplicably huge. The rebuild often fixes both of these issues.
Restart in a different user account
I once had a painful problem in InDesign involving the inability to save or print anything. Of course, I was on deadline, out of town with my laptop, and crazed. My longtime colleague at CreativePro, Anne-Marie Concepción, emailed me with a simple solution I will always remember: Create a new user account on my computer, log into that, and launch InDesign from there. If this works (it did for me!) you know that the problem has something to do with your preferences, or something else in your user settings. If it doesn’t, that points to a deeper problem with your installation of InDesign, your computer’s operating system, or its hardware.
You can make a snippet by selecting one or more objects on a spread, choosing File > Export, and then choosing Snippet from the Format pop-up menu. You can place snippet files on a page by dragging them in or choosing File > Place. By default, in CS3, snippets end up wherever you drop them. However, hold down the Option/Alt key and InDeisgn places the objects exactly where they were on the original document page.
Rule 4: Lean On The Cloud
InDesign is great, but you can’t stay in InDesign forever! Instead, break out and mingle with some other applications every now and again. Using the right program for the job at hand will improve your efficiency. For example, just because InDesign offers vector drawing tools doesn’t mean you should abandon Illustrator.
InDesign users are often in touch with two suites of programs: Adobe’s Creative Cloud and Microsoft 365. Fortunately, InDesign plays reasonably nicely with both, especially if you know a few tricks.
Find Your Original
When you place a graphic on your page, InDesign creates a link between the file on disk and the preview image in your document. Sometimes you may not know where on your computer (or server) the original is sitting. You can find out by double-clicking on the name in the Links panel and looking in the Location field of the Link Information dialog box. To find the file on disk, choose Reveal in Finder (Mac) or Reveal in Explorer (Windows) from the Links panel menu:
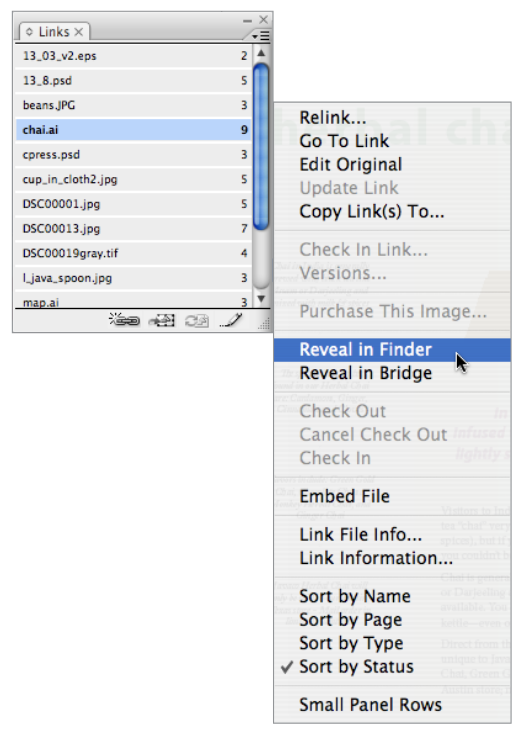
You can also tell InDesign to open the file by choosing Edit > Edit Original. (Or, even faster, click the Pencil button in the Links panel or Option/Alt-double-click on the image with one of the selection tools.) The problem is that this feature asks your operating system to open the file, and sometimes it launches the wrong application (or at least, not the one you hoped for). For example, my Mac usually opens JPEG files in Preview rather than Photoshop.
To get around this problem, you can open the file in Bridge (choose Reveal in Bridge), then use the context menu and choose Open With.
Alternatively, you can tell your operating system to associate that file or file type with a different program. On the Mac, select the image in the Finder, choose File > Get Info, and change the application in the Open With pop-up menu. If you want all similar files (such as all JPEG files) to open in that program, click the Change All button. In Windows, right-click on the file, choose Open With from the context menu, and then choose the program you want InDesign to use for these type of files. Make sure you turn on the “Always Use the Selected Program to Open this Kind of File” checkbox to change the way Windows behaves in the future.
Maintain Vectors
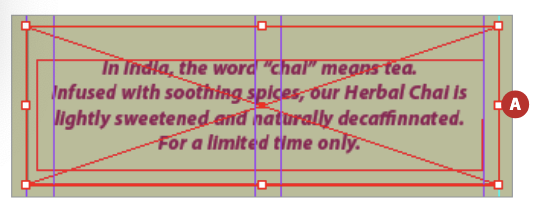
Drawing in Illustrator is often easier than in InDesign, especially when you need some kind of special effect. But the coolest thing to me is that you can copy and paste artwork from one program into the other. For instance, if you want a torn-edge look around a text frame, just draw out a rectangle of the proper size in InDesign, make sure it has either a fill or stroke applied to it, copy it, and paste it into an Illustrator document.
Now you can use many Illustrator effects, such as Scribble, to get the look you want. When you’re done, copy and paste the object back into InDesign:


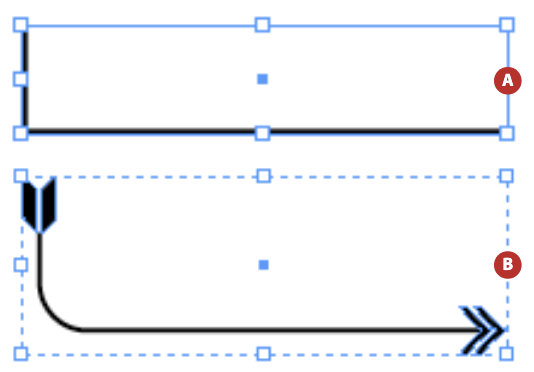
I’m sometimes asked how to get better-looking arrowheads than the ones InDesign offers. Once again, the solution is Illustrator: Copy the line to Illustrator, select arrowheads from the Stroke panel, and have fun! When you’re done, copy and paste the line back into InDesign:
Link to boilerplate text
Do you work with text that appears in a lot of different documents and is constantly being changed? For example, some companies have a paragraph of legal boilerplate that shows up in all their documents. When they want to change that boilerplate, it can be a real hassle.
Here’s one solution: Link to an external text file! First, make a Word document with the paragraph, make sure there’s no special local formatting applied to it, and apply a paragraph style with a special name, such as “boilerplate”. Save the file as an RTF document.
Next, in your InDesign document, make a paragraph style with the same name. (You can define the style to look any way you choose.) Open the Preferences dialog box (Command/Ctrl-K), choose the Type pane, and turn on the checkbox labeled Create Links When Placing Text and Spreadsheet Files. After you click OK, place the RTF file. If you look in the Links panel, you’ll see that InDesign has linked to the file on disk. Now you can disable that preference, so that future text files aren’t linked accidentally.
To update the text, simply use Edit Original (see above). Edit the text, resave it as an RTF file with the same name, and return to InDesign. If you’ve placed that file in other InDesign files, you’ll get a “files have been modified” alert when you open them. Click Fix Links Automatically, and InDesign immediately updates the boilerplate text.
For more robust links that honor styled text, check out plug-ins from Em Software: WordsFlow (for Word files) and DocsFlow (for Google Docs).
You can get real, anti-aliased transparency by double-clicking on an image’s Background layer (to convert it to a regular layer) and then clicking the Add Layer Mask button in the Layers panel. Paint on that mask with black to “erase” to the checkerboard transparency. Paint with white to “un-erase.”
For maximum efficiency and flexibility, try to save your layered files in the native Photoshop (PSD) format. However, vectors (such as type layers) become bit-mapped when you import PSD files into InDesign, so the PDF file format is preferable for files that contain text or vector layers. Unfortunately, vector smart objects are never imported as vectors, no matter what file format you choose.
Pasting data into tables
Say you made a table in your InDesign document with data from Excel, but now the numbers have changed and you need to get the new information into InDesign. While there is a way to link InDesign to the Excel worksheet, I’m not fond of it, as it usually loses too much table formatting when you update. Instead, I usually copy and paste the new data from Excel into InDesign.
But if you want to do this for more than one cell at a time, there’s an important trick: Select one or more whole cells of the table before pasting—that is, the whole cell should be highlighted, not just a flashing text cursor in the cell.
You don’t have to select the same number of cells in InDesign as you did in Excel. I usually just place the text cursor in the cell that represents the upper-left corner of the selection, press Esc (which tells InDesign to select the current cell), and then Paste. InDesign will even add rows or columns if it needs to in order to bring all the data in. (It won’t delete unused rows or columns, though.)
Use InCopy
InCopy is a far better word-processing pair with InDesign than anything else, and you would be missing out if you didn’t at least go take a look at it. We talked about InCopy and why you may (or may not) want to use it back in the August/September 2007 issue (#19).
You can do math in any field in InDesign that has a number. Addition is +, subtraction is – (hyphen), division is / (slash), and multiplication is * (asterisk).
Want to make a frame half as wide? Type /2 after the value in the W field and press Enter. Want it 120% taller? Type *1.2 after the value in the H field. Or, add the Option/Alt key when you press Enter and you’ll duplicate the object while transforming it.
Rule 5: Expand Your Potential with Scripts and Plug-ins
InDesign doesn’t live in a vacuum. So Adobe didn’t add the feature you wanted to the latest release? Don’t take it personally! Instead, go get the feature you want. There are dozens—probably even hundreds—of scripts and plug-ins that extend InDesign’s abilities, and a surprising number of them are either free or inexpensive.
Scripts
You can see “The Power of Scripts” by Mike Rankin in Issue 47 of CreativePro Magazine for a comprehensive collection of amazing scripts for InDesign and other Creative Cloud applications.
Here are a few of my favorites.
LayoutZone:
Martinho da Gloria wrote Layout Zone as a way to promote Automatication, his scripting business, and boy, is it impressive. Layout Zone does two things: It converts any page or selected objects to an InDesign document (optionally replacing the original objects with that INDD file), and it converts placed INDD files back into editable objects:

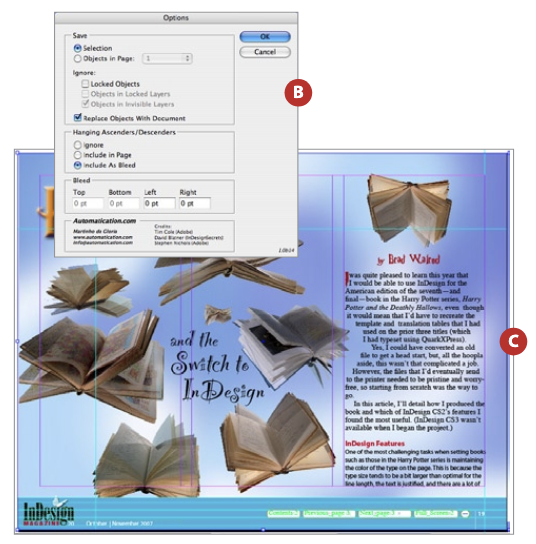
You can download Layout Zone from Automatication.com.
MakeGrid:
This simple but powerful script, in the Script panel’s sample folders, converts any frame into a grid of frames. It’s a must-have for anyone who is laying out grids of advertisements, images, or anything else requiring precise layout.
CalendarWizard:
Need to build a calendar for a month, or a year? CalendarWizard is for you! Scott Selberg offers the script free for nonprofit or personal use. For commercial use, licenses cost $20 (single use) or $100 for (commercial/enterprise use).
PageExporterUtility (PEU):
One of the most common questions I hear is, “How can I export each page of my document as a separate PDF or EPS or PostScript file?” The solution is easy: the free PageExporterUtility (PEU), by Scott Zanelli.
PDFplacer:
Scott also wrote a free script that is, in a way, the opposite of PEU: The PDFplacer script lets you place each page of a multi-page PDF onto a different page of your InDesign document. The PlacePDF script that ships with InDesign does this, too, but Scott’s PDFplacer gives you far more options for the import.
SplitStory:
Another masterpiece by scripting guru Olav Martin Kvern (in the Samples folder) is SplitStory, which converts any threaded set of frames and breaks them apart so they are no longer linked.
FindChangeByList:
How often do you find yourself running through three or more find/change routines in a row to clean up text someone sent you? When you need industrial-strength find/change, check out the FindChangeByList script in the Samples folder.
BreakFrame:
While SplitStory breaks up all the frames of a thread, the BreakFrame script (also in the Samples folder of the Scripts panel) takes a single selected frame and breaks it away from the thread so that the frame and the text in it are longer part of the longer story.
Plug-ins
Of course, InDesign plug-ins are great, too. Here are my top plug-ins:
MultiDo:
InDesign offers unlimited individual undos, but sometimes you want to undo 10 or 20 steps at once, and pressing Command/Ctrl-Z over and over is tedious. MultiDo lists all your moves in a flyout menu, so you can jump back (or forward) as far as you want:

You can find this freebie at 65bit.com. If you want more features, consider buying either 65bit’s EasyHistory or DTP Tools’ History plug-ins.
Sudoku Generator (Rorohiko; $149 per computer per year):
New Zealand-based Rorohiko (which means “lightning brain” in Maori) has released a number of plug-ins worth a look. One of the most popular builds sudoku puzzles for you! It’s great for newsletters or anyplace else you’d like to give someone some entertainment. The commercial version of the plug-in offers much more control. Go to rorohiko.com to check out other plug-ins, including:
- Color2Gray, which converts color images to grayscale, but doesn’t affect the file on disk ($29 per computer per year)
- LikeFindsLike, which lets you select a bunch of similar items on your spread at the same time (donationware)
- LayerLifter, which lets you move items to a different layer via the context menu (free; donation requested)
PatternMaker (Teacup Software, free):
Want some cool background patterns to spice up your pages? Teacup Software’s free PatternMaker plug-in lets you create infinitely customizable patterns based on three basic designs. You can buy more designs from Teacup.
The Right Tools and Techniques Make It Fun
If you’re not having fun while using InDesign, you may be doing something wrong. Usually, the “wrong” is that you’re missing some important tip or trick. With the proper application of a keyboard shortcut, a script, or technique, almost any job can be easier and finished faster.
Commenting is easier and faster when you're logged in!

Recommended for you

10 Terrific Time Savers for InDesign
Life is busy. Work is hard. Use these tips to get more done faster.

Force Text Reflow When InDesign Forgets to Flow the Text
What to do when InDesign stops flowing text automatically from one frame to anot...

Free Script to Add an Antique Edge to Photos
I recently stumbled across an interesting script that changes the border of a re...