

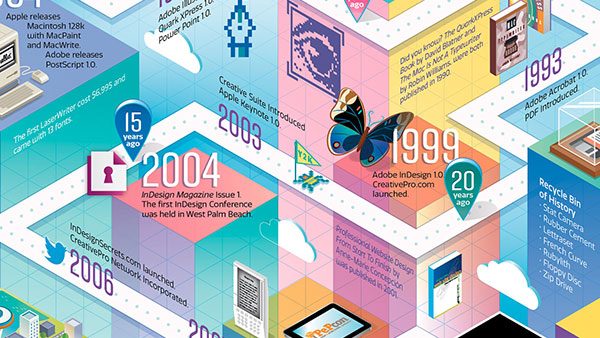
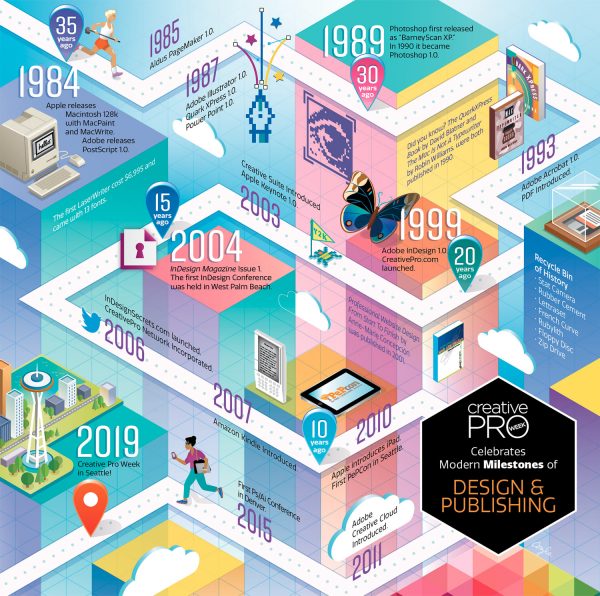
Anticipating another great CreativePro Week in Seattle, I was excited to get a call from David Blatner with a special illustration assignment. His idea was to create a timeline, in the form of a game board – something attendees could follow through the milestones of recent design history. It was all part of celebrating the 20th anniversary of Adobe InDesign.
Illustrating maps and games is one of my specialties and there’s nothing I enjoy more than taking a lot of information and puzzling out a way to make it fun to look at. I was thrilled he called me to illustrate it!
Here are some highlights from my process with a few tips that can help you start your own illustrated journey through time.
Editor’s note: You can download the art to zoom in and look around here!
Do the Research
This part is always the most fun for me. I reminisced about the glory days of rubber cement and X-acto blades at websites like forgottenartsupplies.com
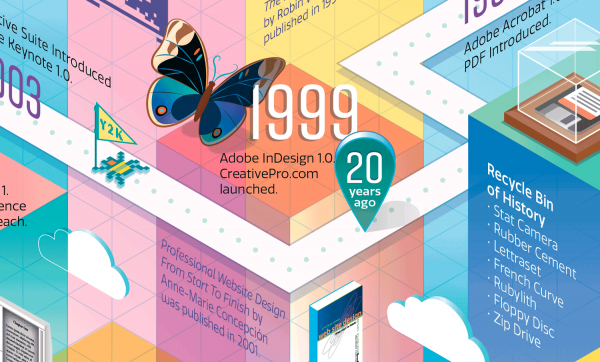
Fun fact: the butterfly species in the original InDesign branding was the Blue Pansy butterfly, or Junonia orithya for you lepidopterists. Another important historical insect was the Y2K bug.
CC Libraries & Color Swatches
David shared CreativePro’s colors and brand assets for my reference via a CC Library. I have my own library of Global swatches with reliable CMYK colors gathered from years of print projects. To find new colors, I keep the Pantone+ Bridge fan guide by my side.

To save a swatch library inside Illustrator, first pare your swatches panel down to only the swatches you want saved. Then click the Libraries button at the bottom of the Swatches panel and choose Save Swatches… This saves a library you can access later in the same menu, under User Defined.
CC Libraries do not yet support global process color swatches. This means sharing colors from Pantone Libraries like Pantone+ Color Bridge requires a workaround. At this time, your best bet for sharing global process colors is saving a swatch library as an ASE file that you can send to others. To do this, load the swatches on your swatches panel, and from the flyout options menu choose Save Swatch Library as ASE…
Keep it all in Perspective
See this article on CreativePro for my tips on using the Actions panel to skew type and other quick tips for working with isometric perspective. For a more in-depth tutorial on creating an isometric grid, see this article on my site: Isometric Illustration Tips for Adobe Illustrator.
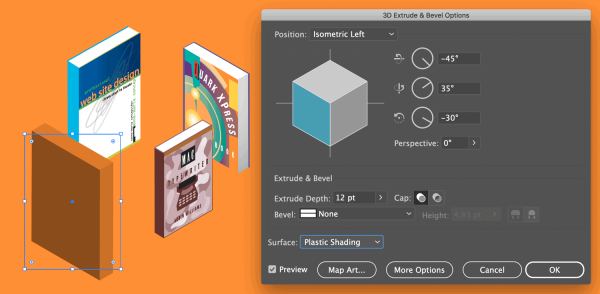
Adobe Illustrator’s 3D Effects Panel
Opacity Masking in Illustrator
I created an opacity mask to make the grid in the background fade out near the top of the illustration.
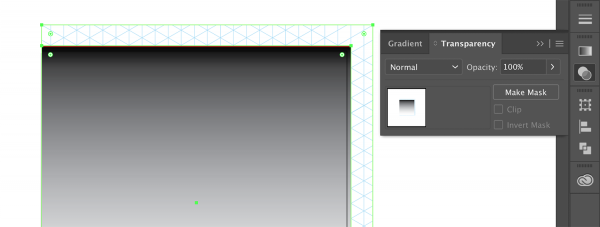
To do this, create a shape large enough to cover your artboard and place it above the grid. Then fill the shape with a black and white gradient. Position the gradient stops where white will reveal the grid, and gray to black tones will fade out the grid. 
Select both the gradient shape and the grid, and in the Transparency panel, click Make Mask. To edit the gradient, select its icon on the Transparency panel and make changes on the Gradient panel. The platform shapes that make up the background of the illustration are all transparent, using the Multiply blending mode, so the grid shows through.
So Long, Seattle
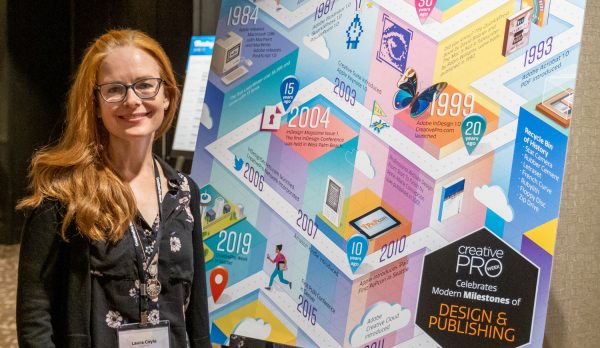
photo by Jeff Carlson for CreativePro
Working on this colorful illustration for CreativePro Week 2019 was a blast. Looking back at how much has changed in the last 35 years makes you appreciate the journey we are on together. As long as technology continues to evolve and influence us, we will continue to gather, learn from, and inspire each other.
This article was last modified on June 30, 2023
This article was first published on October 22, 2019
Commenting is easier and faster when you're logged in!

Recommended for you

Illustrator vs. InDesign
In the struggle to choose the right application for a project, which one will pr...

Review: Randomill for Adobe Illustrator
Learn about a plug-in for applying multiple random transformations to Illustrato...

CreativePro Video: Replace Color Swatch in Illustrator
In this week’s CreativePro video, Mike Rankin shows us how easy it is to create...