

Let’s continue our look at ways to combine pages or objects from one or more InDesign documents? If you missed part 1, check it out before reading this post.
Method 6: Snippets
Scenario
You want to make some or all of the objects on a single page readily accessible to be inserted into other documents.
Need-to-knows
- Can be labor-intensive to copy multiple objects or pages.
- A suitable option for when you are planning on reusing the content multiple times.
- Like a copy/paste, Snippets are inserted into a document unassociated with the IDMS file they came from.
- Snippets (IDMS files) can be shared with others, although they’ll need access to any assets linked to from within the Snippet.
Gotchas
See Potential Gotchas at the beginning of this article.
- Broken Text Threads
- Different Style Definitions
How-To
- Open SourceDoc.Indd.
- Resize InDesign and/or the document window so you can see your desktop or an Explorer or Finder window at the same time.
- Select the required objects in SourceDoc.Indd (see Pre-copying information you should know at the beginning of this article).
- Move the Selection Tool back over one of the selected objects (not a blank space between the objects) and click and drag it out of InDesign, dropping it onto your desktop or into the Explorer or Finder window that you opened earlier.
- The objects, grouped or not, will become a single IDMS file, an InDesign Snippet (See Figure 8).
- For easier access later, rename the file to reflect its contents (eg “Book front matter objects.Idms” or “Letter to Editor page geometry.Idms”).
- Instead of dragging and dropping, you could use File > Export, which lets you save the Snippet anywhere via a standard Export dialog box. Just select InDesign Snippet from the Save as Type or Format drowdown menu in the Export
- To add the Snippet’s content to DestDoc.Indd or any other InDesign document – or to another place within SourceDoc.Indd – just drag the IDMS file back from your desktop or folder and drop it to the desired location in InDesign. All of the Snippet’s objects will be inserted into the document, unassociated with the Snippet.
- You can also choose File > Place and select the Snippet from the Place dialog box which will allow you to place in the appropriate location by click or click and drag.
- Reposition objects in the new location if necessary.
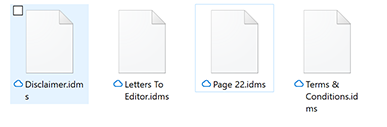
Figure 8 Snippet files contain InDesign objects, ready to be reused as needed in documents.
Method 7: Old-Fashioned Library
Scenario
You like the idea of the Snippets (above) for saving bits of content for re-use but you don’t want to create a bunch of files that you have to keep track of. Just create a single Library file to do the job for you.
Need-to-knows
- A suitable option for when you are planning on reusing the content multiple times.
- Like a copy/paste, Library items are inserted into a document unassociated with the Library they came from.
- Libraries (IDML files) can be shared with others, although they’ll need access to any assets linked to from within the Library.
Gotchas
See Potential Gotchas at the beginning of this article.
- Broken Text Threads
- Different Style Definitions
How-To
- In InDesign, select File > New > Library… and give the Library a name (I’ll use OldFashioned.Indl).
- A Library panel with the tab/title OldFashioned (or the name you’ve allocated) will be displayed.
- Select the required objects in SourceDoc.Indd (see Pre-copying information you should know at the beginning of this article).
- Move the Selection Tool back over one of the selected objects (not a blank space between the objects) and click and drag it from the layout, dropping it onto the Library panel.
- The objects, grouped or not, will become a single Library entry named Untitled (Figure 9).
- Instead of dragging and dropping, you can use the Library’s panel menu and select Add Items (or Add Items as single objects if want to create multiple Library items in one go).

Figure 9 The new Untitled object is added to the Library. Rename it to something that makes sense.
- In the Library panel, double-click the untitled Library item to open its information dialog (Figure 10).
- Give it a meaningful name and, optionally, a description in the field at the bottom.
- In the Object Type dropdown, choose the appropriate category for the Library item you’ve just created.

Figure 10 Name and describe your library item so it’s easily identified when required.
- To add a Library item’s content to DestDoc.Indd or any other InDesign document – or to another place within SourceDoc.Indd – just drag the item out of the Library panel and drop it on an opened document in InDesign. You can also select and right-click the item(s) and choose Place Items(s) for them to be placed on the current page in the current document.
- Reposition objects as necessary.
Method 8: CC Library
Scenario
You have created objects in SouceDoc.Indd and, like with Snippets and Libraries, you want to re-use these objects (or groups of objects) multiple times in multiple documents in the future, plus you’d like to access from multiple locations and/or give others up-to-date access.
Need-to-knows
- A great option for when you are planning on reusing the content multiple times or within other Creative Cloud applications.
- Like a copy/paste, CC Library items are inserted into a document unassociated with the CC Library they came from.
- CC Libraries are stored in the Cloud and can be shared with, edited and updated by others.
Gotchas
See Potential Gotchas at the beginning of this article.
- Broken Text Threads
- Different Style Definitions
How-To
- Open SourceDoc.Indd.
- Open the CC Libraries panel by selecting Window > CC Libraries. If you want to create a new Library and give it a name, do it now by selecting Create New Library … on the panel menu, otherwise you’ll just add your objects to the default, My Library.
- Select the required objects in SourceDoc.Indd (see Pre-copying information you should know at the beginning of this article).
- Move the Selection Tool back over one of the selected objects (not a blank space between the objects) and click and drag it from the layout, dropping it into the CC Libraries panel.
- The objects, grouped or not, will become a single CC Library entry named Artwork (or Text) followed by a number.
- Instead of dragging and dropping, you can use the + at the bottom-left of the CC Library panel, you can then decide which feature of the selected object you want to save to your CC Library – Graphic, text, stroke color, style etc.
- Double-click the default title to give this new asset a descriptive name (Figure 11).
- Open DestDoc.Indd and drag the asset from the CC Library panel onto your layout to the desired location and click to place it.
- You can also select and right-click the item(s) and choose Place Copy to load assets into a loaded cursor which can then be used to place assets anywhere in your layout.
- Reposition objects if necessary.
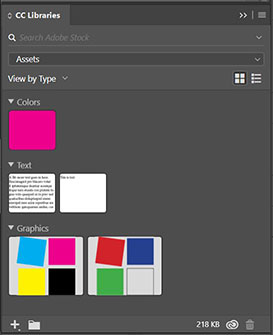
Figure 11 The CC Library panel stores colours, text, graphics and other assets in the cloud where they are readily accessible for reuse.
Method 9: Place PDF pages
Scenario
You have a completed InDesign document, and you want to include all or some of those pages into one or more other InDesign documents.
Need-to-knows
- This method requires an intermediary format – PDF – and to make changes to the content of the placed pages you will need to make them in the original source INDD file, export again to PDF and update the linked PDF inside the destination document(s). Only use this method if you’re not expecting the source content to change.
Gotchas
See Potential Gotchas at the beginning of this article.
- Different Page Sizes
Best suited when SourceDoc.Pdf and DestDoc.Indd have matching page sizes or scale perfectly (eg A4:a5 = 50% scale)
How-To
- Open SourceDoc.Indd.
- If the source pages you want are spread across multiple INDDs, first combine all of those documents into a book (see Method 3: Book ‘em).
- For single documents, choose File > Export... In the Export dialog, select Adobe PDF (Print) from the Save As Type dropdown menu, click Save.
- If you’re making the PDF from the book panel, ensure no files are selected in the book panel and then choose Export Book to PDF from the panel menu. Set the Save As Type dropdown to Adobe PDF (Print) and click Save.
- When the Export Adobe PDF dialog appears (Figure 12), set your options appropriately. Typically, you want to use the highest quality settings possible. Click Export to create the PDF.
- In DestDoc.Indd, choose File > Place… and navigate to the PDF you created. Hold down the Shift Key as you click Open, which will make the Place PDF dialog appear.
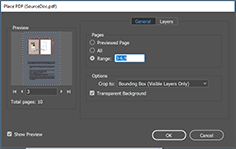
Figure 12 The Place PDF options dialog enables you to place any or all pages of a PDF (SourceDoc.pdf) into an InDesign document (DestDoc.Indd). InDesign treats the placed pages like linked graphics that can be viewed/updated from the Links panel.
- In the Place PDF dialog, on the General pane under Pages, select whether you want to import only the previewed page (which you can change by clicking the navigation arrows underneath the preview), all pages or a range of pages.
- You can click the Layers tab if you want to specify only some layers to be placed.
- In Options section, choose how the incoming PDF pages should be cropped.
- For detailed information on the options to select in the Crop to dropdown, see Jamie McKee’s article “Understanding InDesign’s Place PDF Options” at InDesignSecrets.
- Check the Transparent Background option if you want to see DestDoc.Indd’s master page items or background objects behind the content of the incoming PDF page.
- When you click OK, you’ll have a loaded cursor. Each page of a multi-page PDF will be placed as a separate graphic (all linked to the same PDF), so place those pages one after the other, on sequential pages in DestDoc.Indd in the same way you would place multiple independent graphics during a multi-place operation.
Method 10: Place INDD pages
Scenario
You have an InDesign document, and you want to include all or some of those pages into one or more other InDesign documents. The source document is not necessarily completed.
Need-to-knows
- As well as using this method to place some or all pages of SourceDoc.Indd into DestDoc.Indd, you could also use it to break up SourceDoc.Indd’s pages into multiple destination documents.
- This method allows two designers to work in SourceDoc.Indd and DestDoc.Indd concurrently.
Gotchas
See Potential Gotchas at the beginning of this article.
- Different Page Sizes
Best suited when SourceDoc.Indd and DestDoc.Indd have matching page sizes or scale perfectly (eg A4:A5 = 50%)
How-To
- Open DestDoc.Indd (you do not need SourceDoc.Indd to be opened).
- Choose File > Place and navigate to SourceDoc.Indd. Hold down the Shift Key as you click Open, which will make the Place InDesign Document dialog appear.
- In the Place InDesign Document dialog (Figure 13), on the General pane, use the Pages options buttons to indicate whether you want to import only SourceDoc.indd’s previewed page (which you can change by clicking the navigation arrows underneath the preview), all pages or a range of pages.
- You can click the Layers tab if you want to specify only some layers to be placed.
- In the Crop to dropdown, choose how the incoming PDF pages should be cropped.
- Page bounding box will place SourceDoc.Indd’s pages at their actual page size; Bleed bounding box will include its bleed (if any) and Slug bounding box will include its slug (if any).
- When you click OK, you’ll have a loaded cursor. Each page of a multi-page INDD will be placed as a separate graphic (all linked to SourceDoc.Indd), so place those pages one after the other, on sequential pages in DestDoc.Indd in the same way you would place multiple independent graphics during a multi-place operation.
- To make changes to the placed pages, edit SourceDoc.Indd and then update links in DestDoc.Indd.

Figure 13 The Place InDesign Document options dialog enables you to place any or all pages into another InDesign document (DestDoc.Indd). InDesign treats the placed pages like graphics that are linked to, and updated along with the original SourceDoc.Indd.
Bonus Methods
Sorry to mislead you, but it just sounded so much better to call this post 10-techniques.., rather than 12-techniques… Since this article was originally written in 2012, a couple extra new techniques have been developed that must be included and, besides, everyone loves getting something extra for free ?. So here are my two bonus methods for your consideration …
Bonus Method 1: Content Collector
Scenario
You have some content on a page (or pages) that needs to also appear in another location – on the same page, on another page in your document or in another document. The benefit of using the Content Collector is that it’s the only method that can create a link back to the original individually-copied objects which will update when the original or the copied version is changed.
Need-to-knows
- Best suited for creating multiple layouts which contain the same assets (ie new branding proposal).
Gotchas
See Potential Gotchas at the beginning of this article.
- Broken Text Threads
Use Collect all Threaded Frames to avoid this. - Different Page Sizes
- Different Style Definitions
Use the Map Styles option to make styles in SourceDoc.Indd map to styles in DestDoc.Inddd.
How-To
- Open SourceDoc.Indd and navigate to where the objects are located.
- Click the Content Grabber tool from the toolbar (it looks like a box of blocks with an arrow pointing in). The Content Conveyor panel appears at the bottom of your screen.
- Click on each object that you will want to re-use.
- You can click and drag over multiple objects to have them added as a single element in the Content Conveyor.
- Use the Load Conveyor button to load all objects in a selection or page(s).
- When your Content Conveyor has all objects loaded, switch to another location (in the same or different document) and use the Content Placer (from the toolbox or from bottom left of the Content Conveyor) to place the objects into your layout by click or click/drag from your loaded cursor in the same way you would place multiple independent graphics during a multi-place operation.
- Use the arrow keys to select which object is placed next.
- Choose Create Link to keep a link between copied and placed objects.
- By default, Place, remove from conveyor and load next is selected, meaning the objects will be removed from the conveyor as you place them. If you wish to place them multiple times, choose between Place multiple and keep in conveyor or Place, keep in conveyor and load next. You can switch between these buttons as necessary.
- If you’ve used Create Link in the placing process, placed objects will appear with a small link icon at the top left of their bounding box and be listed in the document’s Links panel. If the original is altered, it will be altered in the conveyor. The placed object’s link icon will change to a warning triangle and there will be a warning in the Links panel – click either to update to the latest version (See Figure 14).
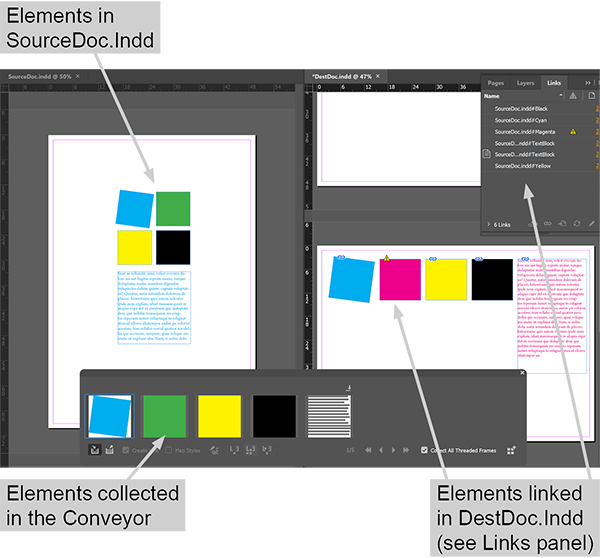
Figure 14 The Content Conveyor will display collected items for placing in other locations. If you check the Create Link checkbox, the copied objects will link back to the original. Note that in this example the magenta square in SourceDoc.Indd was changed to green and was updated in the Conveyor. DestDoc.Indd shows warning indicators.
Bonus Method 2. Interleave Files Script
Scenario:
You have two InDesign documents of equal page count that need to be combined. The first document contains all the odd numbered pages while the second contains all the even numbered pages. These sorts of documents can result from placing multi-page PDFs that were non-duplex scans of two-sided printouts.
Need-to-knows
- This script was written by InDesign scripting genius Dave Saunders per a request in the Adobe forums. (The original post is here: https://forums.adobe.com/ message/1108150#1108150). Take a look at this thread because Dave added a further tweak to accommodate an error message that some people received. Dave gives no guarantees that the script will continue to work for later versions, however it still works for CC2019 (ver 14.0.1) when I recently tested it. Nice one, Dave!
- You’ll need to know where to save the script once you download it. The location of the folder varies based on your operating system and InDesign version. To find the location for scripts on your device, click Window > Utilities > Scripts to open the Scripts panel. From here, right-click on User, and click Reveal in Finder/Windows Explorer. Once Finder/Explorer is open, you’ll see a folder called Scripts Panel. Put your scripts inside that.
Gotchas
See Potential Gotchas at the beginning of this article.
- Different Page Sizes
How-To
- Open a text editor application such as Windows Notepad or Mac OSX’s TextEdit.
- Click this link and download the file InterleaveDocs.
- Open the file and copy all of its contents. Paste it into your text editor.
- In your text editor, save your new file as InterleaveDocs.jsx, a JavaScript file, into the Scripts Panel folder that you’ve previously identified (see Need-to-knows above). Once the file is saved here, it should appear in the Scripts panel in InDesign (see Figure 15).
- Open the two InDesign documents you wish to merge – mine are SourceDocOdd.Indd and SourceDocEven.Indd. Make sure that SourceDocOdd.Indd (ie the one that you want pages to be pulled from first) is the active document.
- On the Scripts panel, double-click the script to execute it. The two files will close and a new untitled document will be created that combines the pages from SourceDocOdd.Indd and SourceDocEven.Indd, interleaved — one after another, like well-shuffled playing cards, starting with the first page of SourceDocOdd.Indd (since it was the active document when you ran the script).
- Check the page order is correct. If not, mostly likely it’s because you had the wrong document active when you ran the script, try it again starting from the other document.

Figure 15 When you save InterleaveDocs.jsx into the correct folder, it appears on the Scripts panel, ready to run.
Wrap Up
Phew! So there’s 10 (sorry, 12) ways to copy content between documents in InDesign. It’s quite a list to choose from, but the main point you should understand is that it’s a waste of your precious time to recreate something from scratch, there’s always a way to reuse content from one document into another – it’s just up to you to select the most appropriate method to use for your situation.
This article was last modified on April 10, 2020
This article was first published on June 17, 2019
Commenting is easier and faster when you're logged in!

Recommended for you

7 Reasons Why You Belong at the InDesign User Group
If you’re an InDesign user, you’ll dig the IDUG
Understanding Liquid Layouts – Part Three
Editor’s Note: This article is part of a 4-part series on using Alternate Layout...

Two of My Favorite Microsoft Word Track Changes Tips
Speed up your editorial workflow in Word and InDesign with these tips.