

Why might you want to combine pages or objects from one or more InDesign documents? Let me count the ways …
- To re-use unchanged pages from an old report into the new one
- To use a previous design’s elements as the template for a new layout
- To combine individual chapter INDDs into a single ‘book’ that can be output as one long PDF
- To re-use some part of a layout in a number of new layouts
- To use elements of branding such as logos or shape elements in multiple documents
… actually let me stop counting there and we’ll just agree, there’s heaps of reasons!
So, which is the best method? Well, as often in the case in life, the answer is “it depends.” To help you determine which is the best method for your situation, I’ve listed some scenarios and some Need-to-Knows and potential gotchas in the methods listed below to help you choose what’s right for you each time.
Pre-copying information you should know
- You’ll need a source document (where you’re copying from) and a destination document (where you’re copying to). To make things simple, let’s call them SourceDoc.Indd and DestDoc.indd.
- Before you start to copy, make sure all of the objects you want to select are not individually locked or not on a locked layer. If something’s on the master page that you want to include, disconnect it from the master page by holding CTRL/CMD+SHIFT and clicking on it.
- You can select all objects on a page by using the keyboard shortcut CTRL/CMD+A.
- You can select multiple objects in one go by dragging across them with the black Selection Tool. Any object that you touch with your selection rectangle will be included in your selection when you release.
- You can individually select multiple objects by holding the SHIFT key as you select.
- You can also SHIFT-click to de-select anything that you’ve accidentally selected (particularly useful if you used the drag method of selection and ended up selecting something unexpected).
Potential Gotchas
You might get unexpected results after using many of the methods described below to copy. As long as you understand what’s happening, you can make them work to your advantage.
Broken Text threads
Text threads will be broken if you copy a text frame with a story that flows outside the selected frame(s). To prevent this, copy both/all frames simultaneously to maintain the threading. Of course, if you want to disconnect the threading, copy the frames as individual objects.
Different Page sizes
When page sizes vary between SourceDoc.Indd and DestDoc.Indd, your results can vary. If copying elements, they may be placed in unexpected positions on the page. If you’re copying whole pages, you will usually end up with different page sizes within DestDoc.Indd.
Different Style Definitions
If you have styles in SourceDoc.Indd and DestDoc.Indd that have the same name but different formatting definitions, the text/objects will change to match the style definition in DestDoc.Indd. So if you need the old text to match the new location, change the name of your styles in SourceDoc.Indd to match the names in DestDoc.Indd, otherwise make sure they don’t match. This could potentially save you hours in reformatting.
Method 1: Copy/Paste
Scenario
You’ve got a couple of objects on a page (or a whole page of objects) that you want to include in another document.
Need-to-knows
- This method uses menu commands and/or shortcut keys and can be carried out without viewing both documents at the same time.
- It requires a bit too much effort and can get a little confusing if you’re doing this for more than a single page.
Gotchas
See Potential Gotchas at the beginning of this article.
- Broken Text Threads
- Different Page Sizes (if using Paste in Place)
- Different Style Definitions
How-to
- Open the source document (SourceDoc.indd) and navigate to the page you wish to copy from.
- Select the required objects (See Pre-copying information you should know above).
- Press CTRL/CMD+C to copy selected objects to the clipboard.
- Switch to the destination document (DestDoc.indd) and navigate to (or create) the page where you want to paste the copied objects.
- Select Edit > Paste (CTRL/CMD+V) if you want the objects plonked right in the middle of your destination page OR Edit > Paste in Place (CTRL/CMD+SHFT+ALT+V) and the copied objects will be pasted onto your destination page in the same position as they were in the source page.
Method 2: Drag and Drop Objects
Scenario
You’ve got a couple of objects on a page (or a whole page of objects) that you want to include in another document.
Need-to-knows
- This method requires dragging with your mouse and for both documents to be visible at the same time.
- It can get a little confusing if you’re doing this for more than a single page.
Gotchas
See Potential Gotchas at the beginning of this article.
- Broken Text Threads
- Different Style Definitions
How-to
- Open both SourceDoc.Indd and DestDoc.Indd in InDesign.
- Click the Arrange Documents button and select 2-Up to make your documents appear side by side (Figure 1).
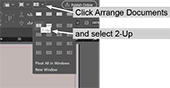
The 2-Up button allows you to display your documents side by side.
- In SourceDoc.Indd, navigate to the page that has the objects you want to copy. In DestDoc.Indd, navigate to the page where you want the objects included.
- Select the required objects in SourceDoc.Indd (see Pre-copying information you should know at the beginning of this article).
- Move the Selection Tool back over one of the selected objects (not a blank space between the objects) and click and drag it from SourceDoc.Indd, dropping it onto DestDoc.Indd in the location you want the objects (Figure 2). All of the selected objects will be copied across to DestDoc.Indd.
- Reposition objects in DestDoc.Indd as necessary.
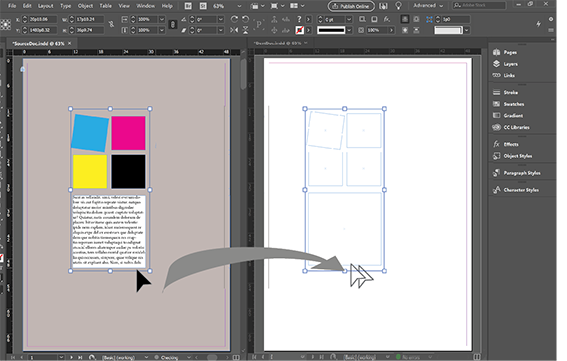
Drag objects from one document window and drop into another document window to copy those objects – even a full page of them.
Method 3: Book ’em
Scenario
You have multiple documents that you want to combine into a single file so that you can add a Table of Contents; consecutive page or figure numbering across files; and consistency of styles across documents. You might also want to do this to output into a single print job, PDF or ePUB. Combine your individual documents into one Book file and the individual documents will behave as if they were all in one, including any numbering!
Need-to-knows
- Page numbering and numbering of tables, figures, etc of each individual document will be updated to reflect the position within the entire book – even if the individual document is opened independently of the book.
Gotchas
See Potential Gotchas at the beginning of this article.
- Different Page Sizes
- Different Style Definitions
To avoid styles appearing differently, synchronize styles across all documents in the book from the panel menu
How-to
- In InDesign, select File > New > Book… and give the book a name (I’ll use NewBook.Indb).
- A book panel with the tab/title NewBook (or the name you’ve allocated) will be displayed.
- Click the + at the bottom of this new panel to Add Documents.
- Navigate to any INDD files you want to include.
- Select the required file(s) and click Open (you can add multiple files simultaneously if they are in the same folder). InDesign adds selected filenames into the book panel.
- Repeat steps 3-5 until you have all the necessary documents in your book panel (Figure 3).

The book panel contains numerous INDD documents that can be output as a single PDF, printout or ePub.
- If your documents are not in the desired order, drag them up or down until you get it just right. There will be a delay each time you reorder as InDesign repaginates each document.
- Edit any page numbering issues by clicking the Book panel’s menu and choosing Document Numbering Options.
- You can now output your book using the Book panel menu – print, ePUB, PDF or package.
Method 4: Move Pages Dialog
Scenario
You want to copy one or more pages between documents. While it’s a tad confusing, the Move Pages dialog can also be used to perform a Copy – who knew?
Need-to-knows
- You can copy/move a single page, sequential or non-sequential pages by using a combination of commas and hyphens (eg “1-6”; “1, 3, 5”; or “1, 6-10, 15, 17-22”).
- You can re-order the pages during the move/copy by listing the pages in the new order (eg “5, 3, 1, 10-16, 2”).
Gotchas
See Potential Gotchas at the beginning of this article.
- Broken Text Threads
- Different Page Sizes
- Different Style Definitions
How-to
- In InDesign, open SourceDoc.Indd and DestDoc.Indd.
- Select Layout > Pages > Move Pages… (you can also access this from the Pages panel menu).
- In the Move Pages dialog (Figure 4), enter the page number(s) of the page(s) to copy.
- All numbers must match the actual page numbers in the SourceDoc.Indd. So if your first page is page 36, your second page will be 37. To type absolute numbers, such as “the third page”, type a + before the number (eg “+3”).
- You can achieve the same result by selecting the required pages in the Pages panel. Use the SHIFT key to select sequential pages and the CTRL/CMD to select non-sequential pages or a combination of both. Once selected, choose Move Pages from the Pages Panel menu. The Move Pages dialog will open with the page number field pre?populated.

Use the Move Pages dialog to copy several pages from one document into another, you can even rearrange the pages.
- Skip down to the Move To field and choose DestDoc.Indd. (If DestDoc.Indd is not listed, you don’t have it open.)
- Back in the Destination field, choose whereabouts in DestDoc.Indd you want the pages to be inserted – at the beginning, the end, or before or after a specific page number. If you choose Before Page or After Page, you’ll need to enter the appropriate page number in the unlabeled field on the right.
- Make this action a Copy rather than a Move by ensuring Delete Pages After Moving remains unchecked.
- Click OK and the page copy (or move) will occur.
- If your SourceDoc.Indd and DestDoc.Indd have different paper sizes, an error message will appear to warn you that objects may not be positioned perfectly (Figure 5). After the copy/move, the copied page(s) will appear in DestDoc.Indd with their original page dimensions (ie. DestDoc.Indd will now include pages of different sizes).

Figure 5 Warning box to tell you that SourceDoc.Indd and DestDoc.Indd have different paper sizes.
Method 5: Drag and Drop Pages
Scenario
You have one or more pages inside SourceDoc.Indd that you want to copy quickly to DestDoc.Indd.
Need-to-knows
- The pages must appear in SourceDoc.Indd in the same order that you want them to land in DestDoc.Indd but they don’t need to be consecutive; for example, you want to copy SourceDoc.Indd’s pages 2,4 and 8 such that they will become page 1,2 and 3 in DestDoc.Indd. Of course, you could always rearrange them after they land.
Gotchas
See Potential Gotchas at the beginning of this article.
- Broken Text Threads
- Different Page Sizes
- Different Style Definitions
How-To
-
- Open SourceDoc.indd and DestDoc.indd.
- Click the Arrange Documents button and select 2-Up to make your documents appear side by side (See Figure 1).
- Ensure that SourceDoc.Indd is the active document window and open the Pages
- In the Pages panel, select the pages you want to copy. Use the SHIFT key to select sequential pages and the CTRL/CMD to select non-sequential pages (you can use a combination of both).
- Click on one of the selected page thumbnails and drag it from SourceDoc.Indd’s Pages panel, dropping it anywhere in DestDoc.Indd’s window (Figure 6).
- If your SourceDoc.Indd and DestDoc.Indd have different paper sizes, an error message will appear to warn you that objects may not be positioned perfectly (Figure 5). After the copy/move, the copied page(s) will appear in DestDoc.Indd with their original page dimensions (ie. DestDoc.Indd will now include pages of different sizes).
- The Insert Pages dialog will appear (Figure 7). From the Insert dropdown, select whether you want the dragged pages to drop at the Start or End of the document, or Before or After a specific page. And, if you choose a specific page, you’ll need to enter that page number in the unlabeled field on the right.
- To make this action a Copy and not a Move, ensure Delete pages After Inserting remains unchecked.
- Click OK and your dragged pages will appear in DestDoc.Indd at the designated location.
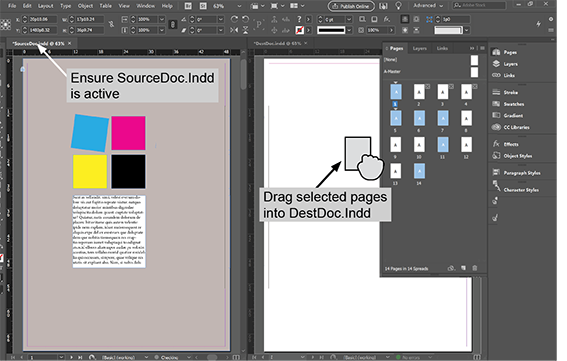
Figure 6 Dragging pages from the Pages panel in SourceDoc.Indd (left) and dropping them into DestDoc.Indd (right) copies those pages into DestDoc.Indd.

Figure 7 The Insert Pages dialog allows you to specify where dropped pages should land in DestDoc.Indd.
This article was last modified on April 10, 2020
This article was first published on June 12, 2019
Commenting is easier and faster when you're logged in!

Recommended for you

Troubleshooting Data Merge Errors
Working with the Data Merge feature of Adobe InDesign is something I do often. F...
Adobe Certified Professional Exam Prep Guides
Use these self-assessment guides to determine what you should study to pass the...

Book Panel Extras
InDesign’s Book panel lacks various useful features. The script described...