

I don’t know about you… but I love my dots.
InDesign includes two dotted stroke types. The Dotted and the Japanese Dots varieties.
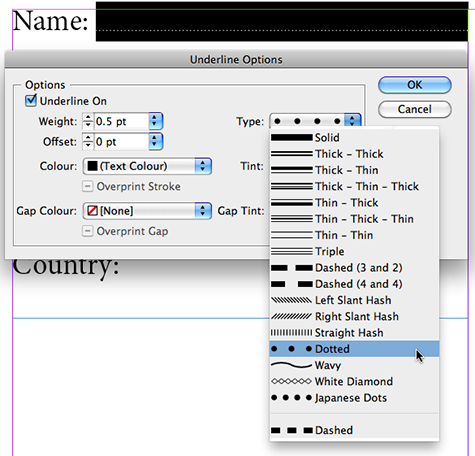
The Type drop-down menu that displays these stroke types pops-up in several areas in InDesign. As soon as you find yourself applying a stroke setting of sorts, you’ll also be prompted to pick a stroke type. You might be applying an Underline (as above) or Strikethrough setting or a Paragraph Rule or adding a border (stroke) to an Object using the Stroke panel.
I’m always a little spaced out by the fact that I seem to have so little control over the spacing between the dots. Basically the space between the dots increases as I increase the stroke weight.
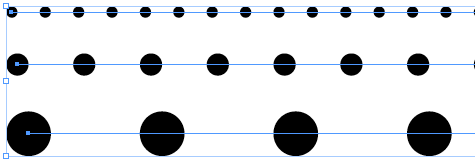
For instance the “Dotted” stroke type, will distribute the dots at 3pt intervals when applied to a 1pt stroke. Increasing the stroke weight to 2pt will increase the distance to 6pt and so on.
So what do I do if I want to check-out some dot distance variations that are applied to a fixed stroke weight, just to see what works best in my design?
Building new Stroke Styles
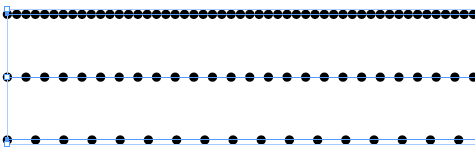
It’s time to add some new stroke styles to InDesign in which we only define the dot distance.
If you’d like to have the newly added stroke styles automatically appear in each new InDesign document you create, ensure you have no InDesign documents open when adding the new stroke styles.
To define new stroke styles to InDesign choose Stroke Styles… from the Stroke panel menu (or Control panel menu).

Next, click New… in the Stroke Style dialog that appears.
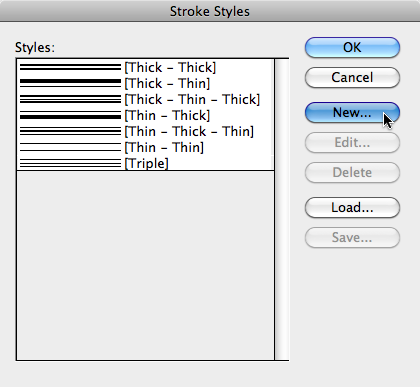
The New Stroke Style dialog displays. Choose Dotted for the Type and Name the stroke style. Then set the Pattern Length and click Add. To add additional stroke styles, increase the Pattern Length and amend the Name and click Add for each additional style you’re adding. Once you’re done, click Done.

I’m adding four new stroke styles for 1, 2, 3 and 4 pt Pattern Lengths.
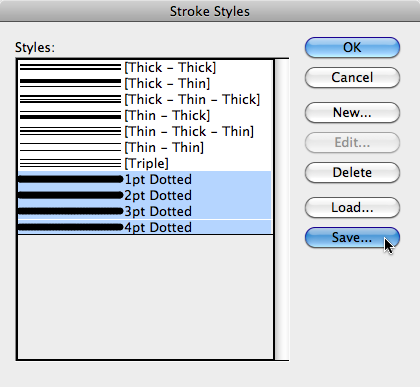
Saving the new styles
Once you’ve added a series of new stroke styles, you might want to share them with your colleagues, or just keep a back-up copy somewhere. You could load these styles again if they ever vanish ;-) for instance after your InDesign preferences were reset.
To Save your stroke styles, press the Shift-key on the keyboard and click the first and last Stroke Style you want to save. Then click the Save… button. In the Save As dialog appears choose a location to save the styles to and name your file. Stroke styles are saved with the .lnst extension (line style).
Applying the new styles
You’re now ready to apply your newly added dotted stroke styles. They will be listed at the very bottom of the Type drop-down menu in your Strokes panel (or Underline or Strikethrough options or Paragraph Rules settings).

This article was last modified on December 20, 2021
This article was first published on June 19, 2010
Commenting is easier and faster when you're logged in!

Recommended for you

Holiday Text FX, part 2: Wrapping Text in Lights
Festive lights are one the treats of the holiday season, so why not add some to...

Understanding the Stacking Order of Paragraph Rules
Understand how underlines, rules, borders and shading interact when you combine...

How to Create 3D Objects Quickly in Illustrator
See how easy it is to create great looking 3D objects in Illustrator quickly. Us...